Disclosure: This post may contain affiliate links. I earn a small commission of product sales to keep this website going.
What are the best settings for the Fujifilm X-T30 when it comes to travel photography? Here’s a guide to the settings that will set you up for success, accompanied by my reasons why.
If you’re looking for the X-T30 II setup guide, click here.
This X-T30 setup guide is derived from a Fujifilm X-T30 tutorial course that I created, complete with videos, a PDF download, and even a quiz! It’s included in my Fujifilm X Course Membership, and I’m offering blog readers an exclusive 20% off your first 3 months at this link.
Please note that these are simply my recommendations based on my lengthy experience with mirrorless cameras in travel photography. And not all settings are mentioned here, just the ones that are the most relevant.
Access these settings via the MENU button, then use the joystick/selector buttons to navigate.
Image Quality Setting
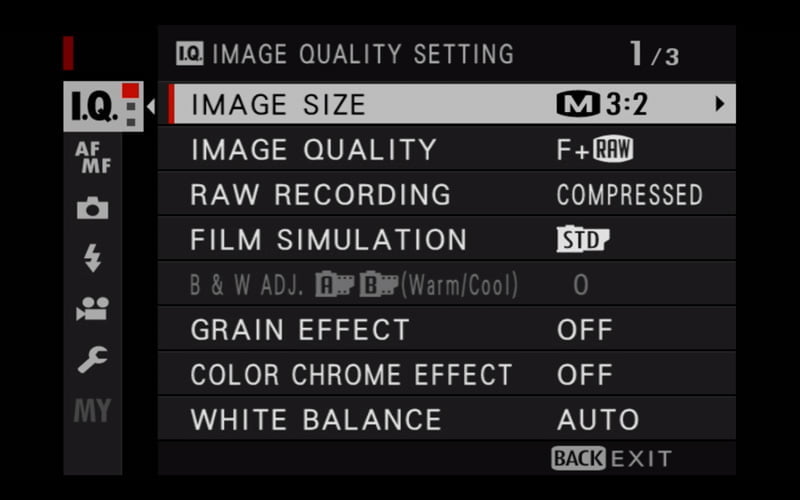
Image Size: L 3:2, M 3:2, or S 3:2. If you’re only recording JPEG then I recommend Large 3:2 so you can get the most out of the file. You’ll have plenty of storage on modern memory cards. Medium 3:2 or Small 3:2 are also fine if you’re also recording RAW or your photos are only destined for social media.
Image Quality: Fine, Fine+RAW, or RAW. If you only want to record JPEG, I recommend Fine to get the most detail possible out of it. Fine+RAW records both a JPEG and a RAW file, RAW records just the RAW file, and Fine records just the JPEG file. See this post for more on deciding between RAW and JPEG.
RAW Recording: Lossless Compressed. This reduces file size and still gives you optimal RAW files.
Creative settings like Film Simulation, Grain Effect, etc. are all creative decisions best suited for the individual moment and photographer’s taste. Learn more about:
- Film simulations
- Color Chrome Effect
- White Balance
- Dynamic Range
- Dynamic Range Priority
- Highlight & Shadow Tones
- Creating Custom Settings
Long Exposure NR: OFF. The cost-benefit of this feature is usually not worth it for travel photography. It will double the time it takes for you to make a long exposure.
Lens Modulation Optimizer: ON. This will optimize your image for known lens characteristics.
Color Space: sRGB. This gives you consistent colors across all devices your audience may view them on.
AF/MF Setting
All settings not mentioned here are situation dependent.
AF Mode: ALL. When set to all, you can cycle through all AF Modes by pressing the joystick and then rotating the command dial. Instead of having to come back into this menu.
AF-C Custom Settings: 1. This is best for general travel photography, tracking moving subjects.
Store AF Mode by Orientation: FOCUS AREA ONLY. Useful for jumping between horizontal and vertical compositions without having to move your focus area each time you recompose.
AF Point Display: OFF. Displaying all focus points all the time is an unnecessary distraction.
Number of Focus Points: 117. You’ll be able to move your focus point quicker with fewer points.
Pre-AF: OFF. Keeps the autofocus running all the time, even when you’re not ready to take a picture. This will waste your battery and doesn’t have much benefit for travel photographers.
AF Illuminator: OFF. This will annoy your travel subjects and drain your battery – the camera will boost ISO to focus instead and this works well.
AF+MF: ON. This will help you refine focus if needed, by rotating the focus dial while the shutter is half-pressed.
MF Assist: Set Digital Split Image MONOCHROME and Focus Peak Highlight RED(HIGH). “Standard” turns these features OFF, select Digital Split Image when you have straight vertical lines and Focus Peak Highlight when you have fine details. Learn more about these manual focus assist modes.
Focus Check: OFF. Magnifies your display every time you rotate the focus ring in Manual Focus. This will distract from your composition if On. You can press the Rear Dial to get this on-demand instead.
Interlock Spot AE & Focus Area: OFF. This can result in inconsistent exposures in travel photography if On while using Spot metering.
Instant AF Setting: AF-S. Commands Single Focus mode when using the back AF-L button to focus, instead of Continuous Focus mode.
Depth-of-Field Scale: Film Format Basis. This setting is good for quickly setting focus only using the scale and your estimated subject distance.
Release/Focus Priority: Release. This will allow you to take a photo without a focus lock.
Touch Screen Mode – Still Photography: AF, AREA, or OFF. AF will focus where you touch it, AREA will set the focus point where you touch it but wait until your command to focus, and OFF disables focus or shooting using the touchscreen. I don’t recommend SHOT – you may miss that important fleeting moment due to lag.
Shooting Setting
All settings not mentioned here are situation dependent.
Photometry: MULTI. Measures the brightness of your scene. Multi works for most travel photographers and is best for everyday shooting.
Flicker Reduction: OFF. This works for most travel photographers and is best for everyday shooting.
IS Mode: 2 – Shooting Only. This helps save your battery with stabilized lenses.
ISO AUTO Setting: See this post on AUTO ISO.
Flash Setting
All settings not mentioned here are situation dependent.
Red Eye Removal: OFF. This can create more problems and we’ll learn ways to avoid it.
TTL Lock Mode: Lock with Metering Flash. More accurate results.
User Setting
All settings not mentioned here are photographer dependent.
Format: Format before using a new memory card with each camera and before each shoot.
Date/Time: Set to your home time zone.
Time Difference: Highlight Local and set the time offset for wherever you’re traveling (+1 hours, -3 hours, etc).
My Menu Setting: See bottom of post.
Sensor Cleaning: When Switched On. Sensor “vibrates” loose dust away when you turn it on. If you want your camera to boot up faster when you switch it on, set this to When Switched Off instead.
Sound & Flash: OFF. Avoid making yourself known all the time.
Screen Setting
All settings not mentioned here are photographer dependent.
EVF Brightness: AUTO. Great compromise for battery life and vibrance.
LCD Brightness: 0 or less. Anything higher will rapidly deplete the battery.
Image Disp.: OFF. Reviews every photo on the LCD right after you take it. Turning this Off saves the battery and helps you avoid distractions when shooting.
Autorotate Displays: ON. Be able to read your display when you rotate the camera.
Preview Exp./WB In Manual Mode: Preview Exp./WB. See the effects of your settings while in Manual.
Natural Live View: OFF if shooting JPG; ON if only recording RAW. See what your JPGs will look like. If you only care about how your RAW file will come out, leave it On.
Framing Guideline: Grid 9. Simple “Rule of Thirds” grid to aid composition.
Autorotate PB: OFF. Make vertical photos take up the whole screen (display sideways).
Disp. Custom Setting: From Defaults, ENABLE: Framing Guideline, Electronic Level, Histogram, Live View Highlight Alert. REMOVE: Image Size/Quality.
Button/Dial Setting
Focus Lever Setting: ON. Enables the focus stick all the time, without extra fumbling.
Function (Fn) Setting: See bottom of post.
Command Dial Setting: Front 1 – S.S., Front 2 – ISO, Front 3 – EXP Comp, Rear – Aperture.
Shutter AF: AF-S ON, AF-C ON. The camera will focus when the shutter is pressed halfway in Autofocus. Turn off if you only want to use the back AF-L button to focus; read this post for more information on that.
Shutter AE: AF-S/MF ON, AF-C ON. Locks the exposure when the shutter is pressed halfway.
Focus Ring Operation: Nonlinear. Allows more precise manual focus.
AE/AF-Lock Mode: AE&AF ON WHEN PRESSING. This option forces you to remember when you’re using AE & AF lock.
AWB Lock Mode: AWB ON AS SWITCH. Lock your auto white balance when it looks right.
Aperture Ring Setting (A): AUTO. Gives you automation when you ask for it.
Aperture Setting: AUTO+MANUAL. Allows full control of lenses with no aperture rings on the barrel.
Sound Setting
I recommend turning all sounds, except Playback Volume, OFF, to avoid drawing attention to yourself.
Power Management
Auto Power Off: 1, 2, or 5 MIN. I’ve found anything shorter than a minute to be annoying. I prefer 2 minutes. I can just tap the shutter button to wake the camera back up. But you don’t want this setting OFF!
Performance: NORMAL. The added performance of BOOST doesn’t really help for travel photography and just drains your battery.
Save Data Setting
Frame No.: CONTINUOUS. Keeps sequential numbering when a new memory card is inserted. This helps with file organization, rather than the image number being reset to 0000 on every memory card.
Save Org Image: ON. If you do use red-eye reduction for any reason, at least save another copy of the photo without reduction applied.
Copyright Info: Set. Enter your name for Enter Author Info and Enter Copyright Info.
Connection Setting
Bluetooth Settings – Bluetooth On/Off: ON. Bluetooth is a very low power draw and there are some smartphone pairing features where this is useful. We’ll manage individual Bluetooth settings elsewhere.
Auto Image Transfer: OFF. This will kill your battery and fill up your phone like nothing else. It’s best to do this manually.
Smartphone Sync Setting: TIME&LOCATION. As long as your phone is showing the correct time, this is very useful. I turn off the Geotagging feature later in the General Settings when I’m photographing vulnerable places or people.
Instax Printer Connection Setting: If you travel with an Instax printer – and I love doing that! – this is where you enter your printer’s unique ID for pairing.
Connection Mode: USB CARD READER. This allows you to plug your camera into a computer and transfer photos. The other option is more of a specialty option and can be set when you need it.
General Settings – Resize Image for Smartphone: ON. Images transferred to your smartphone will be resized to 2048 pixels on the long edge – plenty big for transferring to blogs & social media from your phone. This speeds up the transfer time for multiple photos and dramatically reduces storage needs on your smartphone.
General Settings – Geotagging: OFF. When I do want to record the location I turn this On.
General Settings – Button Setting: WIRELESS COMMUNICATION. Quickly connect to your phone.
Programming the X-T30 MY MENU
The X-T30 allows you to customize your own special menu, so you can access your most commonly used functions with the first press of the MENU button.
When this menu is empty, as it is by default, pressing the MENU button will take you to the first page of the IMAGE QUALITY menu.
When you program MY MENU, pressing the MENU button takes you here first. You can program 16 menu items into this custom menu and prioritize them based on how you want them to appear.
Why use MY MENU?
There are some functions that you might want quick access to but aren’t so important that they need their own dedicated camera button. Some examples might be Wireless Communication, Face/Eye Detection Setting, Drive Setting, Interval Timer Shooting, and Flicker Reduction.
Programming MY MENU
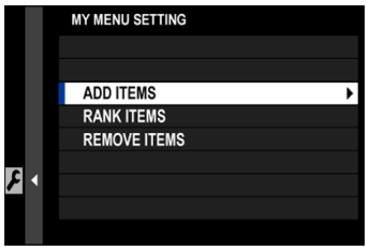
- Go to MENU – SETUP – USER SETTING – MY MENU SETTING.
- Highlight “ADD ITEMS”. The camera will open up the standard camera menu.
- Scroll to the item you’d like to add to your custom menu. Press MENU/OK to add it. Items already added will have checkmarks next to them.
- Press MENU again and highlight the next item to add. Repeat until you’ve added all you want.
When complete, you can rearrange the items using the RANK ITEMS feature in MY MENU SETTING.
What to program in MY MENU
You get 16 items, but they’ll be displayed on two pages. I’ve only identified half of that for things I want quick access to in my menu, so it’s nice only having one page to deal with, and I don’t miss anything.
I’m not going to assume to know what you want in your menu, so I can only suggest that you keep mental notes on the settings you access a lot. You won’t know what to program in this menu the day you get your camera. It’ll take quite a few outings before you have it wired down, so just keep working on it.
It will definitely help your workflow once you do!
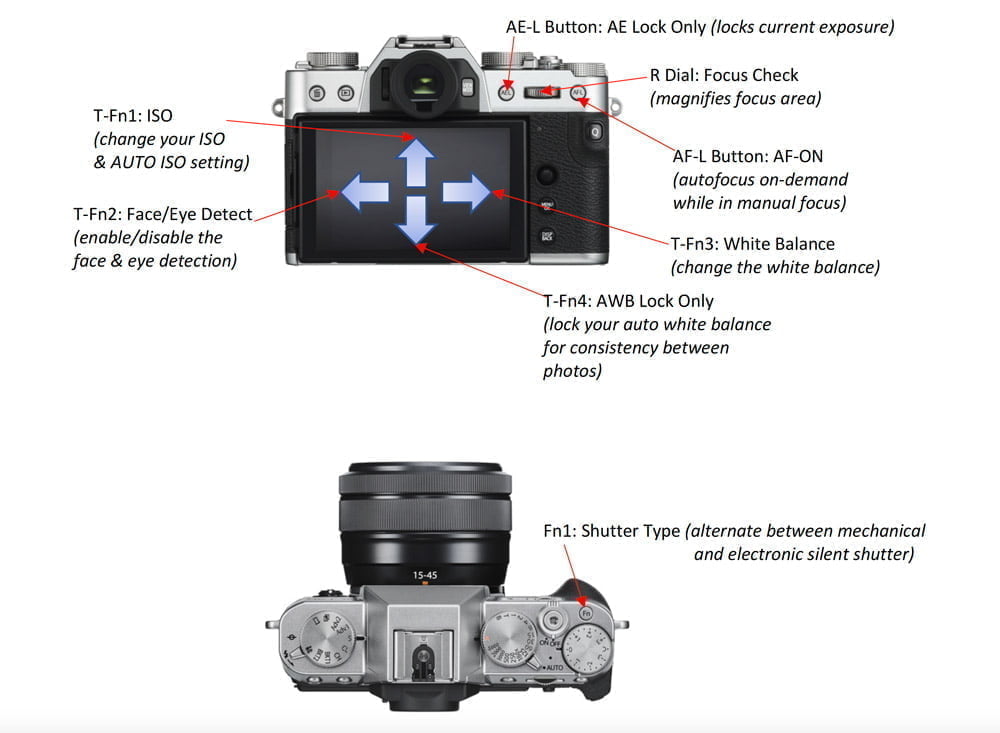
Customizing the Fn Buttons
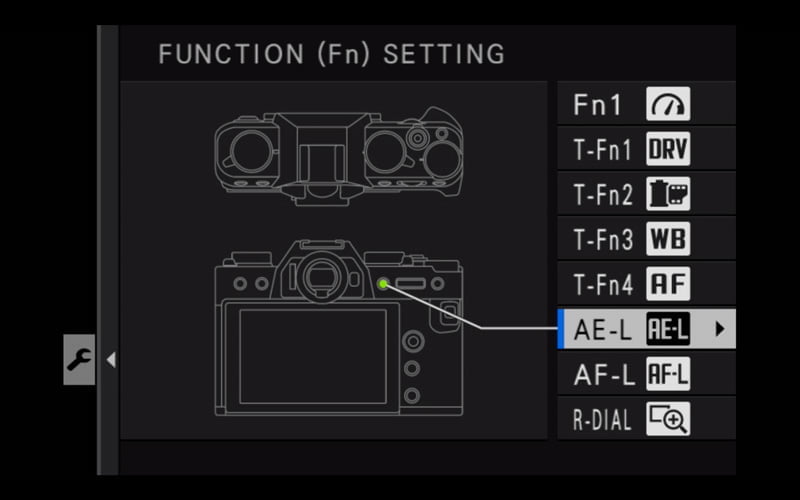
These recommendations are just that – recommendations. After working with mirrorless cameras for years, these are the functions that I’ve found work best in travel photography. But that’s just me – something else may work better for you.
Programming the Fn buttons
To program the Fn buttons, press and hold the DISP/BACK button. It will take you straight to the Fn Setting menu.
Learn more about using & setting up the X-T30
I hope this helped you get started with your X-T30. I know it’s a lot of information, but it’s just one small piece of all the things you can do with this camera.
You can learn all the pieces in an interactive X-T30 Setup Tutorial, included in my Fujifilm X Course Membership. Click here to save 20% on your first 3 months.
Any questions? Please let me know!
Ricardo Ribeiro
Saturday 7th of August 2021
Thank for the article, it helped me with a few issues, as a newcomer Fuji owner.
John Peltier
Sunday 8th of August 2021
Good to hear, thanks!