Fujifilm Dynamic Range Explained: What DR100, DR200, and DR400 Really Do
Disclosure: This post may contain affiliate links. I earn a small commission of product sales to keep this website going.
Fujifilm’s Dynamic Range (D-Rng) system is one of the most useful tools for handling high-contrast scenes, especially when shooting JPEGs. It helps protect your highlights so bright areas hold color and detail instead of washing out to pure white.
Think of Dynamic Range as a built-in highlight recovery step. The camera intentionally underexposes, then brightens only the darker tones during JPEG processing. This lifts the shadows and midtones while leaving the highlights mostly untouched.
It is not as strong as what you can do in Lightroom or Capture One, but it works well when you need good JPEGs straight out of the camera or when the contrast is just a bit too high.
The Dynamic Range setting is not the same as Dynamic Range Priority found in newer Fujifilm cameras. Read this post for the differences between Dynamic Range and Dynamic Range Priority.
How Dynamic Range Differs from HDR
Dynamic Range uses one exposure. HDR uses multiple exposures merged together.
D-Rng is quick, subtle, and meant for real-time shooting. HDR is more heavy-handed and better suited for tripod work or extreme contrast scenes. Fujifilm also offers in-camera HDR processing on newer bodies, but that's a different feature entirely.
How Fujifilm Dynamic Range Works
Dynamic Range is simple once you understand the basic idea:
- The camera captures an underexposed image (for instance, using a faster shutter speed).
- During JPEG processing, the camera brightens the midtones and shadows.
- The brightest highlights remain mostly unchanged, preserving detail.
- Film simulation and tone settings shape the final contrast.
The result: a JPEG with more highlight detail and slightly softer contrast.
DR Settings
- DR100%: Off. No adjustment.
- DR200%: Underexposes by one stop. Requires a minimum ISO (varies by model).
- DR400%: Underexposes by two stops. Requires a higher minimum ISO.
- AUTO DR: Chooses between DR100 and DR200 automatically.
If you use Auto ISO with Dynamic Range, the camera will raise ISO as needed for DR200/DR400, provided your ISO ceiling is high enough.
Here's an example of minimum ISO requirements:
- X-T2, X-Pro2, X100F, X-T20, X-H1, X-E3: ISO 400 for DR200 & DR AUTO, ISO 800 for DR400
- X-T3, X-T4, X-Pro3, X100V, X-T30/II/III, X-E4, X-S10: ISO 320 for DR200 & DR AUTO, ISO 640 for DR400
- X-T5, X-E5, X100VI, X-T50, X-S10, X-H2: ISO 250 for DR200 & DR AUTO, ISO 500 for DR400
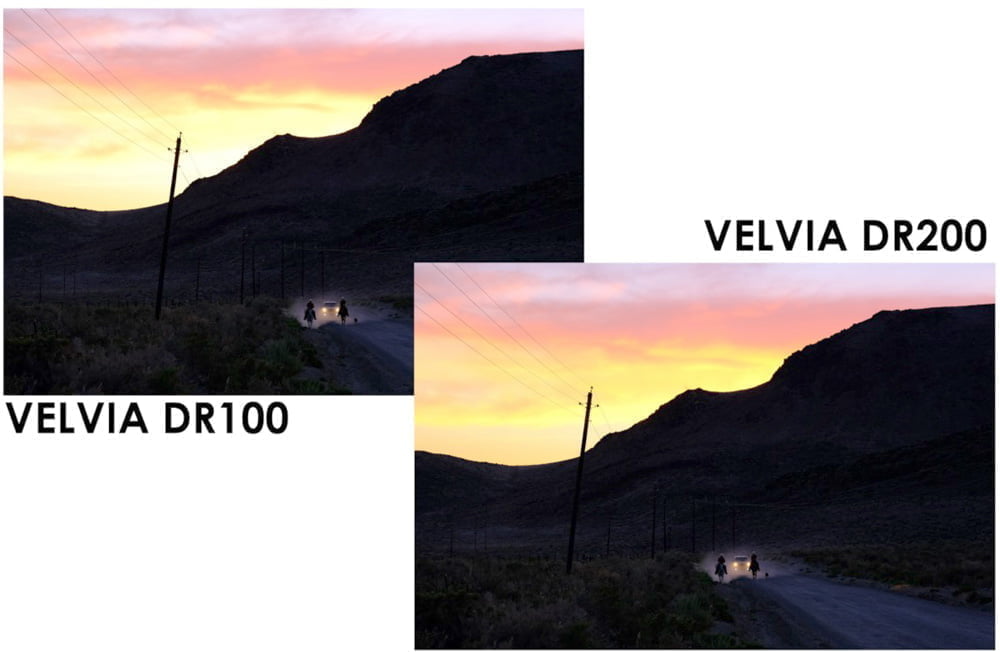
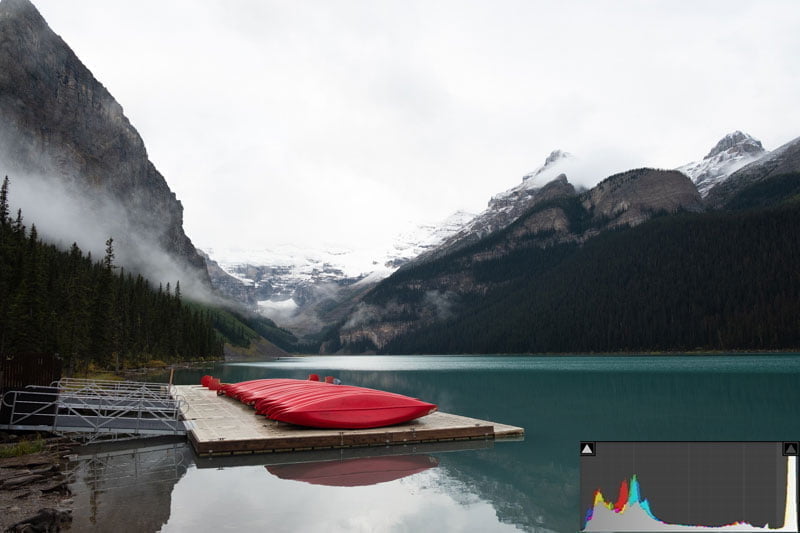
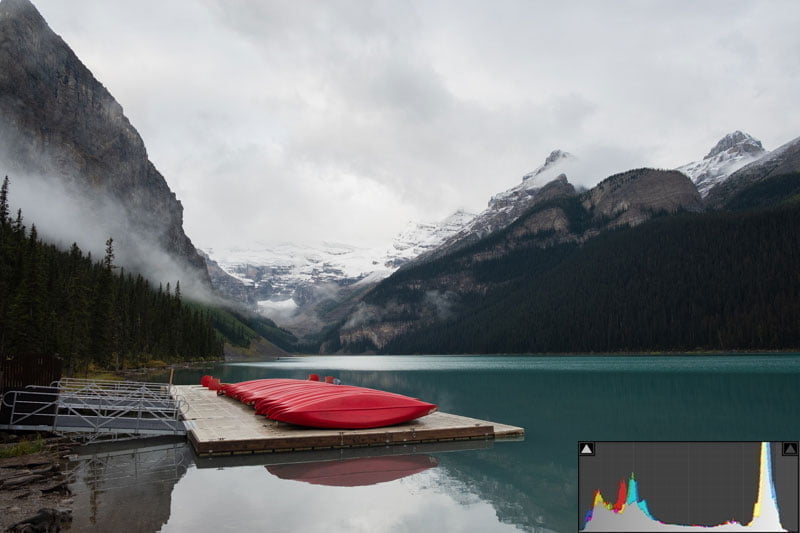
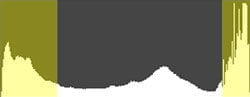
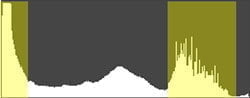
It's easiest to see how Fujifilm Dynamic Range works by looking at photos. The differences are subtle, so I've included the histograms.
Please note that these photos use Lightroom to simulate DR400 processing, to illustrate the steps that the camera processor takes.
Dynamic Range processing example

1 - This is the image that you're exposing for, having set your aperture, shutter, and/or ISO.
2 - This is what's recorded by the sensor, an overall underexposure.
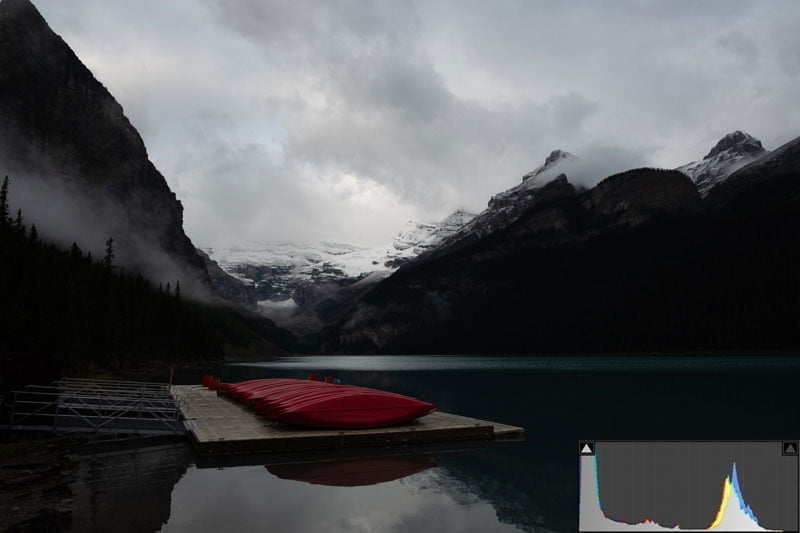
3 - During JPEG processing, the darker areas of the image are then increased to bring the image back to what you expected, without "blowing out" the bright areas.
DR400 can look a bit flat depending on your film simulation, so it’s worth experimenting.
If the contrast is extreme, you may prefer to shoot RAW and handle recovery manually. But for JPEG shooters who want strong, straight-out-of-camera results, Dynamic Range is a powerful tool.
Using Dynamic Range Bracketing
You can bracket DR settings to compare results. Find your camera's bracket settings (either in the Shooting Menu or Drive button menu) and set up the Dynamic Range Bracket.
As long as you've set the minimum ISO required for DR400 (camera-dependent), the camera will make three exposures at all D-Rng levels.
Does Dynamic Range Affect RAW Files?
Yes, but not in the same way it affects JPEGs.
Two important points:
- The underexposure really happens. DR200 and DR400 use faster shutter speeds or smaller apertures (depending on the mode), so the sensor records less light.
- Your RAW converter may apply the curve. Some software (like Capture One) automatically applies Fujifilm’s DR tonal curve to the RAW preview. Others do not, so you may initially see a darker file.
A DR400 capture preserves more highlight detail than DR100 because of the intentional underexposure. But the tradeoff is more noise in the shadows once you brighten them.
If you consistently shoot bright, high-contrast scenes, DR200 or DR400 can give you a better RAW starting point. Just be aware of the noise tradeoff.
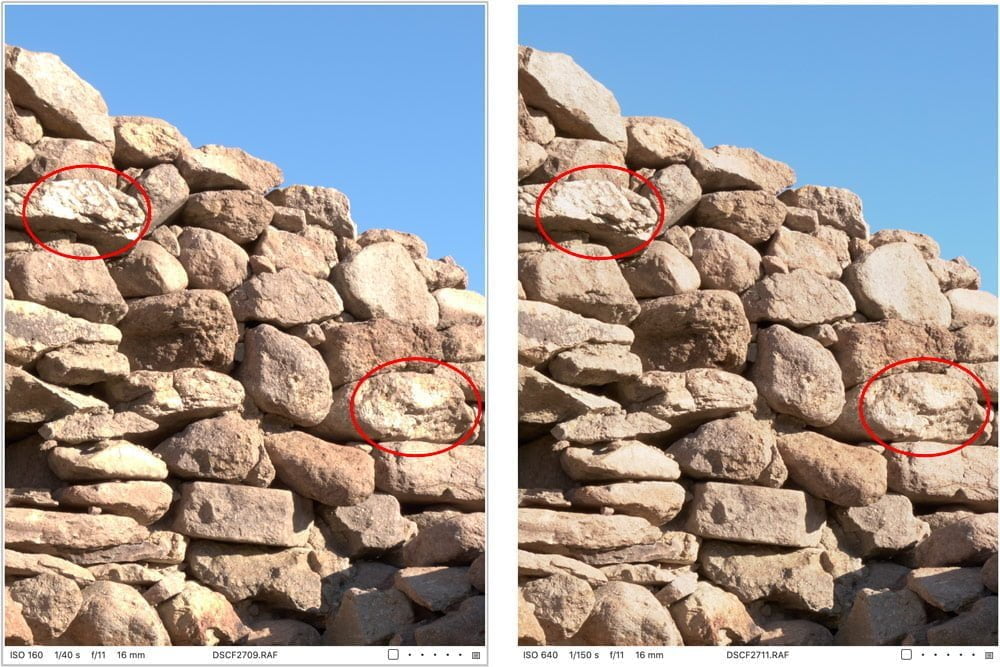
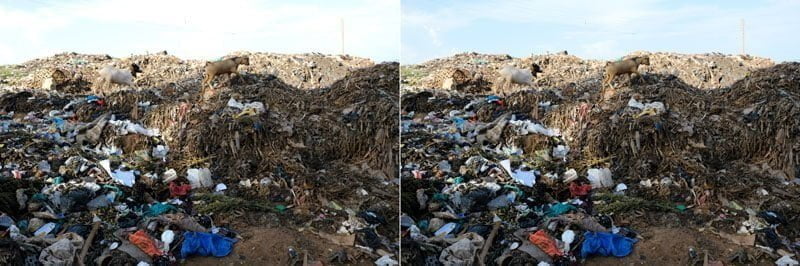
The comparison below is from Capture One with a Linear Response curve applied to the RAW files. I didn't adjust anything else; it's all "zeroed out." DR100 is on the left, and DR400 is on the right.
You can see that the DR400 RAW file starting point retains more detail in the highlight areas than the DR100 RAW file starting point. Looking at the exposure information (shutter speed), the sensor captured two stops of underexposure when the camera ISO setting was raised to 640 to use DR400, and this faster shutter speed is what helped preserve those highlights. Capture One then applied the DR400 curve.
How to Use Fujifilm Dynamic Range for JPEGs
Dynamic Range works best when you expose for the shadows and let the DR system protect your highlights.
Here is a simple approach:
- Start at DR100. This turns the feature off so you can judge contrast naturally.
- Adjust exposure until shadows are not crushed. Keep the bulk of the histogram slightly left of center, but not piled up on the left wall.
- Check your highlights. If highlights are stuck to the right wall, note how many clicks of Exposure Compensation/exposure variable change you need to pull them back.
- Return to your original exposure. Then set DR200 (for one stop) or DR400 (for two stops) to compensate.
Step 1 & 2: Shadows aren't crushed, but highlights are fairly bright:
Step 3: Pull the highlights down and count how many stops of change you made.
Step 4: Push your exposure back up to where it was and set DR200 for one stop or DR400 for two stops.
If the scene requires three stops or more of highlight protection, it is simply too contrasty for Dynamic Range. Choose which tones matter most or shoot RAW.
Using the Q Menu for RAW Files
When viewing RAWs in playback, you can press Q and reduce DR settings during in-camera RAW conversion.
You cannot increase the DR level; only lower it.
When to Use Fujifilm Dynamic Range
Use DR200 or DR400 when:
- The sky is bright and you want color, not white patches
- You are shooting street scenes with strong sun and shade
- Your film simulation has high contrast (Velvia, Classic Chrome, Acros)
- You need usable JPEGs immediately
- You want a cleaner highlight starting point for RAW
Use DR100 when:
- The scene is low-contrast
- You want maximum shadow detail with minimum noise
- You prefer to handle tonal adjustments in RAW
Dynamic Range will not fix every contrast problem, but it is a valuable tool for Fujifilm shooters, especially if your goal is strong images straight out of the camera.
If you want to go deeper into in-camera JPEG workflows and film simulation control, the Perfect Fujifilm In-Camera JPEGs course covers this in much more detail.
This was helpful. I just picked up an X-T4 and have been trying to make sense of the DR settings. Since they affect the RAWs I can see them having a use for landscapes. Maybe even taking the place of a graduated ND filter for sky shots!
Yeah, Dynamic Range can help with blown-out skies in your RAW files to an extent, but will never replace a good ol' 3-stop grad ND!
Hi John
Many thanks.
"...the RAW files are indeed different, with the highlights showing better detail in the DR400 image (right)."
Just to be clear: In fact, the raw files are 1 (DR200) resp. 2 stops (DR400) underexposed. Uniformly, not only the highlights.
With the help of others, I described my conclusion here: https://www.dpreview.com/forums/post/65788937
In short, I see DR200/400 basically as a jpeg shooter tool, not that interesting to raw shooters.
Regards,
Martin
I think there's plenty of utility for using this in RAW photography.
Consider the documentary, event, or street photographer who is working quickly and doesn't have the time to analyze highlight clipping while working, but still wants those areas protected. Activating DR200 or 400 will reduce the light reaching the sensor than what would with a DR100 setting, thus protecting highlight areas in their RAW file, assuming lowest possible ISOs. Or that photographer could just use DR100 at the base ISO and expose for the highlights (effectively underexposing the photo a few stops), then work the tone curves themselves in post-processing, but that makes composition overly complicated when you can't see it. It also depends on the RAW converter they're using since most will apply the D-Rng curve to the RAW file as shown in my example above.
I have made some edits to this article, mostly adding "for JPEGs" in numerous places where readers assumed I was talking about the RAW, as I did not make a distinction. I write these for your average person who just wants to make pictures, but they're also read by folks who want to deconstruct sensors and talk about transistors and analog vs digital gain and ISO invariance etc etc - you lose 99% of photographers there. I sometimes don't clarify that and it leads to major confusion between those two groups. The other problem is that I get notes from people who speak extremely confidently about how things work and they all contradict each other, which also leads to further confusion (not saying you're one of them).
I especially love it when I do write an article that I specifically state is for in-camera JPEG processing and someone will inevitably comment, "this doesn't apply to me since I shoot RAW." Okay, that's great, then don't read it 🙂
All we can do is try to give photographers a basic understanding of the available tools and let them decide how/if they want to use them.
Happy New Year Martin.
@John Peltier, great reply!
@John Peltier,
As an "average person", I can only agree. By far the best explanation of how D Rng affects the RAW output (and not) I could find in the internet yet.
Many thanks.
I appreciate the feedback!
I use dr400 101% of the time. Feels like shooting film again. It also balances the DR of a digital camera so that not ALL of the recovery is in the shadows only.
Interesting technique, I've never considered that as a standard!