Disclosure: This post may contain affiliate links. I earn a small commission of product sales to keep this website going.
There are two primary misconceptions about Fujifilm’s highlight and shadow tone settings.
The first is that they apply some generic S-curve to increase global contrast throughout the image. The other is a bit of confusion about whether you want to set a negative number or positive number to increase or decrease contrast.
Let’s clear things up here with some examples. Hopefully, it’ll give you a better idea of how and when to use Fujifilm’s highlight and shadow tone settings when optimizing your JPGs.
What Fujifilm Highlight Tone and Shadow Tone are not
Highlight Tone and Shadow Tone are not the same as:
- Adjusting Highlights and Shadows exposure sliders in Lightroom. These sliders affect the image regardless of the exposure, whereas the Fujifilm settings do not.
- Levels adjustments. You can roughly adjust the white and black point of some images using Fuji’s settings. But not all of them, and not in the same manner as a Levels adjustment.
- A generic Contrast slider. These sliders found in all processing programs affect contrast in the entire image. Fuji’s settings do not.
Let’s take a look at how Fujifilm’s Highlight and Shadow Tones work so that we can understand what they really do.
How Highlight Tone and Shadow Tone Works
Fujifilm’s Highlight and Shadow Tones do affect contrast, but only in the area of the histogram that corresponds to highlights or shadows. It’s more akin to Lightroom’s targeted curve adjustments if you’re familiar with that, and in similar programs.
The Fujifilm Highlight and Shadow Tone curves are also applied behind the scenes when using the Dynamic Range Priority setting found in newer Fujifilm cameras.
A post-processing example
Let’s just look at what’s happening in Lightroom to easily see what’s happening to all the little graphs and whatnot.
The first image is a relatively flat photo. The histogram is mainly in the midtones, biased lighter. I want more contrast, so I will add a curve in the shadows area to deepen the blacks and a curve in the highlights to bring the whites up. We see the result in the second photo.
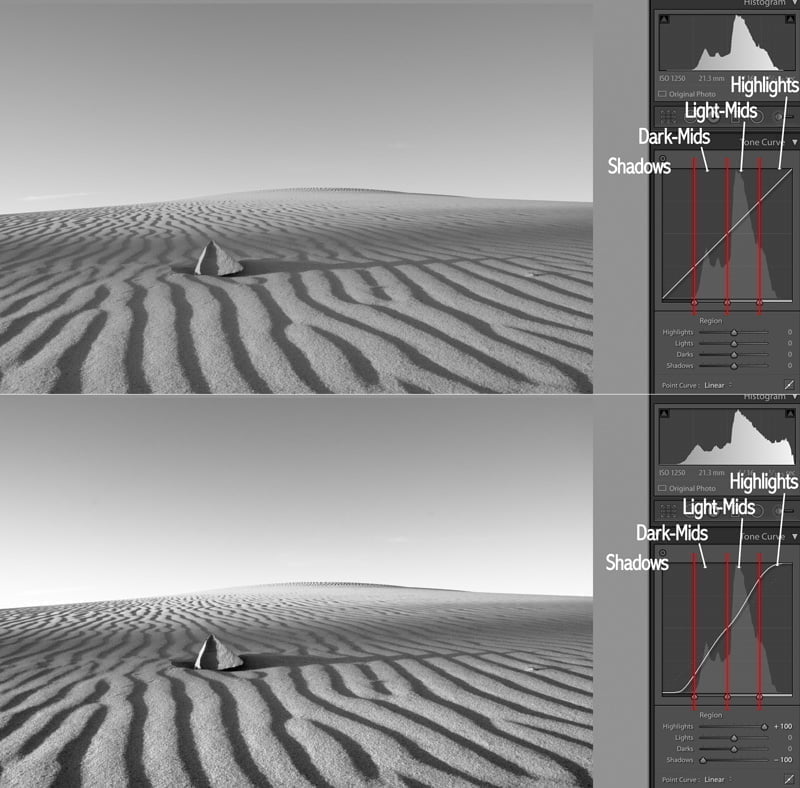
You can see by adjusting these curves only in the highlight and shadow areas that:
- The curve on the graph starts gradually in the mid-darks and mid-lights and then increases drastically once in the shadows and highlights.
- This expanded the overall histogram (top right of image) and brought it closer to the edges for a more contrasty photo.
- The parts of the image that were affected the most were the parts on the far left and far right of the histogram.
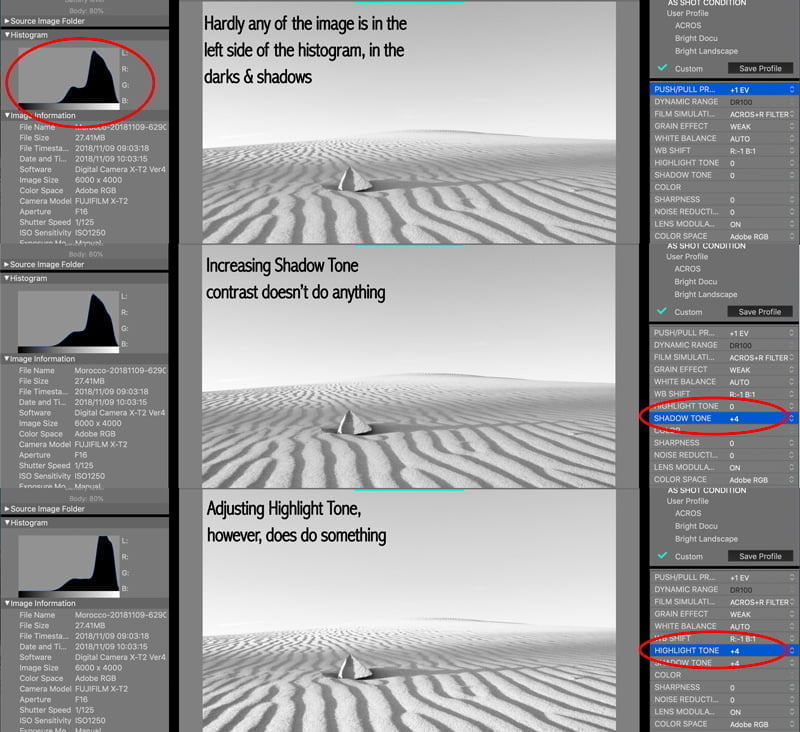
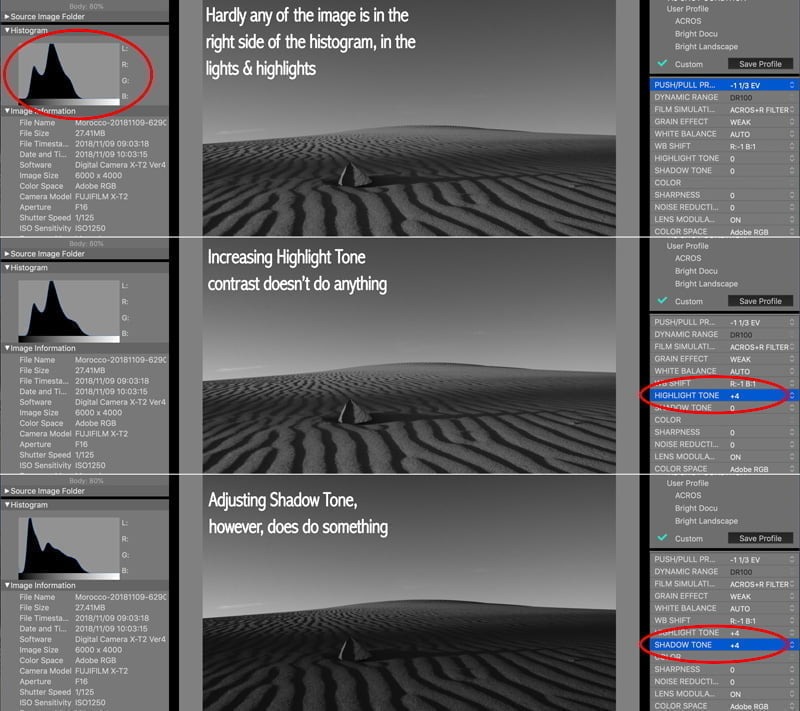
So what happens if none of the histogram falls in the shadows or highlights? Let’s over and underexpose to find out.
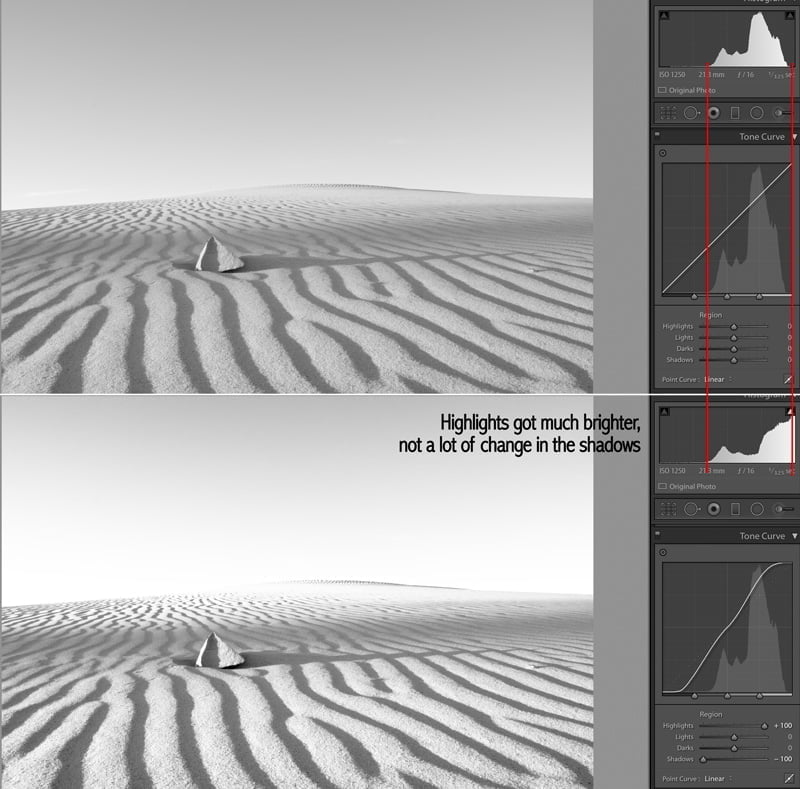
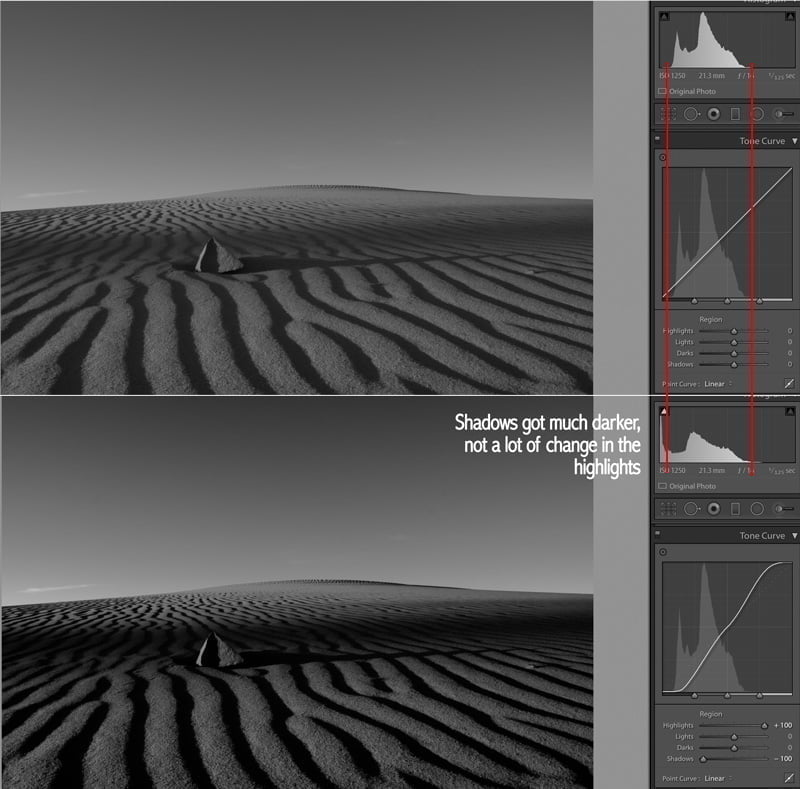
As we see, if none of the histogram is in the shadows, pulling down the shadows won’t do squat. Conversely, if none of the histogram is in the highlights, pushing up the highlights won’t do anything either.
Great, that’s Lightroom, what about with Fujifilm?
Yes yes, Lightroom was just an easier way to graphically see what’s happening.
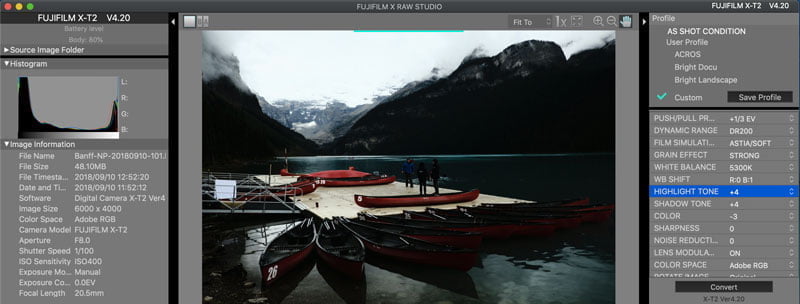
Let’s now take a look at what the Highlight Tone and Shadow Tone adjustments look like in Fujifilm X RAW Studio. I use this program to create my Fujifilm custom settings, and it’s a valuable tool to have if you’re a Fujifilm owner.
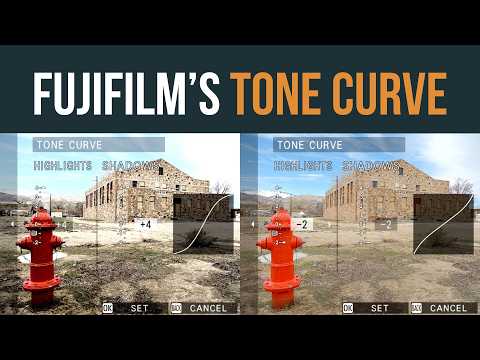
The first image is the same flat image with no adjustments. The second image is after applying +4 Highlight Tone and +4 Shadow Tone.
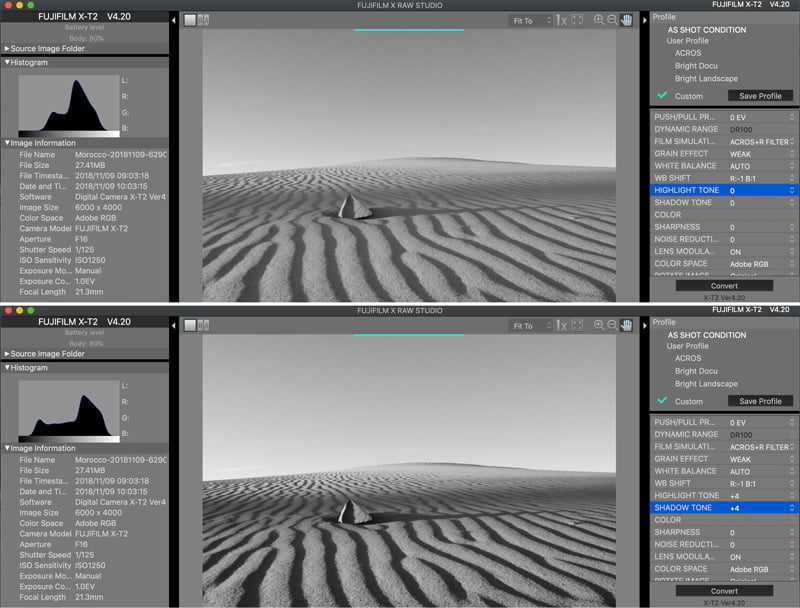
It brought our histogram closer to the edges, adding some contrast, much like how it happened in Lightroom.
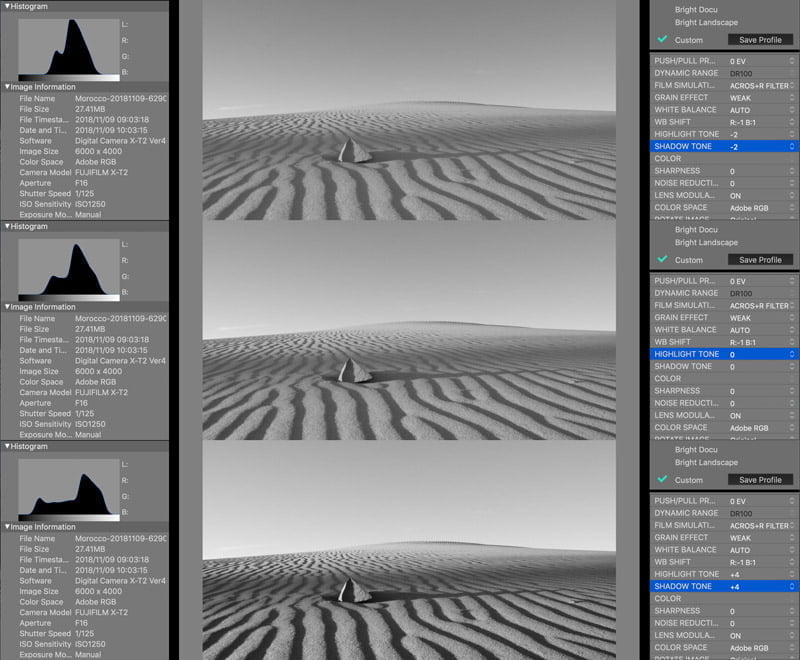
Now let’s look at what happens if our image lies more in the highlights, and we adjust our Shadow Tone.
Okay, we’ve seen positive values, what about negative?
You can increase the tones to +4, but you can only decrease the tones to -2. Using a negative number makes the image flatter, decreasing contrast. Let’s look at a color photo now.

You can see that using a negative number in both the highlight and shadow tones brought up the shadows slightly and took down the highlights a touch. The histogram was brought off of the edges a little.
Beware that in some images, this can make it look too flat and muddy.
How you adjust the Highlight and Shadow Tones on Fujiflim X cameras
You can access the highlight and shadow tones by going to the Shooting Image Quality (I.Q.) menu or pressing the Q button on the back of the camera.
How do I remember to go positive or negative?
There’s a simple way to remember it: a plus sign increases contrast, while a negative sign decreases contrast. This applies to both the shadows and highlights.
Tone Curve Setting
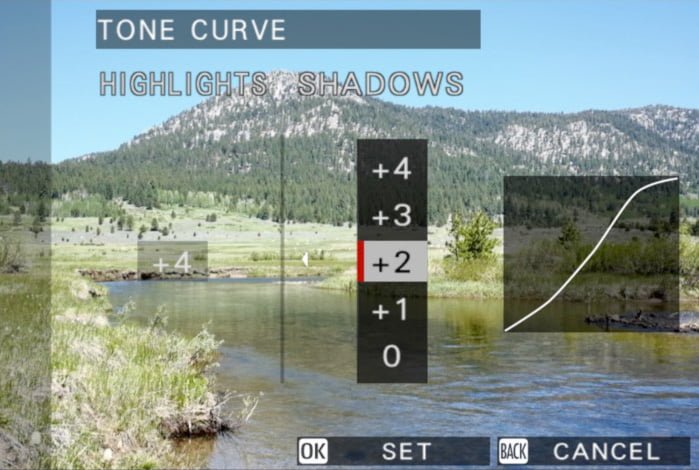
Newer Fujifilm cameras (X100V, X-T4, X-Pro3) have combined both of these settings into a single TONE CURVE setting.
This TONE CURVE setting shows you the curve, so you can see how your contrast is affected.
The more pronounced the shape of the “S,” the stronger the contrast. An inverted S decreases contrast.
When to use Fujifilm Highlight and Shadow Tones
It depends (sorry).
Several factors will influence the kind of effect these settings have. It depends on your film simulation’s contrast, Dynamic Range setting, and how your image is exposed.
Pro Neg Std, for example, already has soft shadows, and Pro Neg Hi has bold shadows. Shadow Tone won’t affect these two simulations the same.
If I’m in a setting that might look good with deep, dark shadows, I’ll hit the Q button and adjust the Shadow Tone to +2 to start. Then go to +4 if it’s not enough. Or if I want to recover some of the shadow areas when I’m shooting, I’ll set Shadow Tone to -1 or maybe even -2. Same concept for Highlights.
I’m a big advocate of using the histogram to determine exposure. The in-camera histogram will show you how much the Highlight and Shadow Tones will affect the image, as described above. Newer cameras with the Tone Curve setting show how your scene is affected as you adjust it.
It’s an amplification of your highlights and shadows
When more of the histogram is on the left or the right, the more amplified the adjustments become.
Our color photo had a lot of contrast to begin with. Watch what happens when setting +4 for both the highlights and shadows. The changes are much stronger than in our flat black & white photo. It will not affect every photo the same.
From one extreme to the other:
Custom settings with Fujifilm highlight and shadow tones
This is why I don’t go too crazy with these values in my custom presets. I have some minimal values that I think are at least the 50% solution to 90% of my photos rather than programming a 100% solution for 10% of my photos. But that’s just my style. You might be different.
Making presets with wild highlight and shadow tones also makes it more difficult to tell how your RAW histogram will look. But then again, if you don’t care about RAW and only care about how the JPG looks in the camera, then this won’t matter to you.
TL;DR
- A positive number increases contrast (stronger).
- A negative number decreases contrast (softer).
- Highlight Tone only affects what’s on the right half of the histogram.
- Shadow Tone only affects what’s on the left half of the histogram.
I hope this helped!
Learn how to leverage the Highlight & Shadow tone settings to further customize Film Simulations in my interactive, online course.
Yang
Tuesday 7th of July 2020
Hi John, can't believe I started using Fuji 3 yrs ago only now found your blog, great post! Just one thing: does highlight/shadow tone curve in xt4 essentially the same as the number setting in xt3?
John Peltier
Tuesday 7th of July 2020
Thanks for the feedback! Yes, the numbers are the same between the X-T3 and X-T4 regarding highlight and shadow tones. It's just all combined into one screen on the X-T4 that shows you what the tone curve actually looks like when you change it, and you can change them in half-increments instead of whole numbers.
Svetlana Grobman
Wednesday 20th of November 2019
So very helpful! I wish I had found this article earlier! I do shoot in RAW sometimes, but I came to the conclusion that there are times when RAW is overkill (like days with clear blue sky, etc.). In fact, there were times when I shot the same subjects in both RAW and JPG and JPG photos looked better (!) after processing. In other words, I alternate -- for golden/blue hours I use RAW or both and for lifestyle and photos shot during the day, I just switch to JPG.
Anyway, I shoot with Fuji X-T2 and although it is not new anymore, I am still puzzled about some of its settings (like DR settings, for example -- before I read your article, of course:)). It maybe is just my age (I am retired but I do some freelance writing and photography), but it seems that the camera is still too smart for me :(. Did you ever write anything about your settings and why you chose them? If you did, I'd LOVE to see that.
Thanks you in advance, Svetlana
John Peltier
Thursday 21st of November 2019
Hi Svetlana, I appreciate the feedback. I've also become extremely happy with the JPGs I get out of my Fujis, often opting to not process any RAW files at all. It's awesome! I haven't written anything about my own settings but that's a great idea. I'm also in the process of creating an online course for mirrorless cameras, the beginning of which goes through camera setup. It's not specific to any brand of mirrorless camera, though I have a plan for a Fujifilm-specific course in the works. I'll be announcing the release of both of these in my newsletter and I can add you if you'd like to be notified. Thanks!
Tom GIbson
Monday 2nd of September 2019
But this is just for .jpg, not RAW
John Peltier
Monday 2nd of September 2019
Yes. Believe it or not there are photographers out there - even professionals! - who produce professional work only with JPGs. So this is very relevant to them. How was your Africa trip?
David Tanner
Wednesday 21st of August 2019
Very interesting article. But I still can’t get my head around the +/- Highlights.... if I want to pull back, say, cloud detail in the sky is that + or - ?? I would assume - ?
Simon
Wednesday 28th of July 2021
I just came across this and many other great articles from this website, thank you alot!
I've always struggled to remember the +/-. Personally, I remember it as "+ adds highlights (brighter)/shadows (darker), - removes highlights/shadows (just the opposite of +)".
John Peltier
Wednesday 21st of August 2019
Yeah that gets a lot of people. I just remember it as “- reduces contrast” which makes it flatter.