Disclosure: This post may contain affiliate links. I earn a small commission of product sales to keep this website going.
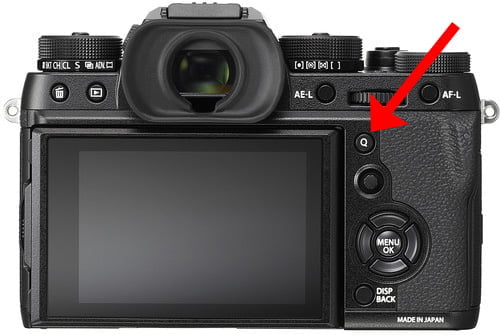
In talking to a number of Fujifilm shooters I’ve come to the realization that not many photographers take advantage of that Q button on the back of the camera. They don’t know that it’s there, they don’t know what it’s for, and they don’t know how to use the Q button. Did you know you can program it to customize what’s in that menu? Did you know you can drastically change the look of the photo you’re about to take in a matter of seconds?
Here’s how to use that Q button in shooting mode, something that you should definitely consider if you haven’t already tried it.
What the Q Button Does
Fujifilm’s Q button instantly puts important Image Quality, Shooting, Focus, Flash, and Set Up functions at your fingertips. No need to go into the main menu. If you need it done now and don’t have a dedicated dial or button for it, just press Q to get those big boxes right in your face.
The Q menu is customizable with up to 16 programmable slots. It may seem like it’s only useful for photographers who take advantage of Fujifilm’s amazing JPEG rendering, but photographers who strictly shoot in RAW format will find the Q menu useful also.
The Q button is functional in Shooting, Movie, and Playback modes. The same menu is shown in Shooting and Movie modes, though some functions may be disabled in Movie mode. In Playback mode, the in-camera RAW converter comes up. This post will only focus on the Shooting mode; you can learn how to use Fujifilm’s in-camera RAW converter here.
How to Customize the Q Button
Customize Q menu appearance
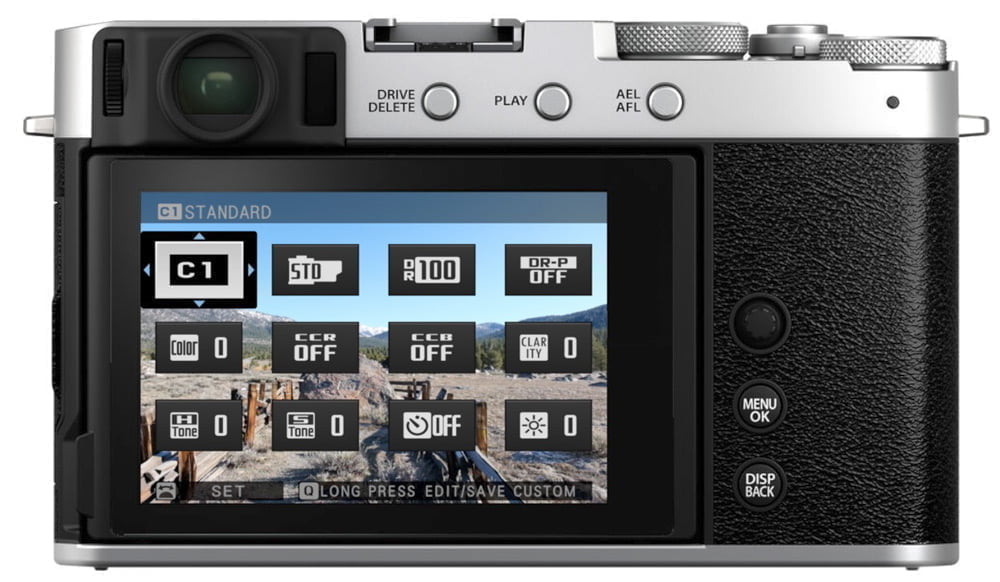
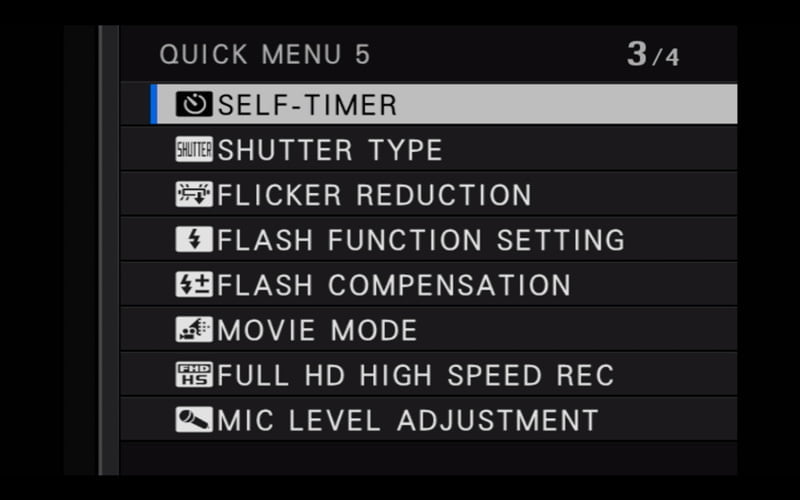
More recent cameras allow you to select between 4, 8, 12, or 16 slots (older cameras are stuck at 16). To change the number of slots you want, go into the Button/Dial Setting menu then Edit/Save Quick Menu (for either stills or movie modes). While here, you can also program the individual slots as described later.
You can also choose between a black background and transparent background in the newer cameras. The transparent background is very helpful for JPEG photographers since it allows you to see the changes as you’re making them. The Q Menu Background option is found towards the end of either the Screen Setting or Button/Dial Setting menus (camera dependent).
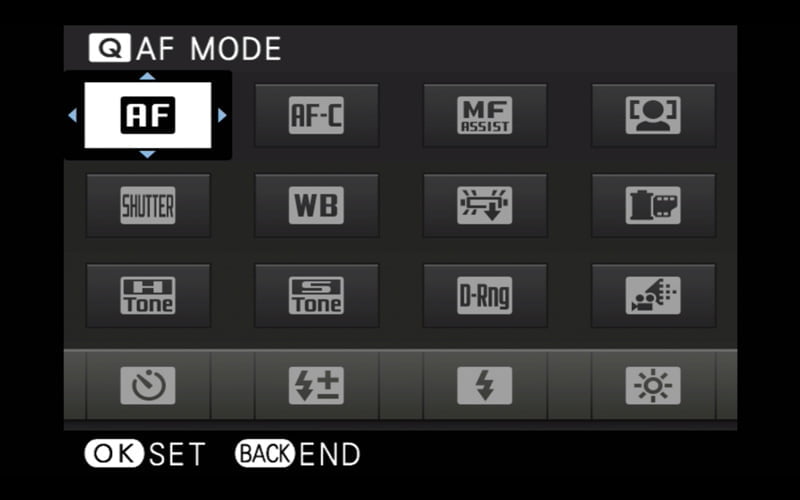
Program the Q menu
You can customize the Q menu by pressing and holding the Q button. Use the joystick or selector pad to navigate to a slot you want to change, press OK, then go through the list to pick a new function.
The Q menu defaults are largely aimed at photographers who want to customize the style of their photos. But RAW-only photographers can reprogram this entire menu to take out styling options. JPEG photographers can also reprogram the styling options to suit their flow.

The Q button for RAW-only photographers
Could you care less about going into the Q menu to adjust Film Simulation and Color? Did you know you can program other things that you might care about instead?
Here are some ideas for programming the Q menu if don’t want to mess with any image styling in the camera. Please keep in mind that these may vary slightly from camera to camera.
You can put all of your focus options on the top line to be able to quickly change things like your Continuous Focus tracking mode and MF Assist mode, and toggle Face/Eye Detection.
Quickly go into Electronic Shutter and adjust White Balance for a more accurate rendering of your RAW preview. Keep things like Highlight & Shadow Tone and Dynamic Range in the menu to see what you can get out of your RAW file, or remind you in a RAW preview how much contrast you wanted the image to have. By keeping the Film Simulation in this menu, you can quickly switch to Black & White if you plan on processing it in monochrome, or for situations when removing all color can aid in your composition & exposure choices.
And of course, you always have the option of choosing “None” for any of these slots, which will help you remove distractions if you could care less about Dynamic Range, for example.
Assigning some of these functions to the Q menu will free up custom buttons for more frequently used items.
Programming the Q Button for Working your JPEGs
If you love your Fujifilm for those awesome JPEGs, you’re going to want a different setup in your Q menu.
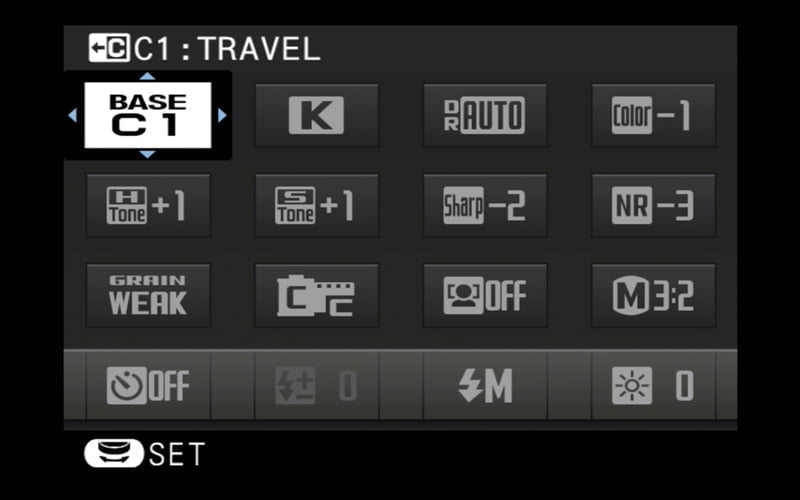
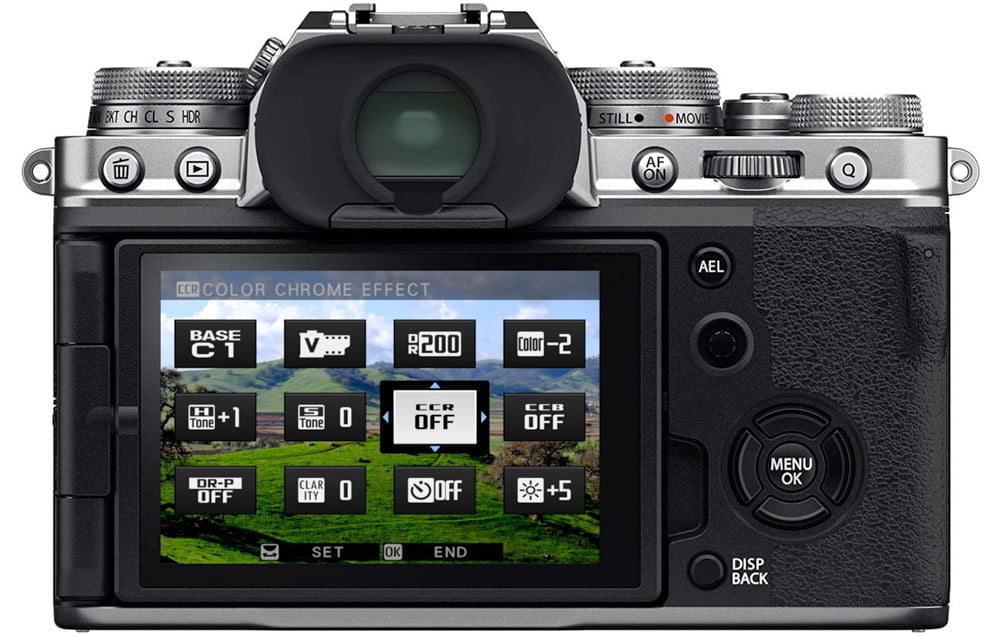
I have mine set up in a manner and order that aligns with my workflow when I’m photographing a scene (which I’ll go through in the next section). But basically, I first identify one of my Custom Settings (if applicable), and then refine that setting based on the character of what’s in front of me. Using the order of things in my Q menu, this only takes a couple of seconds.
You can see how it’s set up here on my X-T4, pretty much in the order I adjust things, with a few miscellaneous items at the end.
Using the Q Button for Those Awesome Fuji JPEGs
Here’s where the Q button shines in my opinion. It’s one thing to be able to come up with your own Custom Settings that align with your photographic style. But to be able to quickly refine those settings in the moment is what counts.
Here’s what I did on a trip to Death Valley with an X-T2. I didn’t really care to process any RAW files on this trip. I just wanted a good JPEG. Proper use of the Q button made it happen.
1. Identify my custom setting. I had a landscape in front of me, where I’d usually use Velvia, but this landscape was mostly browns and yellows. I’m not a fan of how Velvia renders these colors (but I love it for purples, blues, and oranges). So I went to my Travel custom setting that uses Astia as a base film stock, and this is what I saw through my viewfinder.
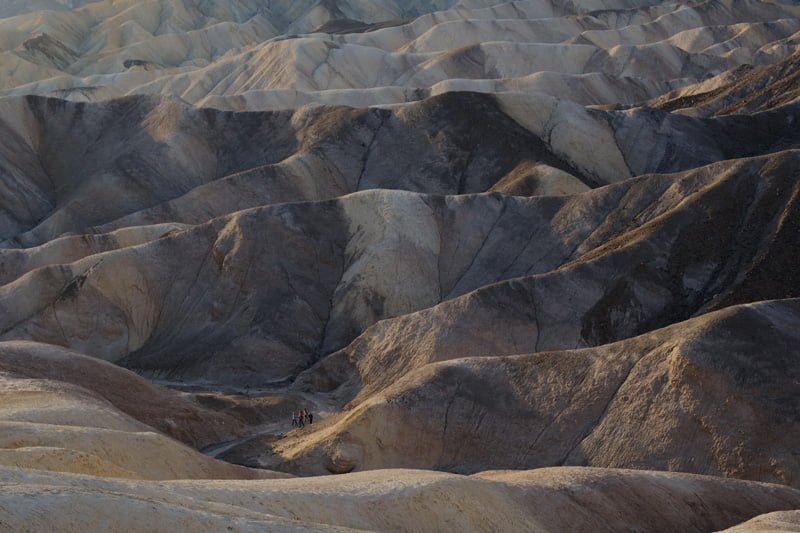
2. Set my White Balance. Proper color (how you want it to be, not how the camera sees it) is crucial to getting a good JPEG. One of the most important – if not the most important – things in my opinion. The yellow hills threw off my Auto White Balance, cooling down the color too much. So I went to Kelvin White Balance with a temperature of 5600K, a pretty good temperature for a warm golden hour. I think I added one point of Magenta in the White Balance Shift too. I switched eyes between my EVF and the scene in front of me, and the colors were really close.
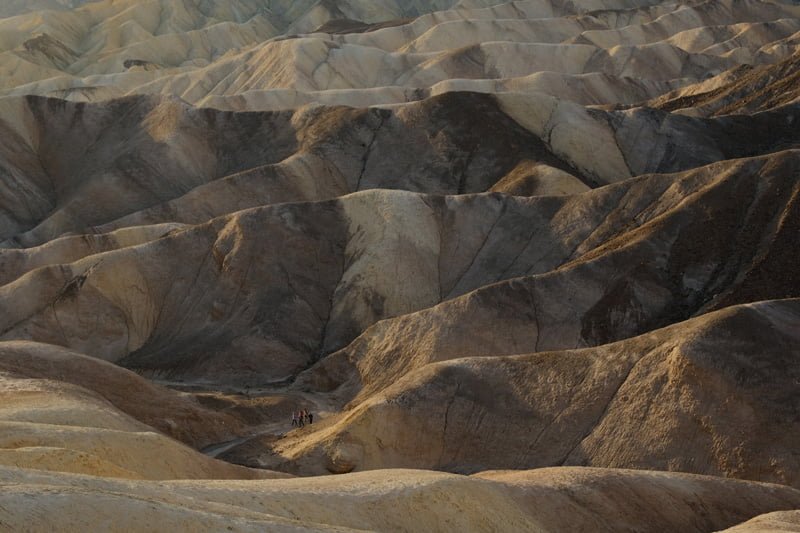
3. Adjust my saturation. The colors in front of me were really vivid. My Travel custom setting has a Color value of 0, so I went back to the Q menu and quickly set a Color of +2. Now those warm colors stood out without being too strong.

4. Check the contrast in the shadows and highlights. This photo was still too flat. I really wanted to make the layering of the hills stand out. My Travel custom setting has a Highlight Tone of -1 and a Shadow Tone of +1. I wanted to increase contrast in both of these zones, so I went to the Q menu and set both to +2. Now I had the contrast that really gave depth to the photo.
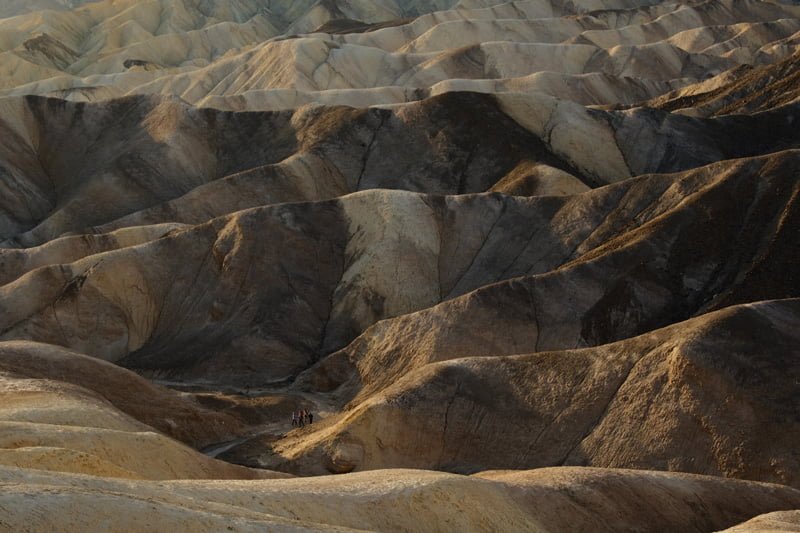
What I now saw in the EVF made me happy, what I wanted my photo to look like. Going through the above steps really only took me a couple of seconds. This process is all covered in detail in the Perfect Fujifilm In-Camera JPEGs course.
Could I just have taken the photo as-is and messed around with it later? Absolutely (and in full disclosure, I used the Q playback menu to be able to illustrate this post, despite going through the above steps in the moment).
But taking a few seconds to get it right before making several photos meant that I didn’t have to do it afterward when I might forget about it or just have too many photos to go through and adjust.
Investing a few seconds before will save you minutes & hours later – all thanks to the Q button!
Keith
Friday 8th of September 2023
I don't like the Q Button because it's too easy for me to touch and accidentally change one of my settings. One time I unknowingly changed it to the toy camera setting for about half a dozen shots—I was not amused! Especially since I wasn't shooting RAW. I've actually disabled the Q Button on my X-T30II. Maybe I don't hold my camera correctly to keep from touching it by mistake. Does anyone have any tips?
John Peltier
Friday 8th of September 2023
The Q button was actually never programmable until a lot of people started having this very problem with the X-T30. Then it became a button you could disable and some people assigned it to a different button. Some photographers have also found that an external grip helps. I've never had any problems - maybe my bony thumb doesn't roll over that grip protrusion enough to activate it :)
Tim Donner
Wednesday 30th of August 2023
Thanks! I under that you tweak the settings using the Q button. Does the camera that reset the adjustments back to your programmed default (like the white balance, saturation, etc)? How do you do that? Turn off/on the camera or somehow else?
John Peltier
Friday 1st of September 2023
Hi Tim, that actually depends on the camera. In most older cameras (X-T4 generation and earlier, minus the X-S10 and X-E4), your tweaks are not reset until you "re-select" the saved custom setting. Your tweaks are saved in a "Base" modification so you can turn the camera off/on without losing your changes. Then you "select" that saved setting again when you want to go back to your programmed default. In the newer cameras, it's a little more tricky. It resets your tweaks if Auto Update Custom Setting is Disabled and automatically saves your tweaks to the setting if Auto Update Custom Setting is Enabled, with no option to go back to your default. It's goofy/frustrating. I wrote another article about that here.
Rob
Tuesday 10th of November 2020
With 'standard' I meant: all the built-in factory sims that come with the camera (Std, Velvia, Acros, etc. among others)
Dimitra K
Wednesday 28th of October 2020
Really useful post, thank you! I would like to ask you how can I change from the customized modes in the Q menu into the preset of my xt-30 camera? I mean, if for example I want to shoot BnW street, I have this setup personalized in my 1st Q choice. But after if I need the standard film with my other settings from the main menu (about highlights, shadows, DR, WB, auto ISO, etc.) is there any way to switch to that? Even if I switch off my camera and then switch on, I cannot get the standard way my camera is setup. Many thanks!
John Peltier
Thursday 29th of October 2020
I'm not quite sure I understand what you're asking.
Go into the Image Quality menu, Edit Custom Settings, and create your custom settings in the seven available slots.
Press and hold the Q button to program your Q options, and set the first one to Select Custom Setting, as shown in this post.
When shooting, press Q, highlight your Custom Setting option, then use the wheel to select between your seven custom settings. This will let you go from you BnW custom setting to your standard custom setting, which you'd have to have preprogrammed into one of the seven custom settings.
Prasad
Monday 18th of May 2020
Thx for your clear explanation of how you use the q button - just what I needed!
John Peltier
Tuesday 19th of May 2020
You're welcome, glad I could help!