Disclosure: This post may contain affiliate links. I earn a small commission of product sales to keep this website going.
Many Fujifilm photographers don’t think about using the in-camera RAW converter under the Q button in Playback Mode if they use the Q button at all. The Q button is also powerful in Shooting Mode; learn about all of the benefits in this post.
But learning how to use Fujifilm’s in-camera RAW conversion with the Q button will not only save you processing time, but it will also make you a better photographer without processing.
Access Fuji’s In-Camera RAW Converter
Fujifilm’s in-camera RAW converter is much better at handling Fujifilm’s RAW files than any other program, like Lightroom or Capture One, at the most basic, fundamental level. I mean, that makes sense, right? They’re the ones who made the camera.
No, you don’t have anywhere near the functionality of those programs, but to many photographers, what Fujifilm offers in-camera is enough. It’s increasingly becoming enough for me as I learn Fujifilm more and more.
You must be recording RAW
To use Fujifilm’s in-camera RAW converter, you need to be recording the RAW file. The camera must store the negative so it has something to process.
I know this isn’t what many JPEG-only photographers want to hear, but if you want to edit a photo at all after the fact, you need the RAW file too. You can always delete them after you transfer the files to your hard drive if you no longer need them.
Go into your Image Quality menu and set either RAW or FINE+RAW.

Now you can edit your photos in Playback Mode using that Q button.
What do you want to edit?
You just took a photo, but after looking at it, you realize you should have used a different Custom Setting or film simulation. No worries, we can take care of that as long as you recorded the RAW file.
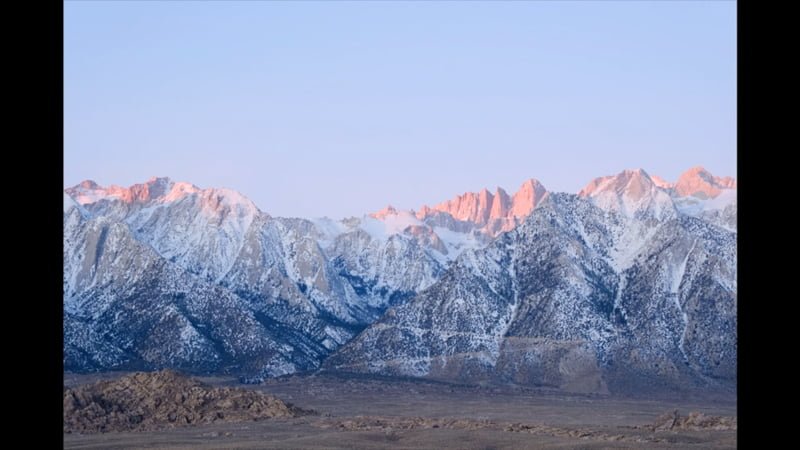
This image of the first light on Mt. Whitney is just too dull and flat. I need to bring it to life.
Entering the Fuji RAW Converter
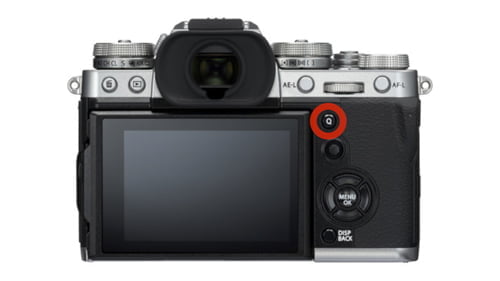
Enter Playback mode and go to the photo you want to edit. Press that Q button on the back of the camera. This is the menu that will come up for the Fuji RAW converter, with a thumbnail of that image:


Go through all of the menu items that you’d like to change. The available items will differ from camera to camera; you can see most Fujifilm options at the end of the post, with descriptions of what they do.
This is kind of the order that I do things:
- Make sure the exposure is good with the Push/Pull option. Press the Q button to preview the new exposure. Press “Back” to return to the editing menu.
- Fine-tune the White Balance and White Balance Shift for subtle tints. Press the Q button to preview the changes, then press “Back” to return to the editing menu.
- Do I like the film simulation? Change to another film simulation and press Q to preview the new film simulation. Press “Back” to return to the editing menu.
- Adjust the contrast using Highlight & Shadow Tone, and adjust Color. Press Q to preview changes. Make slight adjustments as necessary.
- When I have a preview that I like, press “OK” to save that JPEG to my memory card. The new image will be saved to the end of your files.
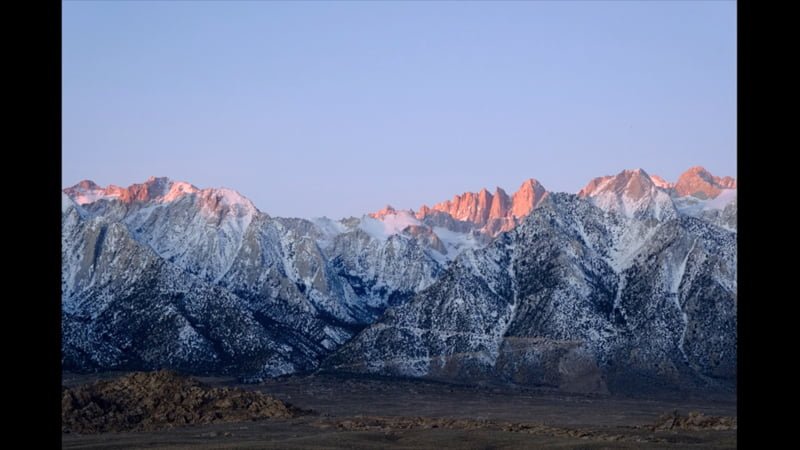
After just a minute of processing, the image below is what I came up with. It looks so much better than the old one! And I didn’t have to spend countless minutes on a computer processing it!
You can watch a video of each step, and how I went through the Fujifilm Q button RAW converter for this photo:
Your Fuji RAW Converter Editing Options
Not all of these are available in every Fujifilm camera. I will list everything here but check your camera to find out which ones are available to you.
- REFLECT SHOOTING COND.: Creates a JPEG using the original settings from when the photo was taken.
- FILE TYPE: Save your output as a JPEG (compressed), High Efficiency Image File (HEIF), or TIFF (lossless). The TIFF files are huge, especially the 16-bit (more tonal depth), but they allow for more processing options later on.
- IMAGE SIZE: Change the dimensions of your final file.
- IMAGE QUALITY: Useful for increasing/decreasing the quality of your final JPEG output.
- PUSH/PULL PROCESSING: Adjust the exposure of your photo. Most cameras allow you to decrease exposure by 2 stops and increase exposure 3 stops. It’s much easier to push (increase exposure) and get more out of the shadows than it is to pull (decrease exposure) and get detail out of the highlights.
- DYNAMIC RANGE: Reduces overall exposure to bring everything down (particularly the highlights) and then pushes the shadows back up. Requires the original photo taken at a higher ISO. Learn more in this post about Dynamic Range.
- D RNG PRIORITY: Adjusts Dynamic Range, Highlight, and Shadow toning for high-contrast scenes. Learn about the differences between the Dynamic Range option and Dynamic Range Priority in this post.
- FILM SIMULATION: Change the film stock of the photo. Learn more about Fujifilm’s film simulations here.
- MONOCHROMATIC COLOR: Only available for monochrome photos; you can add a cool or warm tone to the photos.
- GRAIN EFFECT: Adds a natural-looking film grain to the photos. It’s handled differently between ACROS and other film simulations and from one ISO level to the next. Fujifilm’s GRAIN EFFECT setting in-camera is better than any other grain effect plugin you’ll find elsewhere.
- COLOR CHROME EFFECT: Adjusts the saturation of certain colors, expanding the range of tones available in reds, yellows, and greens, for a more natural-looking tonal transition. Learn more here.
- COLOR CHROME FX BLUE: The same as Color Chrome Effect but specifically optimized for blue colors. Learn more here.
- SMOOTH SKIN EFFECT: Smooths out skin tones to slightly reduce blemishes and wrinkles.
- WHITE BALANCE: Change the overall color temperature of the photo, from blue to yellow.
- WHITE BALANCE SHIFT: Useful for adding/removing magenta and green hues, though you can also adjust blues and yellows.
- HIGHLIGHT TONE: Increase or decrease contrast in the Highlight (bright) areas of the photo. Negative numbers decrease contrast, and positive numbers increase contrast. Learn more about Highlight & Shadow Tone in this post. Highlight & Shadow is combined into Tone Curve on the X-Pro3 and later.
- SHADOW TONE: Increase or decrease contrast in the Shadow (dark) areas of the photo. Negative numbers decrease contrast, and positive numbers increase contrast. Learn more about Highlight & Shadow Tone in this post. Highlight & Shadow is combined into Tone Curve on the X-Pro3 and later.
- COLOR: Adjusts color saturation. Standard saturation is 0, positive numbers add saturation, and negative numbers decrease saturation. Not available for monochrome images.
- SHARPNESS: Useful for adjusting when you have fine detail. Standard sharpening is applied at -4 (not 0). So going to -4 doesn’t add softening, it just applies the minimum amount of sharpening. Going too high will introduce “halos” around edges.
- NOISE REDUCTION: Reduce the “graininess” resulting from high ISO levels. Like Sharpness, standard noise reduction is applied at -4. Higher numbers may make the image look “waxy” by removing too much detail.
- CLARITY: Like Lightroom’s Clarity slider, this increases definition in the photo by increasing the contrast around larger areas without adjusting tones in the highlights or shadows. And like Lightroom’s Clarity slider, too much can look very unnatural.
- LENS MODULATION OPTIMIZER: You’re usually fine just keeping this ON (and better off if you do).
- COLOR SPACE: Unless you’re a professional printer and printing at home, just leave this in sRGB. You don’t gain anything by going to Adobe RGB. Everyone else is viewing photos on sRGB devices, so you should be in the same space.
- HDR: Produces a High Dynamic Range photo by adjusting highlight tones, shadow tones, and mid tones, and combining it all into one photo.
- DIGITAL TELE-CONV: Change the crop to “zoom out” if the digital teleconverter was used when the photo was captured.
It would be super-nice if there were an “Apply Custom Setting” option to apply all Image Quality settings under one of our custom recipes (ahem, Fuji engineers…).
Fujifilm’s In-Camera RAW Converter for Better Photography
Using Fujifilm’s in-camera RAW Converter a la the Q button is a great way to familiarize yourself with Fujifilm’s Image Quality settings.
The big reward?
As you practice in Fujifilm’s RAW converter and see how all of those Image Quality settings interact with different lighting and colors and film simulations, you’ll be able to make those decisions before the capture, as you come upon a scene. Then you won’t have to process anything at all!
Victor Filepp
Monday 26th of August 2024
Good explanation. You can do this with the Fujifilm X Raw Studio software (free). Strangely, it only works on files stored on your computer, but it uses the camera's converter. So you have the have the camera plugged into the computer. I would not consider either of these things as a problem, but it will only save TIFF files if the RAW is medium format. So GX- cameras only, no X-. I've tried it and the quality of the JPEGs is not that good. Certainly nothing I would want to continue editing.
John Peltier
Friday 30th of August 2024
Yes I've written several articles on X RAW Studio. The JPEG quality is the same that comes out of the camera since, as you said, it uses the in-camera converter to do this and not the software itself. It's fine for basic edits but offers nowhere near the control of a third-party RAW processor.
Jojo Bombardo
Saturday 2nd of September 2023
Do you know a way to apply another custom setting to an image or several images? Thanks for your work
John Peltier
Sunday 3rd of September 2023
This isn't possible in the camera, you'd need to use Fujifilm's X RAW Studio computer software to do that.
Mahdi
Wednesday 23rd of August 2023
Great article. I have come across an issue that I seek clarification on. If you shoot an image using your Fujifilm camera and used another Fujifilm camera to do the in-camera processing, a gift icon will be displayed in the play back image and you cannot use the in-camera processing. Now, I have images from my previous Fujifilm camera that I have sold and I would like to use the in-camera processing; how would I do this? I do not want to use LR or PS for this.
John Peltier
Wednesday 23rd of August 2023
Unfortunately, you need to have the same model available that the initial RAW file was created with. Each camera model has specific instructions for processing the photo, and they are not compatible with different camera models. There aren’t any other good options other than going into a different post processing program.
Thomas
Thursday 23rd of March 2023
"It would be super-nice if there were an “Apply Custom Setting” option to apply all Image Quality settings under one of our custom recipes (ahem, Fuji engineers…)."
That would be a great option indeed! Can't imagine they haven't thought of that!
JF
Wednesday 14th of December 2022
Thanks for the article. "The new image will be saved to the end of your files." -> do you know of a way to have the new images appear in playback right after the original RAW/JPG? It's possible for example with the Ricoh GR, and makes it super easy to compare different versions. Having the new JPGs sent "at the end of the card" makes playback quite confusing and doesn't allow to compare in-camera subtle changes in processing.
John Peltier
Wednesday 14th of December 2022
Sorry, this isn't possible (yet) in Fujifilm cameras.