Using Fujifilm's Live View Highlight Alert for Better Exposures
Disclosure: This post may contain affiliate links. I earn a small commission of product sales to keep this website going.
To follow up on an article about how to use a histogram in mirrorless cameras, there's an additional tool to go with that. In Fujifilm cameras, it's called the Live View Highlight Alert. What is it, and how do you use it?
What is Live View Highlight Alert?
The Live View Highlight Alert is mainly there as an overexposure warning. To let you know when you've clipped your highlights.
Clipping the highlights? What does that mean? And how does this Highlight Alert show that?
"Clipping the highlights" is a term that describes when your highlights - the brightest areas in your photo - become pure white. They can't possibly get any brighter.
This is typically unwanted unless you photograph a bright light source like the sun or a bare lightbulb.
When the highlights are clipped, and that area of the photo appears pure white, then that area shows zero color, detail, or texture.
Think of when you're photographing clouds. Those clouds might have some interesting textures in them. But when your photo is overexposed, those textured areas are now pure white. No detail is left in those clouds, and even if you're recording the RAW file, you will never get that texture back in that file because it's all just now a mess of pure white. You can pull the exposure back down all you want, but that pure white area will then just be a blob of very light, smooth gray instead of pure white.
Do you sometimes want areas of pure white? Sure. Like when you're doing a silhouette or something intentional. I'm not saying it's always bad. But it can be bad when you're not aware it's happening.
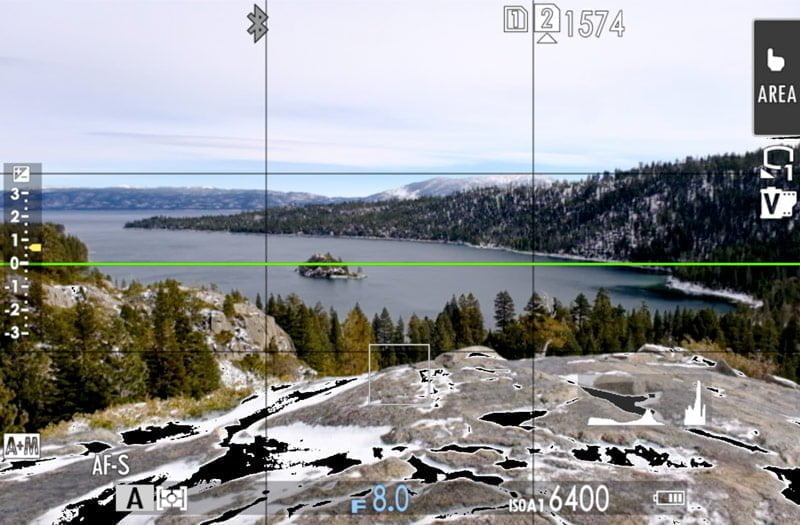
The Live View Highlight Alert in Fujifilm cameras brings this to your attention. Those "clipped" areas will flash black and white when they're overexposed to the point of being "blown out."
Enabling the Live View Highlight Alert
The Live View Highlight Alert is not available in all Fujifilm cameras, like the X-T100 or X-T200.
But on cameras that do have it, there are two ways of seeing Fujifilm's Live View Highlight Alert in Shooting mode.
The first is how I had my cameras set up for years.
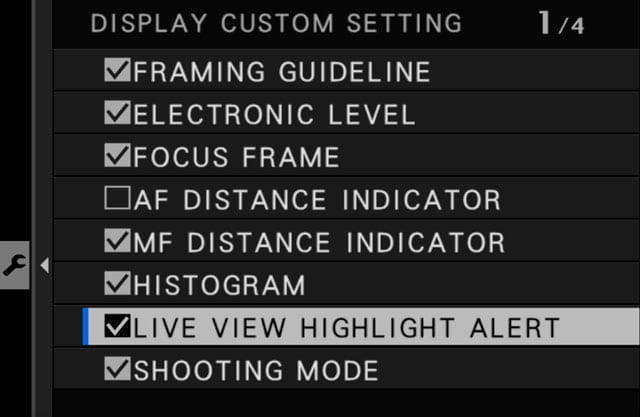
Go into your SET UP menu > SCREEN SET UP > DISP. CUSTOM SETTING, then scroll down to LIVE VIEW HIGHLIGHT ALERT. Press OK to put a little checkmark next to it. Now you'll see this alert in Shooting mode. If you're using an X100 or X-Pro series, this is not available for the OVF.
This method will always show you the blinking warning in Shooting mode when your highlights are clipped. I eventually found this to be a little bit annoying, especially when I was intentionally overexposing certain areas of my photos. Thankfully Fujifilm gives us a few ways to customize our displays.
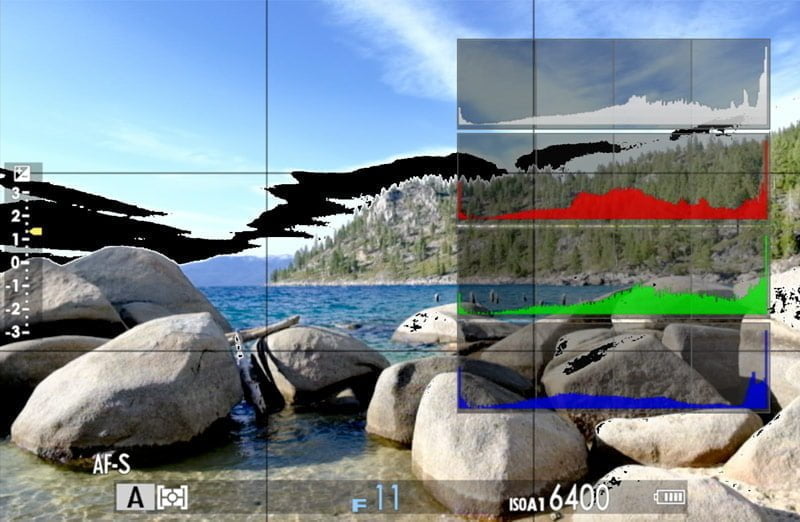
There's another little hidden way to see this warning on-demand, only when you want to check it. And that's to program a custom function control to the Histogram function.
When I hit that button (the Up selector button in the case of my X-T4), then a large RGB histogram is overlaid on the screen so I can refine my exposure better, and it activates the Live View Highlight Alert.
To program this control, go into your SET UP > BUTTON/DIAL SETTING > FUNCTION (Fn) SETTING menu. Highlight the control you want to use to activate the Histogram and set it to HISTOGRAM.
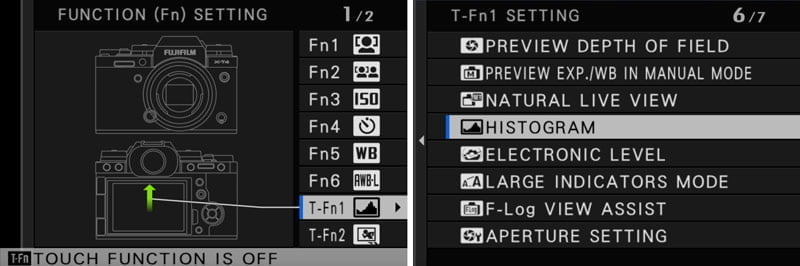
On most Fujifilm cameras, you can shortcut to this programming screen by pressing & holding the DISP/BACK button.
Exposing with Live View Highlight Alert
For JPEG photography
If you're recording just the JPEG file format, or even both the RAW and the JPEG file, you'll want to know when your JPEG file is clipping.
Learn how to get perfect Fujifilm in-camera JPEGs here.
You'll usually start to blow out your highlights in your JPEG file before it happens in your RAW file - even with a low-contrast film simulation like ETERNA.
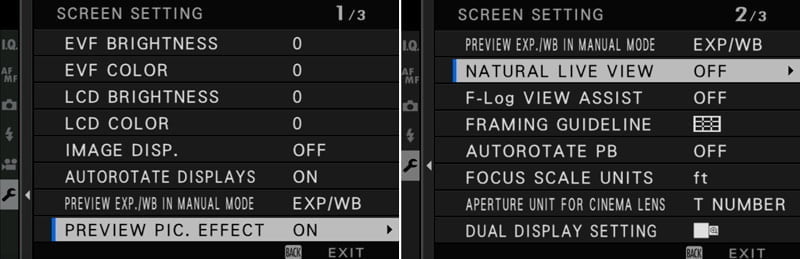
First, ensure that you've enabled the JPEG preview in your SCREEN SET-UP menu. Depending on your camera, you'll want either
- PREVIEW PIC EFFECT ON, or
- NATURAL LIVE VIEW OFF
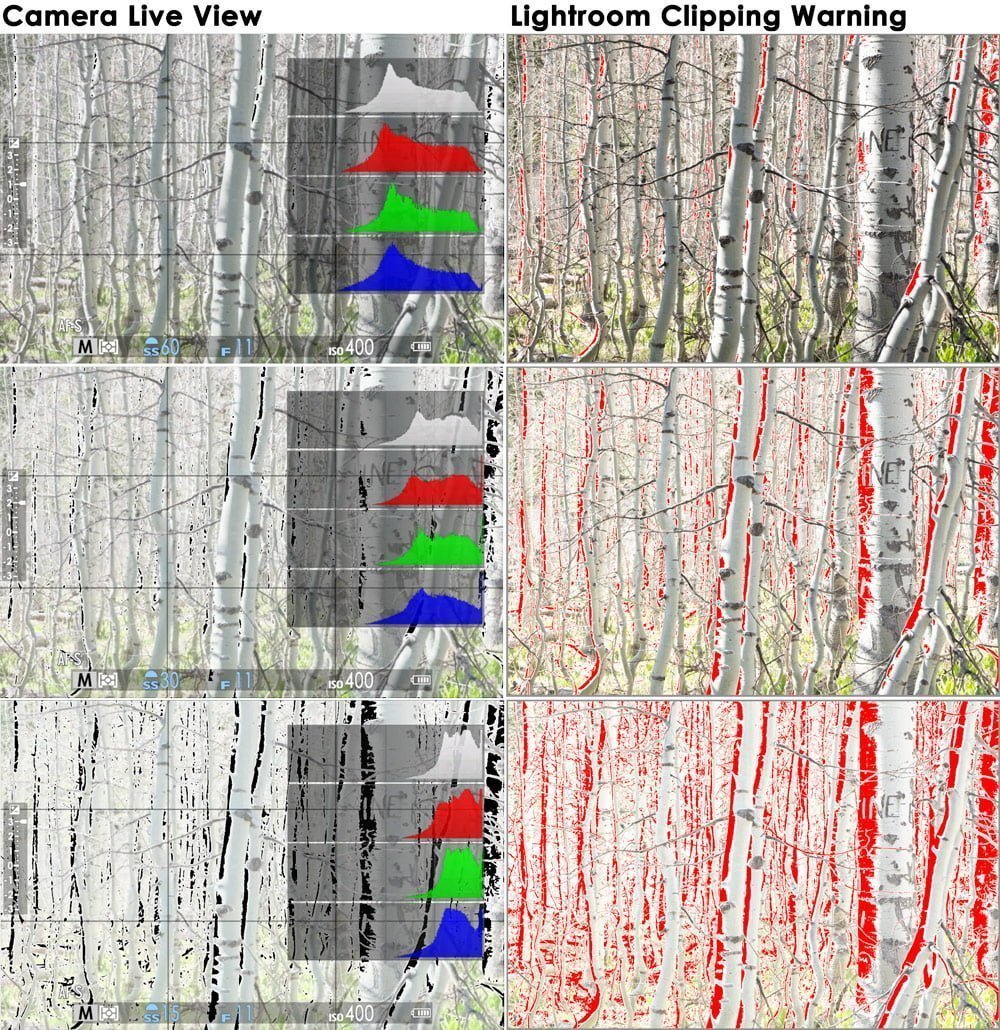
Looking at when and where those "blinkies" showed up in my Live View and comparing it to the JPEG file output, we can see that it's pretty darn close.
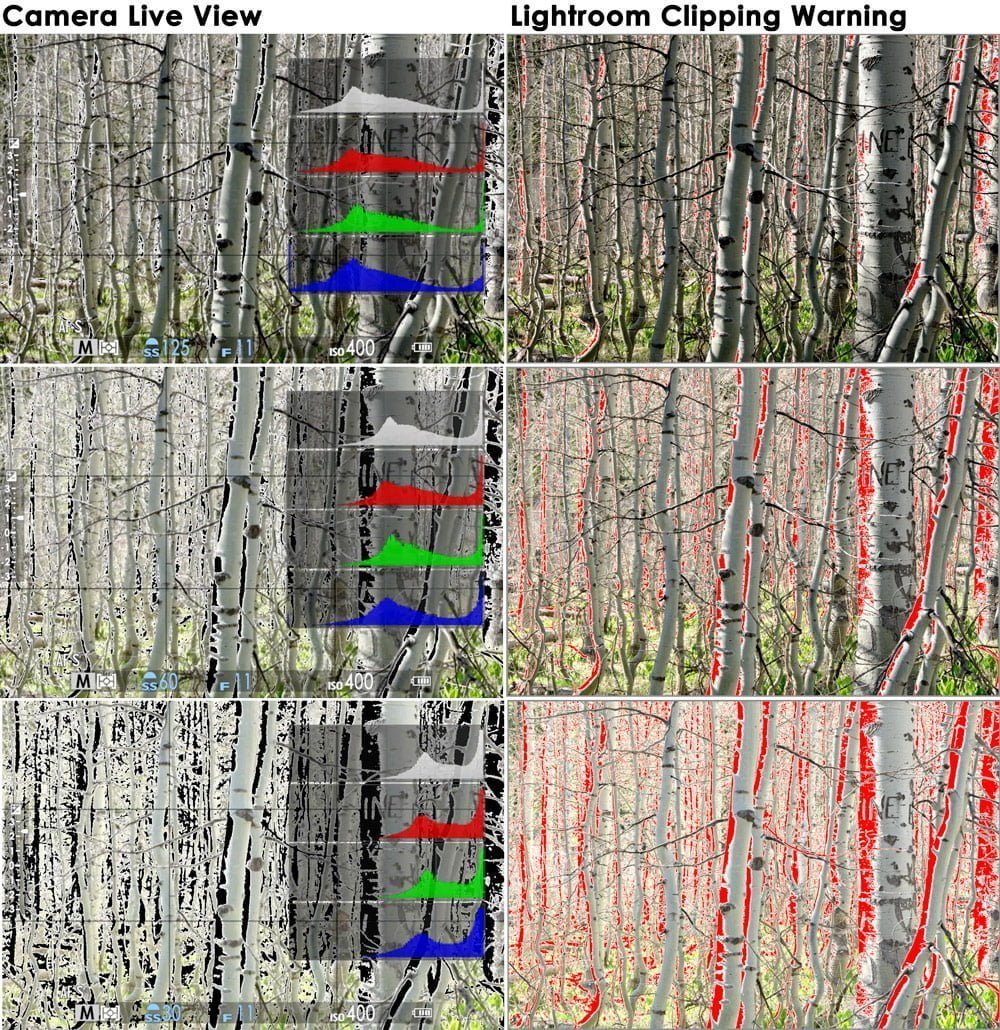
If you're coming from another camera system (like Sony), you may think that you have some padding there, like an early warning. But that's not the case here. When you see those warnings, your highlights are overexposed. Pure white.
So once you see those start to appear on your screen, bring the exposure back down just until they disappear. Unless, again, you're intentionally overexposing those areas.
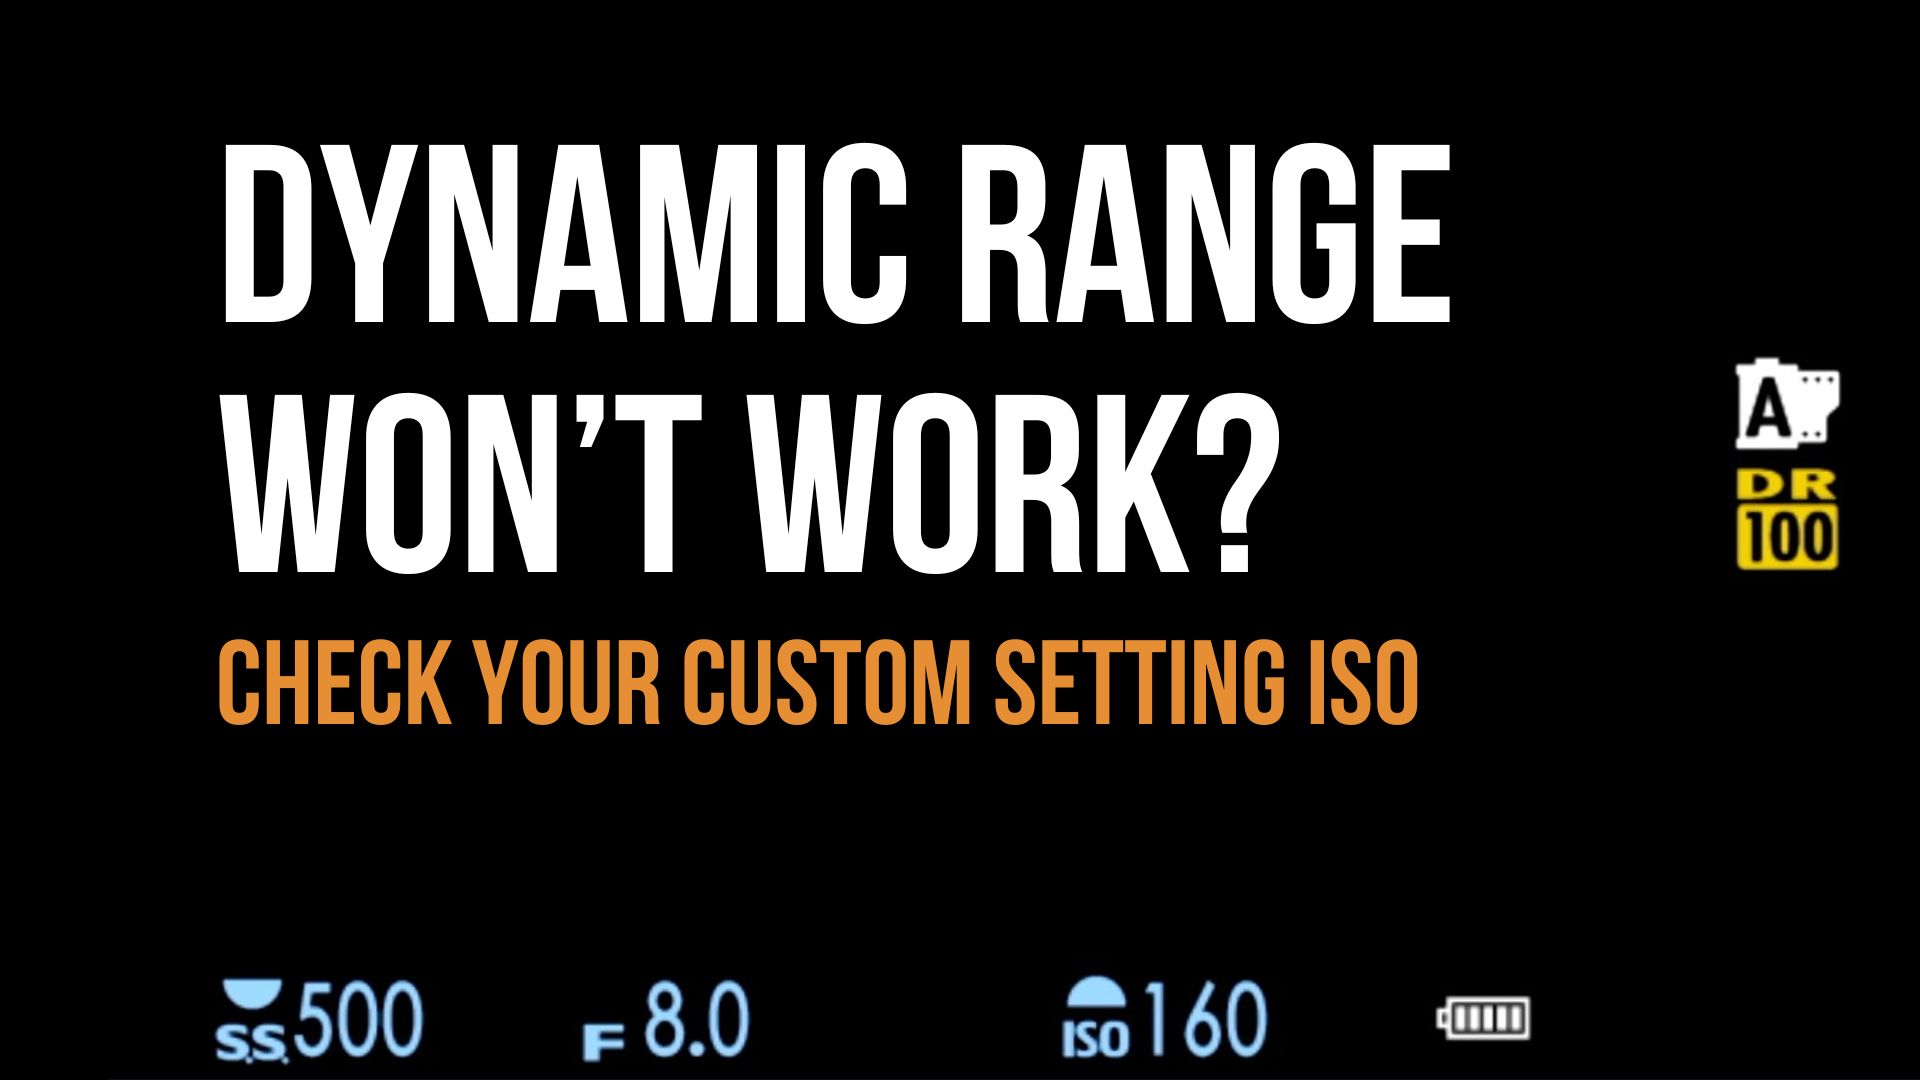
Effects of Dynamic Range Setting
If you're using the Dynamic Range setting (DR AUTO, DR 200, or DR 400), you can actually go just past where the highlight alert starts to appear.
The Live View can't accurately show exactly what the JPEG will look like with Dynamic Range applied - all of that magic happens after the photo is created.
So with that setting enabled, you can actually keep your exposure just where that clipping warning first appears. After the shutter button is pressed, the exposure in those highlight areas will be slightly reduced. Just be cautious when pushing it if you intend to indeed avoid clipping since it's going to be very close.
For RAW photography
Only care about the RAW file? "Exposing to the Right"? Or just more concerned with clipping the highlights in your RAW file?
A common RAW exposure technique is something called exposing to the right. The theory is that you'll get more tonal information per stop if your photo is overexposed than if it's exposed "correctly."
Can't wrap your head around that? Don't worry. Just know that some people will encourage you to push your RAW exposure as far to the right on the histogram as possible without clipping to get the most color, detail, and texture out of that exposure. You'll then bring your exposure back down in post-processing.
Anyways, not the point of this article. How do you use Live View Highlight Alert for a RAW file?
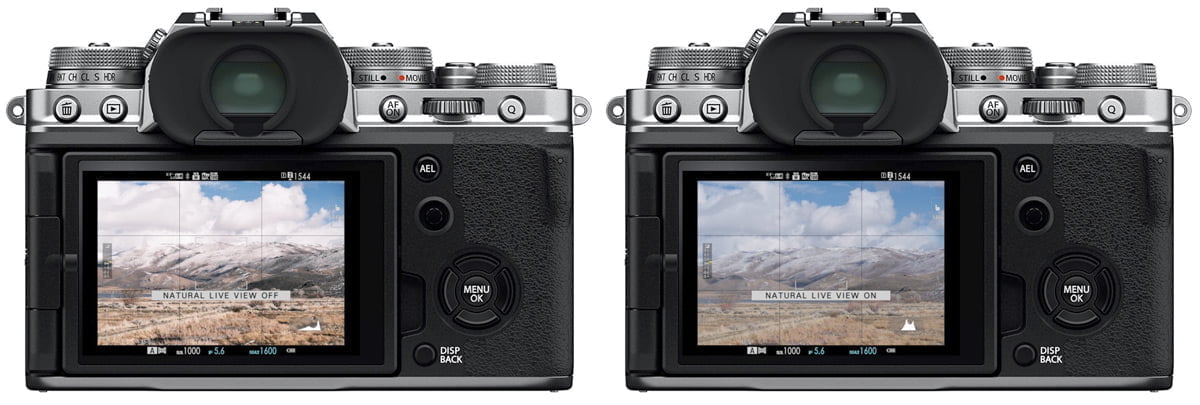
You'll want to ensure that your Live View shows what the RAW file will look like instead of what the JPEG settings would do to it. Depending on the camera, you'll want either
- PREVIEW PIC EFFECT OFF, or
- NATURAL LIVE VIEW ON
You should also set the Dynamic Range setting to DR100 (Off). With any other setting, I noticed that Lightroom gave me a wildly overexposed file, but Capture One gave me a "normal" exposure. The DR setting is written to the EXIF, and every program interprets it differently. Turn it off so you can just get a regular RAW file without the gremlins.
Now, when exposing your RAW file, you can keep pushing that exposure until you see the blinkies. Once you see the blinkies, bring your exposure back down at least a third of a stop or until they're all gone.
Conclusion/TL;DR
Take advantage of Fujifilm's Live View Highlight Alert to help you expose your photos better. Avoid clipping the highlights to retain better color and details in those bright areas.
If you're recording the JPEG file,
- Ensure you have either PREVIEW PIC EFFECT ON or NATURAL LIVE VIEW OFF.
- The Live View Highlight Alert is pretty darn accurate in showing you where your JPEG highlights will be clipped.
- If you're also recording the RAW, you'll definitely have some wiggle room and be safer from clipping than your preview shows.
If you're only recording the RAW file,
- Make sure you're getting the "natural" live view with either PREVIEW PIC EFFECT OFF or NATURAL LIVE VIEW ON.
- Set Dynamic Range to 100.
- The Live View Highlight Alert doesn't give you any wiggle room, so when you see the clipping warning, back off at least a third of a stop.
Let me know if you have any other questions or comments about the Live View Highlight Alert below!
Great explanation, thanks! I wasn't aware ot the different setups needed for jpg and raw, but it certainly makes sense 🙂
Yeah I struggled with that for a while because it's not that intuitive in the manuals or camera itself.
Thank you so much for this and your other Fujifilm tutorials. I recently bought a little pocketable XF10 and many of its settings were a mystery to me even after reading the manual but you make it all clear. I knew the XF10 had a good sensor but I had not begun to appreciate the great features it shares with its larger siblings. They must share much of the firmware. When I next buy an interchangeable lens and/or viewfinder camera it will be a Fujifilm for sure!
Great to hear! Yes, they do like to share a lot of features between cameras, even between their entry cameras and professional cameras.
Thanks for this. The information about Dynamic Range was good to read...I thought that if I INCREASED my DR, it would give me more information in the RAW file. Am I correct that the DR actually is just a command for JPEG and post camera editing software?
Yes, this setting just tells the camera (and some post-processing programs) how to process the RAW file. The data that is recorded by the sensor and captured in the RAW file isn't changed.
Excellent! I learnt how to do away with the constant (and irritating!) blinking while still being able to use the 'blinkies' with the Histogram!
Yes it's a nice little hidden feature!
Weirdly the highlight alert shows more areas blown out when you press the focus button (even if the camera is already at the max aperture). So which one should we go by?
Go with your original composition exposure before pressing the focus button.
Thanks for your explanations.
I‘m shooting with my X-T4 only raw, FW 1.23, but using natural live view OFF gives me the most consistent histograms/highlight alerts from aiming, shooting, playback in cam up to LR (iPad).
DR 100%/off.