How to Use Structured Keywords for Photo Organization (Photo Mechanic)
Disclosure: This post may contain affiliate links. I earn a small commission of product sales to keep this website going.
You've finally started adding keywords to your photos after realizing how much they help you organize your expanding collection of photos.
But adding one keyword at a time is tedious. Trying to remember all of the keywords related to another keyword - synonyms, etc - can be quite a task.
But do you know about structured keywords? I hated keywording my photos until I discovered structured keywords. Now it's, dare I say, fun!
We'll look at how to use structured keywords in Photo Mechanic & Photo Mechanic Plus, hands-down the best photo editing programs.
Lightroom Classic has something kinda similar called keyword hierarchies, and I'll add a little at the end about that.
Continue reading or watch the video:
What are Structured Keywords?
Think of structured keywords as like a folder hierarchy on a computer, or for the biologists, animal taxonomies. A duck is always a bird, and it's also always an animal. But an animal is not always a duck.
Structured Keywords For Tunnel View at Yosemite National Park might have a hierarchy that looks like this:
United States > California > Mariposa County > Yosemite National Park > Yosemite Valley > Tunnel View
See how it goes from largest to smallest? From the macro to the micro?
Using structured keywords, when you want to keyword a photo taken at Tunnel View, you just double-click on Tunnel View in your structured keywords list. Photo Mechanic will automatically apply Tunnel View, Yosemite Valley, Yosemite National Park, Mariposa County, California, United States because those are Tunnel View's parent keywords.
If you want to keyword a photo taken in Yosemite Valley but not at Tunnel View, you double-click on Yosemite Valley and it will apply the parent path for Yosemite Valley - Yosemite National Park, Mariposa County, California, United States. But not Tunnel View because that is a child to Yosemite Valley.
Why Use Structured Keywords?
There are two main reasons for using structured keywords - organization and efficiency.
Organization
You may not realize it now, but as your photo collection grows, organization is going to be more and more critical.
Start using an extremely detailed organization system now so you're not creating extra work for yourself years down the road!
I speak from personal experience - I wish I started using a system like this from day one.
If I want to view all of my photos of Yosemite National Park, I search for Yosemite National Park in either my Lightroom Classic or Photo Mechanic Plus catalog search bar. All photos with the Yosemite National Park keyword come up.
Or if I just wanted to see photos taken at Tunnel View, I type Tunnel View into the search bar and get photos with the Tunnel View keyword.
This is a reason for using keywords in general, but structured keywords take it to the next level by ensuring all related keywords are also applied to a specific photo.
And if you want to get into stock photography - either with an agency or representing yourself - having this level of detail will help buyers discover your photos.
Efficiency
If I wanted to add all related keywords for Tunnel View without structured keywords, I'd not only have to type in all of those keywords manually, but I'd also have to strain my brain to try and remember which keywords I need to add.
With structured keywords, you can just double-click on the lowest-level keyword and have everything automatically applied.
This becomes a bigger deal when you have multiple subjects/things/ideas in a single photo.
Say you have a photo containing both a location and an animal. You double-click on the lowest-level location keyword and all parent location keywords will automatically be added. Then you double click on the lowest-level animal keyword (like brown bear) and all related animal keywords will automatically be added (like grizzly bear, bear, wildlife, mammal, animal).
A few clicks and you're done.
How to Create Your Own Structured Keywords
You can purchase pre-made Structured Keyword libraries, which are actually a very good time-saving investment and worth the money. Or you can create your own library.
Or you can do both, as I've done and continue to update as I photograph new subjects.
Creating the Structured Keywords File
One of the most efficient ways to create a structured keywords list is to just use an old-fashioned text document on your computer. This is much faster than using the keywords panel interface within Photo Mechanic to create your first list.
You can certainly use Photo Mechanic's keywords panel to modify your list after it's created, say if you want to add another keyword later, but that can be tedious for large jobs like creating a main list.
So open up a text file. Use plain text format, not rich text format.
Type your top-level keyword on the first line.
If you want it to be a category, and not a keyword that's applied to the photo, put it in square brackets. So for our Yosemite example, instead of United States on the top line, maybe I'll put Locations there so that this keyword hierarchy is within a Locations category.
Each sub-level gets a tab. So I'm going to tab over under [Locations] and type United States. I'm going to go to the next line, tab over twice, then type California. On the next line, I'll tab over three times and type Mariposa County. I'll keep repeating this until I have a good list of keywords to start with.
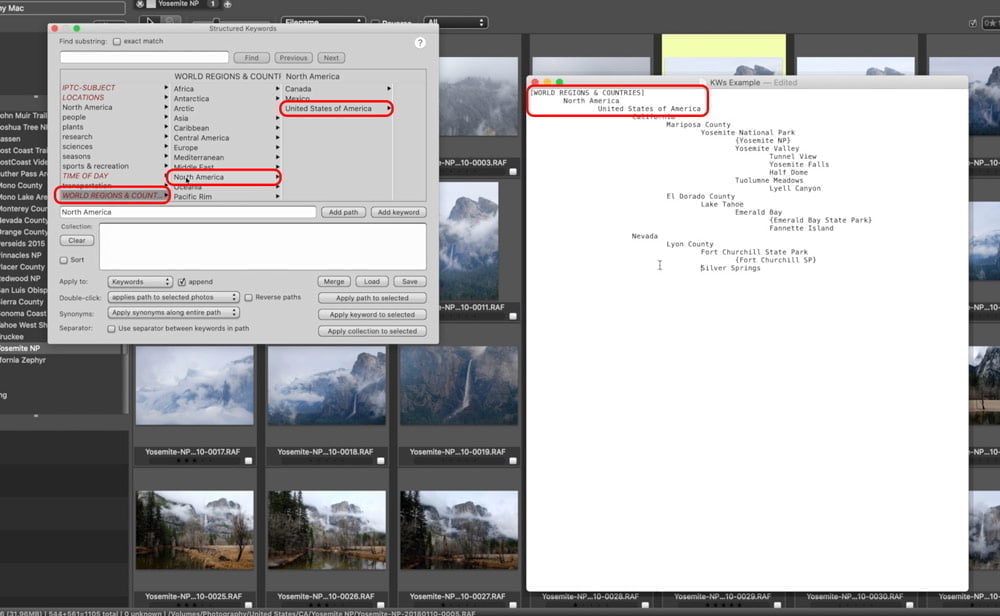
Synonyms go in curly brackets, on a new line, and indented an extra tab from the other word they're a synonym for. Yosemite NP is a synonym for Yosemite National Park; you can see how that looks in the example below.
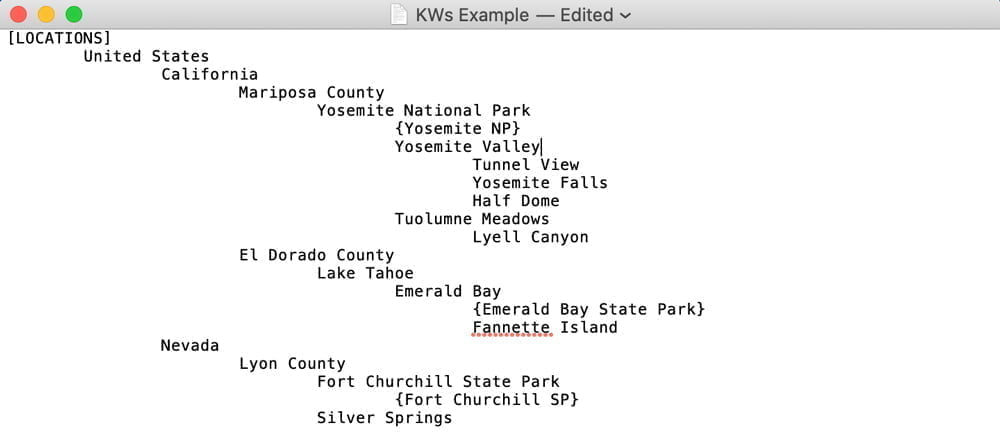
In the example above we have six levels of keywords. This is about as deep as I want to go. Some folks say this is twice as deep as it should be. Some folks will go even deeper. You do what you need to do to have the kind of organization that you want.
Importing into Photo Mechanic & Photo Mechanic Plus
Importing a structured keyword list into Photo Mechanic takes some care, especially if you already have structured keywords (new versions of Photo Mechanic do have a basic list already).
Open up the Structured Keywords panel (Opt+Cmd+K [Mac]/Ctrl+Shift+K [PC]) and take a look at the lower-right.
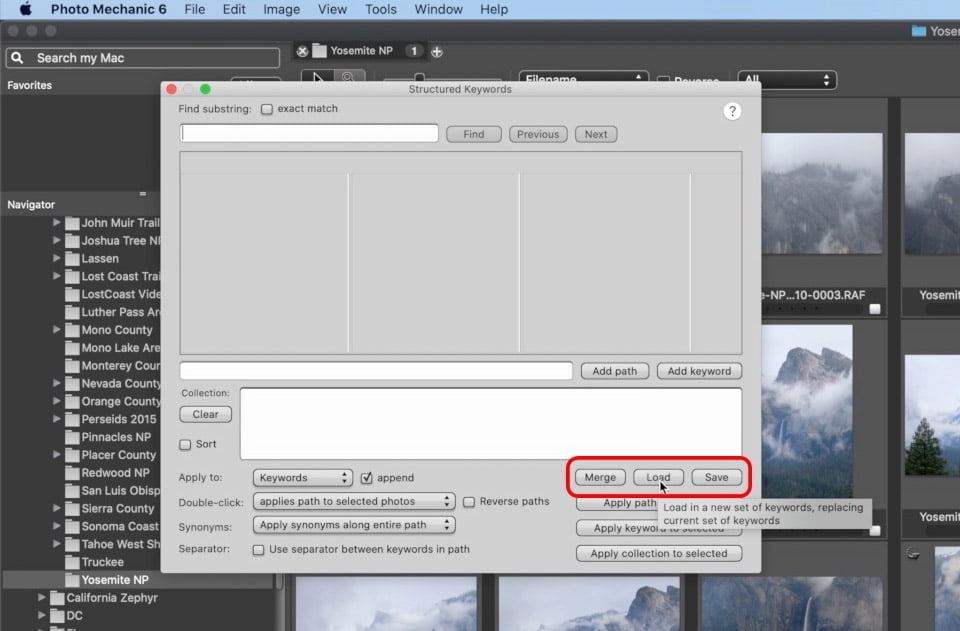
If you have existing structured keywords, save your current list! Click on Save and put it in a safe location. You can re-load your old list if anything gets jacked up during the import (another personal experience heartache).
Then you'll click on Merge and select the structured keywords text file you want to import.
Only use Load if 1) you're starting from scratch or 2) you want to overwrite your current keyword library with the new one you're importing. Load will erase your current keyword library!
A note about merging. The top-level keyword in your text file will be added as a top-level keyword in your Structured Keywords library when you Merge. If you want to merge within an existing structure, you'll need to include all parent/top-level keywords in your text file, letter for letter. In the example below, to merge my file within an existing library, I need to include what's above it.
Using Structured Keywords
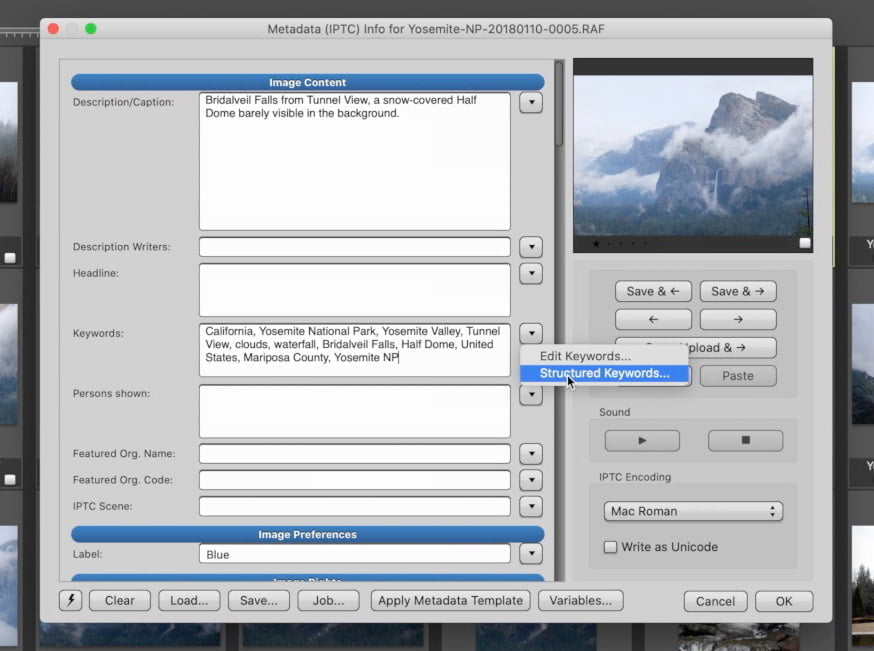
Now when you want to add keywords to a photo, select that photo (or photos) and open the Metadata IPTC Template (Ctrl/Cmd + I). Using the arrow next to the Keywords field, select Structured Keywords.
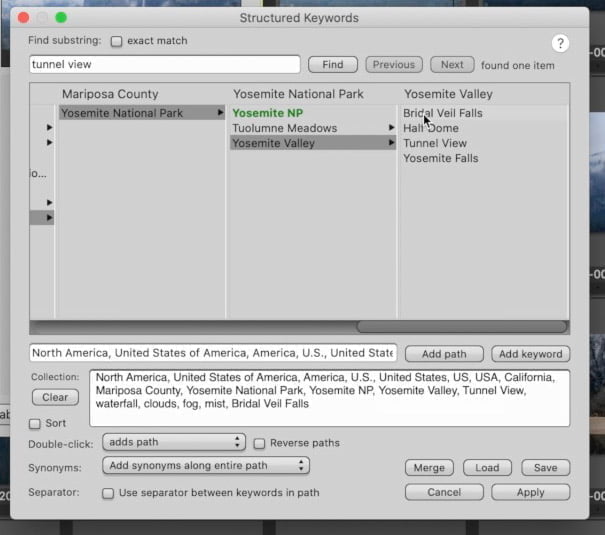
To start, enter a search term for something that's in your photo. In this case, I'll type in tunnel view. All associated keywords come up.
Notice Yosemite NP in green - that means it's a synonym for the parent, Yosemite National Park.
If I double-click on Tunnel View, that entire path containing that keyword will be applied, including synonyms.
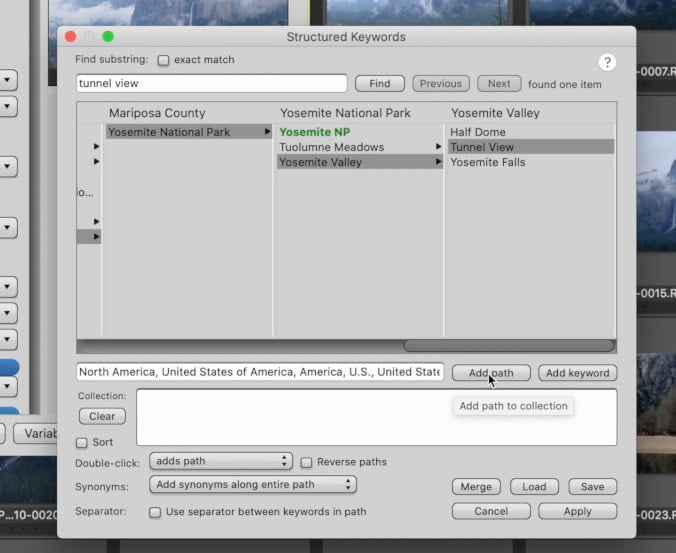
If you only want the one keyword added, and not the entire path, go to the bottom where you see Double-click and set that to adds keyword instead of adds path. You can also choose to ignore synonyms using the drop-down below that.
Once your keyword paths are in the Collection - and you can repeat for as many paths are applicable - you can add the one-off keywords applicable to that photo that may not appear in your library. For example, here, I just typed in waterfall, clouds, fog, and mist.
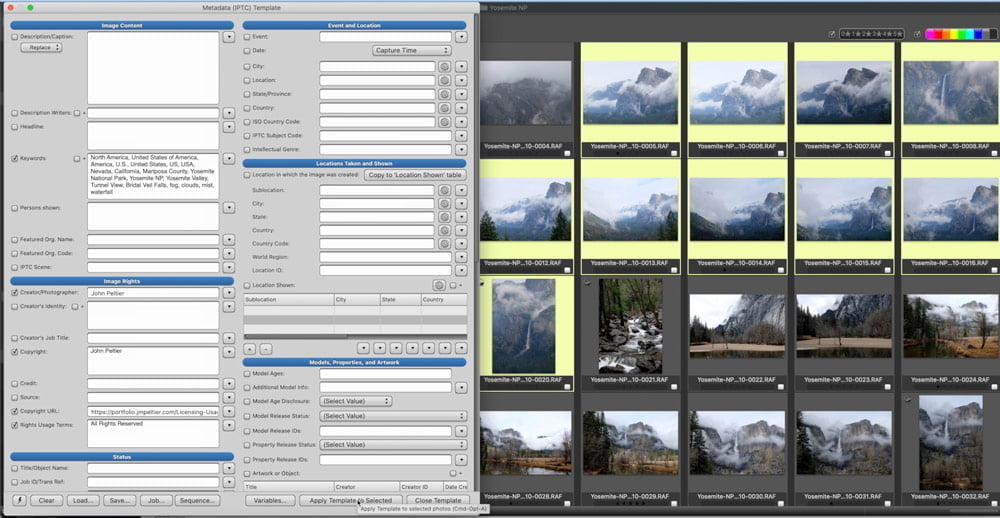
When you're all done, be sure to hit Apply! Then in the Metadata IPTC Template, be sure to hit either Save or OK for a single photo, or Apply Template to Selected for multiple photos.
Editing Structured Keywords
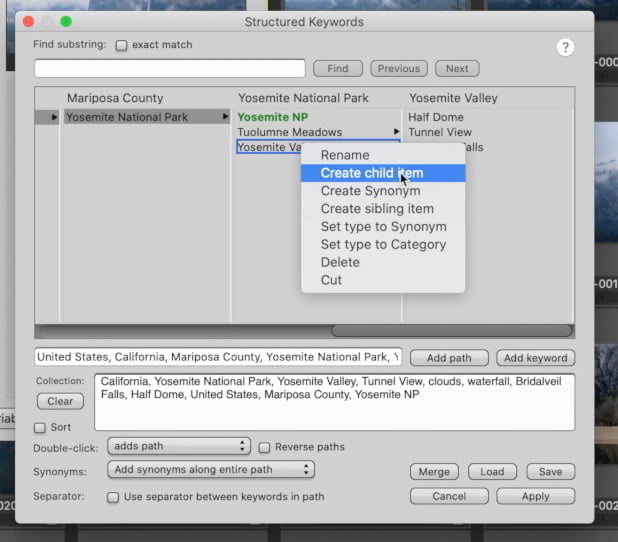
In the example photo above you might notice that I added Bridal Veil Falls, which wasn't in the original file that I added. How'd I do that, and how do you add keywords after loading a file? Like if you forgot something?
If you right-click in those keyword panels you'll get a flyout menu with a bunch of options.
- Rename renames any keyword, category, or synonym that you right-click on.
- Create child item creates a keyword underneath the level you right-clicked on.
- Create Synonym creates a synonym for a keyword you right-click on.
- Create sibling item creates a keyword in the same level you right-clicked on.
- Set type... allows you to change what you right-clicked on to a keyword, synonym, or category.
- Cut allows you to cut a keyword and paste it elsewhere as either a child or sibling, like if you need to move something.
- Delete deletes it.
What about Lightroom?
Yes, you can also create something similar for Lightroom Classic (not Lightroom CC, yet).
Create your text file in a similar manner. Square brackets for categories are ignored. Curly brackets for synonyms are preserved.
You'll import your hierarchal keywords into Lightroom Classic in the following manner:
- Go to the Metadata menu
- Click on Import Keywords...
- Navigate to your plain text file and open it
After you open it, verify it's all there. Go to the Metadata panel, expand your Keyword List, then look for the top level keyword in your list. All sub-levels should be there.
The similarities end there, though. You can still right-click on a keyword to edit it or add it to a photo. But the paths are not automatically applied.
Anything to add?
If I missed anything, or you have any questions or comments, please leave them below!
Structured Keywords are an amazing way to quickly & efficiently organize your photo collection. And you'll be glad you started using this technique early in your photography life!