Importing, Editing, and Metadata with Photo Mechanic
Disclosure: This post may contain affiliate links. I earn a small commission of product sales to keep this website going.
There's a large number of photographers who want nothing to do with Adobe Lightroom, the "industry standard" for cataloging, editing, and processing photos.
Thankfully there's another - and I would argue, better - option for the importing, editing, and metadata steps. If you're looking to jump from Adobe, or want to explore other options, here we'll look at how to use Photo Mechanic for importing, editing, and adding metadata to your photos.
Importing Photos
In Photo Mechanic, "importing" is called "ingesting". And it's a little different than Lightroom. Okay, quite a bit different.
Ingesting all photos from a card
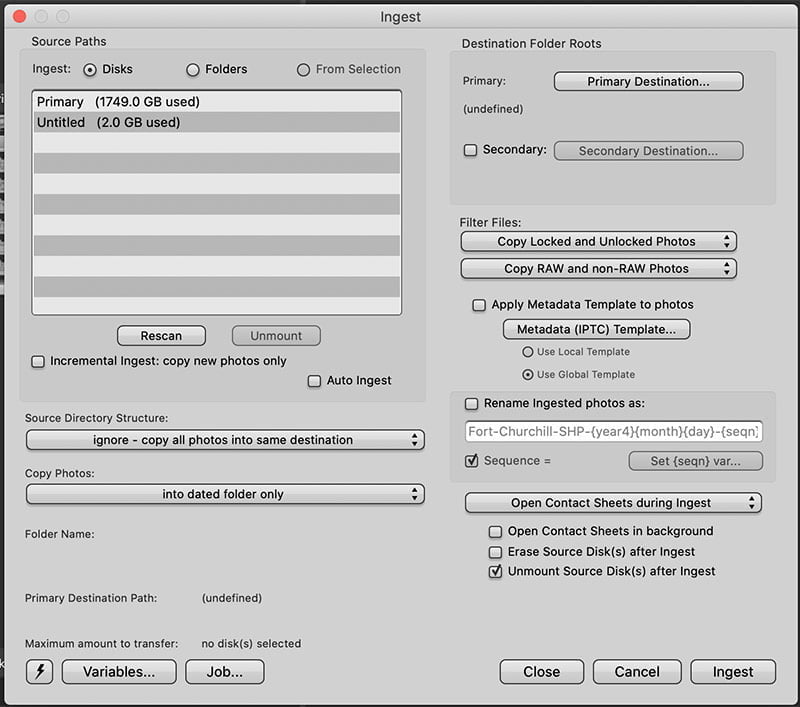
When you insert a memory card, hard drive, or connect a camera via USB, the Photo Mechanic Ingest dialog should automatically open up. If not, go to File > Ingest (Mac/Windows command hotkey + G).
When the Ingest dialog will opens up, you'll notice on the upper left you can select your source path. As a default, the only available options are "from a disk" or "from a folder". You can't select which individual photos you want to ingest! *Gasp* Read on to the next section to learn how to do this.
But perhaps importing all photos from your card is good enough. If you're routinely formatting your memory card like a smart photographer, you shouldn't have year-old photos on that card that you don't want to ingest into Photo Mechanic. Select the card/folder containing your photos.
You could also select Incremental Ingest, which in theory will only ingest photos that haven't been ingested yet, but you still can't see which photos those are.
Ingesting selected photos
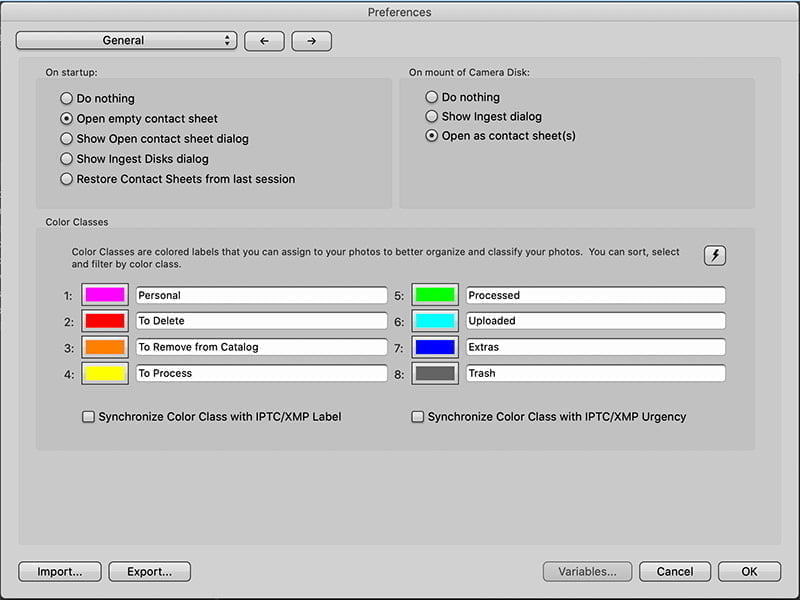
If you do want to select which photos you're going to ingest, you'll need to open that source as a contact sheet. To enable this, go to Preferences > General and select "Open as Contact Sheet(s)" under On mount of Camera Disk.
Once that's done, then connect your camera/card to your computer. Photo Mechanic should then automatically open up a contact sheet with all of those photos. Select the ones you wish to import. You can sort by name, size, camera, etc.
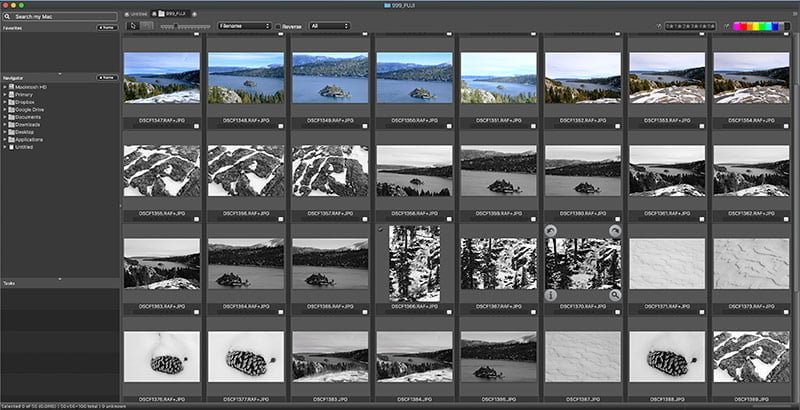
If that doesn't automatically happen, go to File > Open Contact Sheet... (command hotkey + O). Select the photos you wish to ingest, then select File > Ingest From Selection.
Setting an import destination
Photo Mechanic lets you ingest files into a primary destination and backup destination all at once. You'll set these under Destination Folder Roots in the upper right.
Select Primary Destination... and set the destination path for your photos. Do the same for Secondary if you wish to create a backup right now.
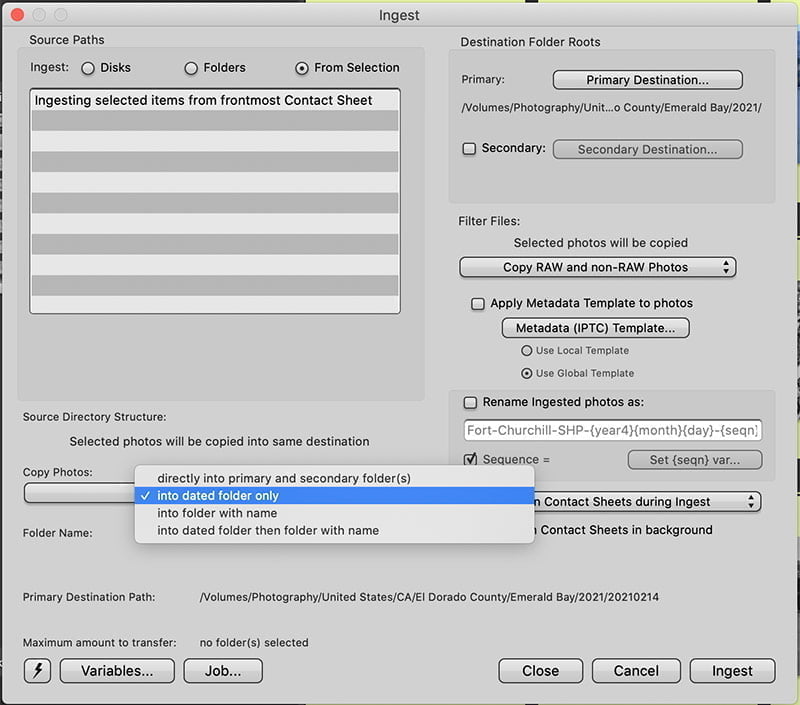
Then go back to the lower left to choose a subfolder for the photos you're ingesting. All of the photos you're ingesting will go into this subfolder.
For example, I like to have all of my photos in a Date subfolder. A subfolder in whatever folder structure I sent them to, which is named after that day they were captured.
So if I'm ingesting photos that were captured over two days, September 7th and 8th 2020, the photos would be sent to respective subfolders called 20200907 and 20200908.
This is set under Copy Photos. You can choose to forego any subfolders, automatically create a dated subfolder, and/or create subfolders with custom names.
Once you have all of this sorted out, check where your files are going using the example path at the bottom of the Ingest dialog (Primary Destination Path).
Adding Metadata template
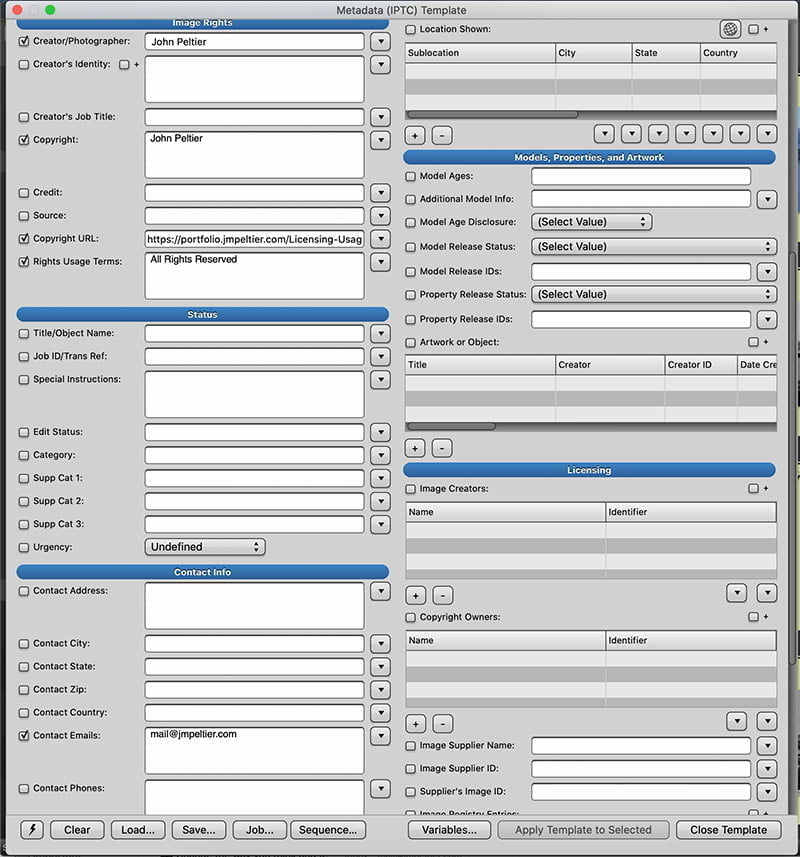
Add a little metadata now rather than waiting to do it all later! You can do this under Apply Metadata Template. It's another way to make your Photo Mechanic ingests more efficient.
I prefer to check Use Local Template, which means that the metadata I enter here will be my "ingest" metadata set. This separates it from any other metadata work I do elsewhere in the program.
Some fields I'd recommend filling out here as a minimum:
- Creator/Photographer
- Copyright
- Copyright URL & Rights Usage Terms (for Google "Licensable" badge)
- Contact Emails
- Contact Web URLs (for Google "Licensable" badge)
Once these are filled out, hit Save... so all this information is now stored in a template you can open at a later time if you need to.
I also take this opportunity to add Keywords that apply to all photos in the Ingest. So if all photos were taken in Emerald Bay, Lake Tahoe, I would add those keywords in the Keywords field and ensure there was a checkmark next to it. I wouldn't try to add more specific keywords that only apply to a few photos out of the bunch, like "sky" or "island".
We'll learn more about keywords in Photo Mechanic at the end here.
Renaming photos
The final step is to rename your photos during ingest into Photo Mechanic, so you have file names that make sense rather than DSCF0281.RAF.
Check Rename Ingested photos as... then enter some custom text that describes the photos. For my Emerald Bay photos, I might enter Emerald-Bay-SP.
Add some dynamic variables that append other information automatically. For example, Photo Mechanic will pull the date of the photo and append it to your custom text. You can check out the available variables by hitting the Variables... button at the bottom. These variables go in curly brackets.
For example, I like to append a four digit year, month, and day to my custom text so I know when those photos were made by looking at the file name. This looks like -{year4}{month}{day}- in this field and would ingest as -2021126- for January 26th, 2021.
And then finally we add a sequence number to the end of the filename. This variable is {seqn}. Be sure to set and reset the sequence number prior to each ingest! Do this under the Set {seqn} var... button, and be sure Sequence is checked.

My final file names would look like Emerald-Bay-SP-2021126-0001.RAF, Emerald-Bay-SP-2021126-0002.RAF, etc.
Once all that looks good, Ingest!
Editing Photos
Photo Mechanic is sooooo faaaaast compared to Lightroom! If half of your time editing (picking selects) in Lightroom is waiting for the photos to load, you can edit in Photo Mechanic in half the time.
Setting up
Photo Mechanic allows you to set custom color labels and keyboard shortcuts. We'll do that now so our lives are easier when making our selects and trashing rejects.
Open up your Preferences. In the General tab, you can rename your Color Classes if you want certain colors to mean certain things. I changed a few things from the defaults; do what makes sense for you.
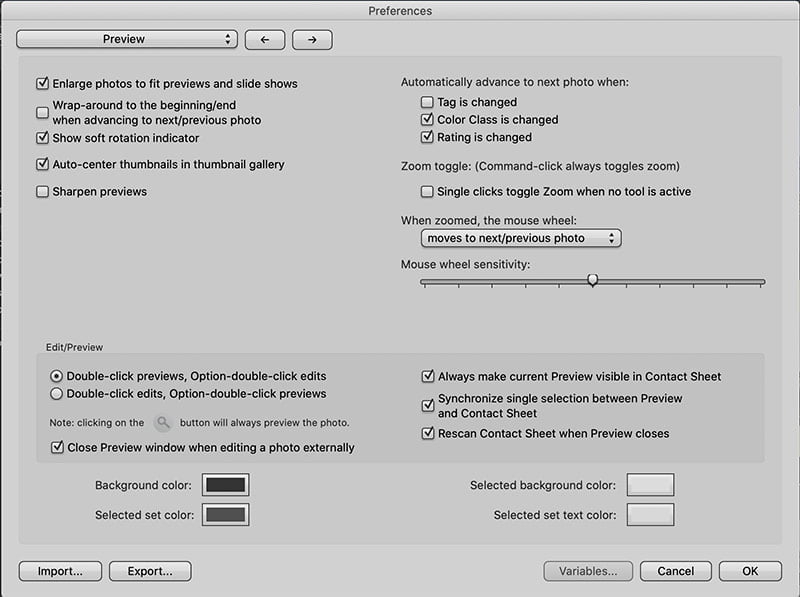
Then go to the Preview tab. For faster editing (selections), put checkmarks next to Color Class is changed and Rating is changed under Automatically advance to the next photo when... Now when you're going through your photos and making your selects from the Preview pane, Photo Mechanic will automatically go to the next photo when you assign a Color or Rating to the current photo. One more way to speed up the process.
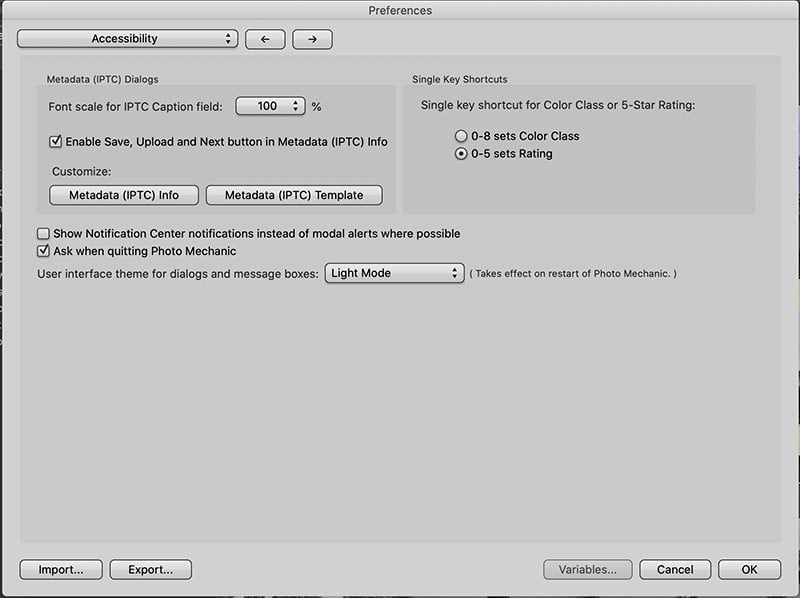
Finally, go to the Accessibility tab. Do you want the keyboard numbers 0-8 to set your Color Class, or do you want the keyboard numbers 0-5 to set your Star Rating? Set that under Single Key Shortcuts. I keep it set to Star Rating since that's what I use the most. You can use the command hotkey for the other one (Cmd+8 sets Gray Color Class when Star Rating is checked here).
Make your selects and trash your rejects!
Oh man, there are so many ways to edit, the process of making your selections.
Do whatever makes sense to you, or if you're coming from Lightroom, use a similar system here.
On the first sweep, you can go through and identify the files you want to trash by using the Gray Color Class (or whatever color you assigned to the trash photos). The photos out of focus, duplicates, etc. Then use the Sort feature to show you only those photos, and delete them off your disk. Sayonara, they're no good to you.
On the second sweep you could assign one star to the photos you want to keep but probably won't process. Assign two stars to the photos you want to keep and will consider processing/adding to your portfolio.
On the third sweep you can start by hiding all the one-star photos. Then "promote" to three stars the two-star photos you definitely want to process/add to your portfolio.
That's just an example. You get the picture, so to speak. However you decide to do it, Photo Mechanic can make the process fast and efficient. Use the hotkeys, and let Photo Mechanic advance to the next photo when you make your decision.
Adding Metadata
Once I've identified the photos I want to process, then I add more detailed metadata to those photos.
When you select a photo, hit the little "i" in the lower left of the thumbnail. This will bring up the metadata for that photo.
If you want to add the same metadata to several photos, select those photos then go to Image > Metadata (IPTC) Template. Or use the command hotkey + I.
Add a description for that image under Description/Caption. Amplifying information that will inform viewers who weren't there and might need more context.
Then add more specific keywords in the Keywords field than what you may have added during the Ingest.
Structured keywords
Photo Mechanic has this awesome thing called Structured Keywords. Yes, Lightroom has it too, but I've always hated that interface. The interface here is much clearer. Simple directions are in the next few paragraphs; this post goes into much more detail about Structured Keywords.
Structured Keywords are kind of like folder hierarchies but for keywords. For my Emerald Bay photos, which were taken in Lake Tahoe, El Dorado County, California, U.S., North America, that is my keyword hierarchy. And you can easily create your own Structured Keywords.
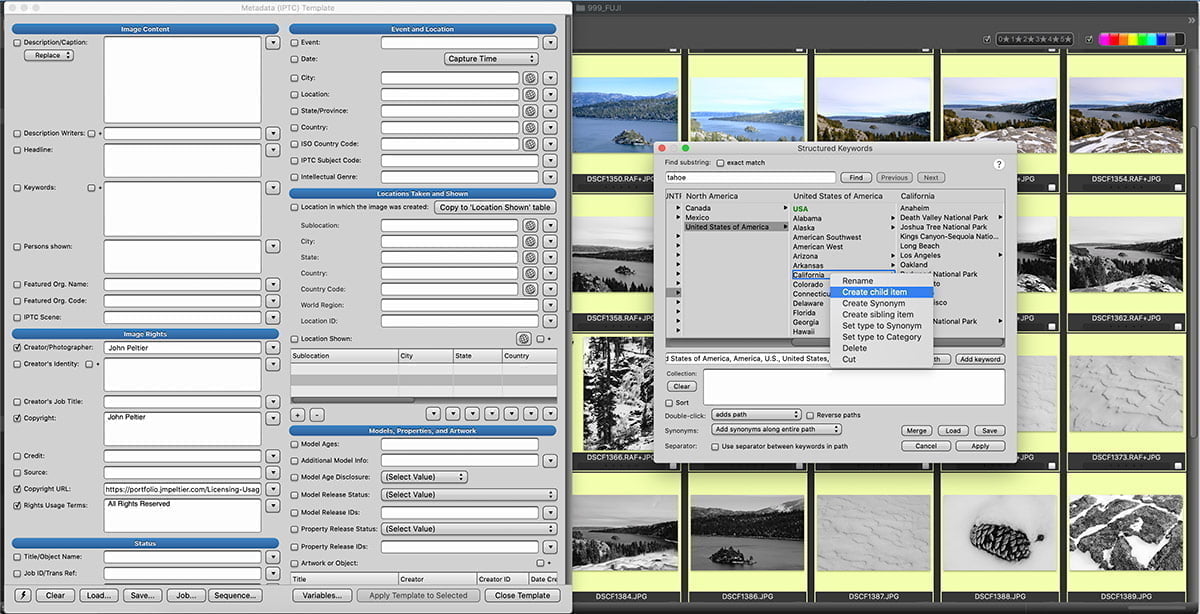
Open up the Structured Keywords dialog. First, use the Find feature to see if your keyword categories already exist in Photo Mechanic. You can also purchase a Controlled Vocabulary for an extensive library of common keywords used in stock photography.
I have a California keyword category within United States, but no subcategories that match my needs after that.
So I'm going to right-click on California and choose Create Child Item. This will create a sub-keyword under California. I'm going to type in El Dorado County. I'm going to create a Child Item under here named Lake Tahoe. Under that, another Child Item called Emerald Bay. And then another child item under that called Emerald Bay State Park.
Now, because all of these photos were made in Emerald Bay State Park, I'm going to double click on that Child keyword. All Parent keywords above that will automatically be added to this photo. If the photos were made in Emerald Bay but not within the state park, I'd double-click on the Emerald Bay child keyword (not Emerald Bay State Park under that) to have that and all parents added.
It's a great way to get specific within a subcategory/keyword and have everything above it added, ignoring things below it that don't apply. This is the Add Path option; Add Keyword will only add that specific keyword.
You can keep doing this process for each photo, adding multiple structured keywords to a single photo, then use the text dialog to add your own random keywords that you haven't put in your keyword library.
Then just hit Apply to add all of those keywords to that photo(s)!
Cataloging & Importing into Lightroom
The vanilla version of Photo Mechanic ingest is not a database utility. You can't search through all of your photos on your hard drive using any of the sort or search features. It's just a highly-advanced image browser and editing utility. For the actual database/catalog function, Photo Mechanic Plus is the version you're looking for.
You can read this article about how to catalog your photos in Photo Mechanic Plus.
But I'm willing to bet many of you will want to process your photos in Lightroom, one of the things this program does well. Once you've imported into Photo Mechanic, edited, and added all of your metadata, then you can import to Lightroom Classic for the processing (this article explains how to do this with Capture One).
Upon selecting Import, navigate to the folder on your hard drive containing the photos you just edited in Photo Mechanic. Select the ones you want to import into Lightroom. Make sure Add is selected at the top of the Import dialog - not Move or Copy! We're only adding existing, edited files to our Lightroom catalog, not making any copies.
And you're on your way! I hope you find this a much more efficient, faster way of doing these first few steps of the post-capture process, as myself and countless other photographers have discovered.

Hi John,
I've just found your blog and started reading some articles, ones about Photo Mechanic (Plus) and Capture One to process my Fujifilm images.
Just thought I'd mention a possible flaw in your image renaming process, in particular the date portion.
"This looks like -{year4}{month}{day}- in this field and would ingest as -2021126- for January 26th, 2021."
Using the above sequence could cause confusion, as it could also be read as November 6th, 2021. You'd be best to use 8 digits for the date, as in YYYYMMDD, or 20210126, this would create a unique date. I would suggest -{year4}{month0}{day0}, or {datesort}, which would generate the same.
Just a suggestion.
Sorry had a brain fart there.
Make that December 6th, 2021 not, as I've written November 5th, 2021.
Sorry old timers setting in.
Hi John
I'm using Photomechanic6 Trial version... i add data to the metadata template to save for later use.
When i save a couple more templates with different keywords etc... i can see where I saved them to in my folder with the other ones... however, when i click on the image tab and select Metadata (IPTC) Template, a blank template opens up (all good)... however when I click the Load button, there are NO templates to load (or cant find them to load), even though I can see them when I save them to the folder.
Is this a Trial Version thing?.. e.g. it wont show and let you Load templates until I purchase the software??... or even though they are saved to my folder... do you have to load them from another folder, different to where you first saved them?..(or where do they actually reside so that I can load them and apply the metadata to a new images / photos??
Any info greatly appreciated.
Kind Regards
Super helpful. Thank you.