Disclosure: This post may contain affiliate links. I earn a small commission of product sales to keep this website going.
I was finishing up my Fujifilm X100V tutorial course and realized the manual – per usual – does a poor job at explaining what the Corrected AF Frame does.
This is a menu option found in all Fujifilm cameras that have an Optical Viewfinder (OVF), like the X-Pro series and the X100 series. And if you want to use the OVF, it’s important to understand how to also use the Corrected AF Frame.
Viewfinder Parallax
Take a look at the front of your camera. The lens and the optical viewfinder don’t line up, right? Well, neither will what you see through the viewfinder versus what the camera records through the lens.
This is parallax, and the effect is most extreme at close distances but becomes negligible as your subjects are further and further away. If you’re looking through the viewfinder at something really close, the camera is going to see a different picture.
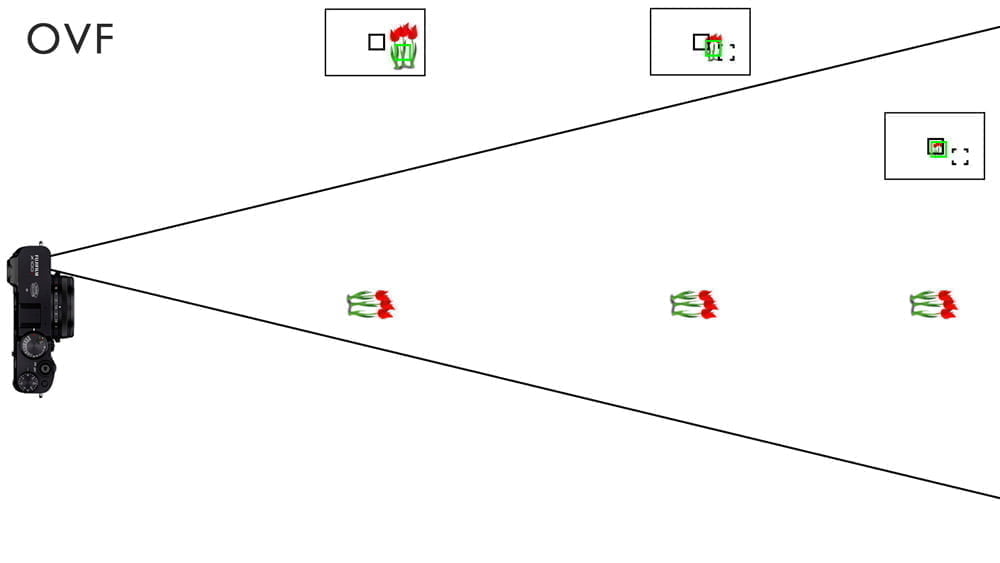
Let’s look at a simple diagram. The solid line represents our view through the OVF and the dashed line represents what you’d see through the EVF (which is what the lens sees).

Notice how when those flowers are really close, and they’re centered up in the OVF, the camera lens only captures part of them. That’s because of the extreme effect of parallax up close.
But when they’re far away now they’re both more or less centered in the frame.
What Does Corrected AF Frame Do?
The Corrected AF Frame tells you where to move the camera to focus on your subject, especially at closer distances. Kinda.
When you turn this ON in the AF/MF SETTING menu under CORRECTED AF FRAME (last page), you’ll see two focus areas in the OVF.

The upper-left focus area (the solid box when using SINGLE POINT) is where your camera would focus on an object at a distance of infinity (or, just, far away).
The lower-right focus area (the dashed box when using SINGLE POINT) is where your camera would focus on an object at the minimum OVF focus distance, which is 50cm, or 1.6 feet for most cameras.
The Corrected AF Frame is below and to the right of the other focus area…hey, that’s where your lens is in relation to the OVF!
How to Focus with Corrected AF Frame
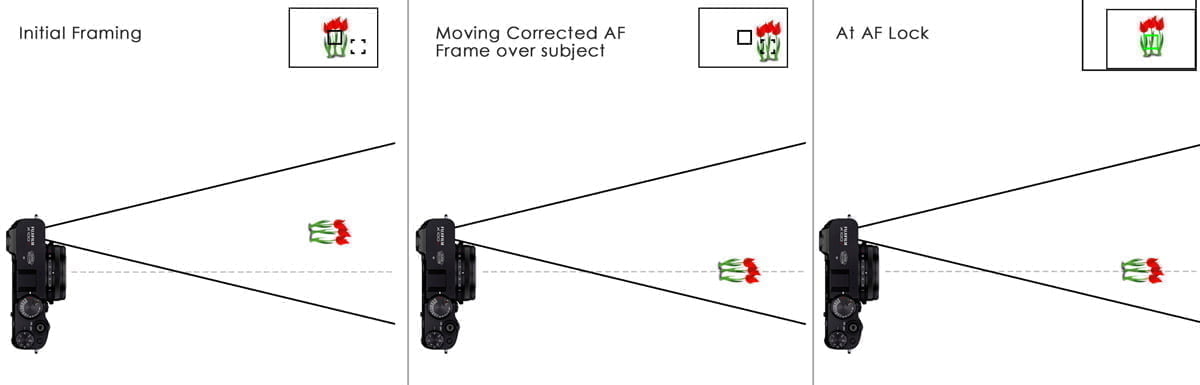
The Corrected AF Frame isn’t a perfect guide. But it gives you a better chance of making sure your Active Autofocus point (where the camera focuses) is actually on your subject when looking through the OVF.
If your subject is really far away, put it under the AF Frame to the upper left (infinity distance).
If your subject is really close – like 50cm, or 1.6 feet for my American friends – put it under the Corrected AF Frame to the lower right.
But what about if your subject is in between those distances? Put it in between the boxes. Draw an imaginary line between the two frames and put it somewhere along that line. The closer your subject is to you, the closer it should be to the Corrected AF Frame on the lower right. The further it is, the closer it should be to the AF Frame on the upper left.
Then command autofocus with a shutter half-press or using the back autofocus button. When you do that, the camera will focus along that line from the Corrected AF Frame to the AF Frame at infinity. Upon lock, the Infinity frame will disappear and you’ll see a green box where the camera locked focus (Active Autofocus point).
If your subject is really close, the composition frame will also jump to show you what your final framing looks like at that distance, as shown below (upper right of the diagram).
Here’s a diagram of the relationship for subjects at different distances:
You can also use the joystick or touchscreen to move the AF Frame in the OVF like you can when using the EVF or LCD.
Resetting the Corrected AF Frame
When the autofocus locks and the Active Autofocus point turns green, the AF Frame you see in the OVF after that stays at that focus distance – the distance the autofocus determined, not infinity. The dashed Corrected AF Frame will still be to the lower right of that.
Turning the power off doesn’t reset it. To reset that AF Frame on the upper left to infinity, point the camera at something really far away and command autofocus.
But if your subject is more or less staying at the same distance after you got that first focus lock, then you’ll have a good AF Frame to work with for subsequent photos and won’t need to “guess” using the Corrected AF Frame.
What About Manual Focus?
You won’t see the Corrected AF Frame when using the Electronic Rangefinder in Manual Focus. The focus frame you see in the OVF will be corrected based on your manual focus distance. The magnified focus area, which will use whatever MF Assist you have set, will be based on that distance.
I recommend turning on the focus distance scales for the OVF under SET UP -> SCREEN SET-UP -> DISP. CUSTOM SETTING -> OVF -> AF & MF Distance Indicators.
The Takeaway for Using the Corrected AF Frame
Assuming you want to put your subject in the center of your final photo:
- That subject should be in the center of your OVF if they’re far away
- That subject should be towards the bottom-right of your OVF if they’re very close
The Corrected AF Frame will remind you of this, and give you an idea of where you should put your subject in relation to your desired autofocus frame.
- A subject very far away should be under the upper-left frame.
- A subject only 1-2 feet away should be under the lower-right frame.
- Subjects in between those distances should be in between the two frames.
After achieving focus lock, your AF Frame will now be set at that distance. Reset the AF Frame to infinity by commanding autofocus on something very far away.
Watch the video version:
