Disclosure: This post may contain affiliate links. I earn a small commission of product sales to keep this website going.
What are the best settings for the Fujifilm X-T100 for travel photographers? Here’s a guide to the settings that I recommend, accompanied by my reasons why.
This X-T100 setup guide is a small part of my larger guide in the Fujifilm Camera Fundamentals Course. This course is packed full of videos, PDFs, tests, and assignments to help you master your mirrorless camera. This entire course is included in the Fujifilm X Course Membership, and I’m offering my blog readers an exclusive 20% off your first 3 months by clicking this link.
Please note that these are simply my recommendations based on my lengthy experience with mirrorless cameras in travel photography. And not all settings are mentioned here, just the ones that are the most relevant.
Press the MENU button to access these settings, then use the selector buttons to navigate.
Shooting Menu 1
Scene Position: Choose a mode when SP is selected on the mode dial. We won’t be using this in this course.
Advanced Filter: Choose a filter when Adv. is selected on the mode dial. We won’t be using this in this course.
AF/MF Setting: Set up your autofocus and manual focus.
- Focus Area: Move your focus area around. Will vary by situation. We’ll set this using the AF button.
- Focus Mode: Manual, Single Autofocus, or Continuous Autofocus. Will vary by situation.
- AF Mode: Will vary by situation.
- Single Spot: Focus on a single, moveable spot.
- Zone: Focus on an object in a larger, moveable zone.
- Wide/Tracking: Focus on object of high contrast or movement throughout the entire frame.
- Release/Focus Priority: Release. This will allow you to take a photo without a focus lock.
- AF+MF: ON. This will help you refine focus if needed, by rotating the focus dial while the shutter is half-pressed.
- Face/Eye Detection Setting: Face Off/Eye Off. Only enable Face On/Eye Auto when taking portraits because sometimes it detects a face when there is none.
- Pre-AF: OFF. Keeps the autofocus running all the time, even when you’re not ready to take a picture. This will waste your battery and doesn’t have much benefit for travel photographers.
- AF Illuminator: OFF. Turn off the beam that assists focusing in the dark. The camera will boost its sensitivity to aid in focus, which works well, and the light is only an annoyance to your subjects and a waste of battery.
ISO: Adjust the sensor sensitivity. See this post about setting up AUTO ISO in Fujifilm cameras.
Image Size: L 3:2, M 3:2, or S 3:2. Recommend selecting Large 3:2 if only recording JPG. Medium or Small are just fine if you’re recording RAW also, or if the JPG photos are only destined for social media or blogs (no printing).
Image Quality: FINE, FINE+RAW, or RAW. If you only want to record JPG, I recommend FINE to get the most detail out of the photo. FINE+RAW will record a FINE quality JPG plus the RAW file, and RAW only records the RAW file.
Dynamic Range: AUTO. See this post for more details on Dynamic Range.
Shooting Menu 2
Film Simulation: See this post for more on Film Simulations. The X-T100 does not have ACROS.
Film Simulation Bracket: See this post for more on Film Simulation Bracketing.
Self-Timer: Use 10 seconds for getting yourself in the frame, use 2 seconds to stabilize the camera after pressing the shutter for a long exposure.
Interval Timer Shooting: For creating time-lapse photos.
Time-Lapse Move Mode: For creating time-lapse movies.
White Balance: AUTO. Start in Auto, we’ll use a custom button to change it as necessary. See this post for more on White Balance.
Color: Controls color saturation.
Shooting Menu 3
Sharpness & Noise Reduction: Negative numbers apply the minimum amount of sharpening and noise reduction. Use sparingly as over-sharpened and over-“noise-reduced” photos can look awful.
Highlight & Shadow Tone: See this post for more on Highlight & Shadow Tones.
Long Exposure NR: OFF. The cost-benefit of this feature is usually not worth it for travel photography. It will double the time it takes for you to make an exposure.
AE BKT Setting: Frames 3, Step 1, Continuous, – 0 +. In tricky exposure situations, select AE BKT for the drive mode and the camera will take three photos of different exposures so you can choose the best.
Touch Screen Mode: AF or AREA. I’ve found the touchscreen to work much better for controlling focus than controlling shutter release.
Shooting Menu 4
Touch Zoom: I do not recommend using digital zoom.
Mount Adapter Setting: Set the focal length of third-party (not Fuji) lenses.
Shoot Without Lens: ON. Enable shutter release without a lens attached.
MF Assist: Focus Peak Highlight RED(HIGH). Highlights areas that are in focus. Learn more about Focus Peaking in this post.
Photometry: MULTI. Measures the brightness of your scene. Multi works for most travel photographers and is best for everyday shooting.
Interlock Spot AE & Focus Area: OFF. This can result in inconsistent exposures in travel photography if On.
Flash Setup: Set up your flash.
- Flash Mode: Suppressed Flash. We’ll learn to control lighting ourselves in this course.
- Flash Compensation: 0.
- Red Eye Removal: OFF. We’ll learn how to avoid red eyes in this course.
Shooting Menu 5
Movie Setup: Movies are not covered in this course.
IS Mode: 2 – Shooting Only. This helps save your battery with stabilized lenses.
Digital Image Stabilizer: Digital stabilization in movies.
Wireless Communication: Control your camera with your smartphone and transfer photos.
Shutter Type: MS. Only use ES (Electronic Shutter) when you need to be silent, as it can have some undesirable effects.
Electronic Zoom Setting: ON. You can control zoom when the screen is flipped up in selfie-mode.
Set Up 1
Date/Time: Set to your home time zone.
Time Difference: Highlight Local and set the time offset for wherever you’re traveling (+1 hours, -3 hours, etc).
Sound & Flash: OFF. Disable all the unnecessary lights & sounds to better blend in.
Sound Set-Up: Operation Vol. & Shutter Volume OFF. Turn off unnecessary sounds.
Screen Set-Up: Set up your displays.
- Image Disp.: OFF. Reviews every photo on the LCD right after you take it. Turning this Off saves the battery and helps you avoid distractions when shooting.
- EVF Autorotate Displays: ON. Be able to read your display when you rotate the camera.
- Preview Exp. In Manual Mode: ON. See the effects of your settings while in Manual.
- EVF Brightness: AUTO. Great compromise for battery life and vibrance.
- LCD Brightness: 0 or less. Anything higher will rapidly deplete the battery.
- Preview Pic. Effect: ON. See what your JPGs will look like.
- Framing Guideline: Grid 9. Simple “Rule of Thirds” grid to aid composition.
- Autorotate PB: OFF. Make vertical photos take up the whole screen (display sideways).
- Focus Check: OFF. Magnifies your display every time you rotate the focus ring in Manual Focus. This will distract from your composition if On. You can press the Rear Dial to get this on-demand instead.
- Disp. Custom Setting: From Defaults, ENABLE: Framing Guideline, Electronic Level, Histogram. REMOVE: Expo. Comp. (Digit), Image Size/Quality.
Set Up 2
Button Setting: Set up your buttons.
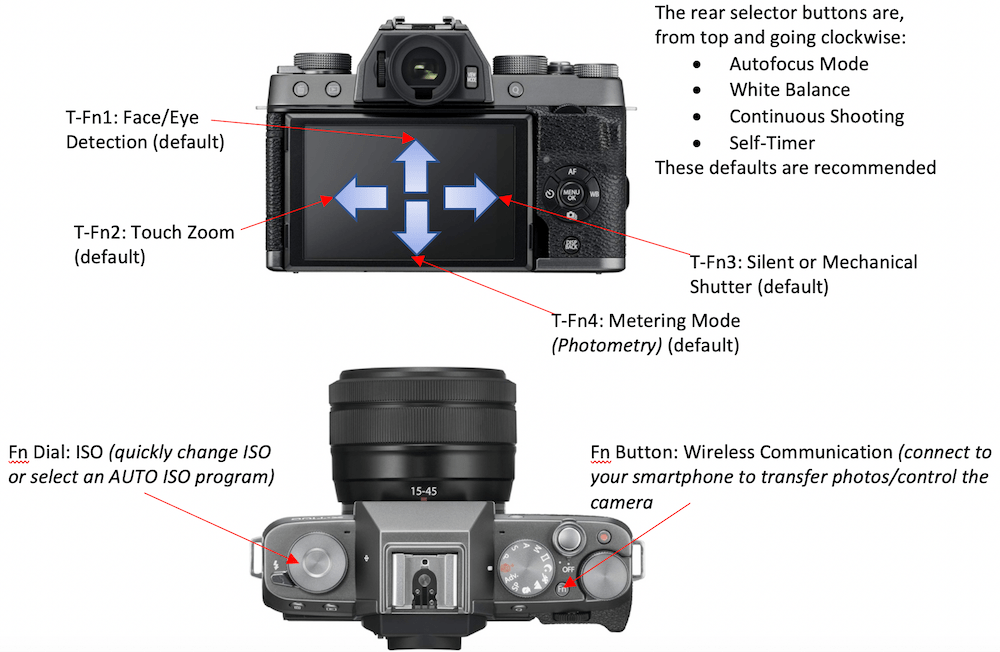
- Function (Fn) Setting: See bottom of post.
- Edit/Save Quick Menu: Your “Q button” Menu. Defaults are fine, see bottom of post for customization.
Focus Ring Operation: Leave on default.
Touch Screen Setting: Turn your touch screen control on or off and set up which area of the LCD screen is active for control while you’re looking through the EVF.
Power Management
- Auto Power Off: 2 MIN. The camera will turn off after 2 minutes to preserve power. You can wake it up by tapping the shutter button.
- High Performance: OFF. The added performance doesn’t really help for travel photography and just drains your battery.
Sensor Cleaning: When Switched On. Sensor “vibrates” loose dust away when you turn it on. If you want your camera to boot up faster when you switch it on, set this to When Switched Off instead.
Save Data Set-up: Setup how your files are saved.
- Frame No.: CONTINUOUS. Keeps sequential numbering when a new memory card is inserted. This helps with file organization, rather than the image number being reset to 0000 on every memory card.
- Date Stamp: Date & Time. Record when you made the photos, valuable for recordkeeping & organization.
- Save Org Image: ON. If you do use red-eye reduction for any reason, at least save another copy of the photo without reduction applied.
- Color Space: sRGB. This gives you consistent colors across all devices your audience may view them on.
Set Up 3
Connection Setting: Setup Bluetooth & WiFi.
- Bluetooth Settings – Bluetooth On/Off: ON. Bluetooth is a very low power draw and there are some smartphone pairing features where this is useful.
- Bluetooth Settings – Auto Image Tagging: OFF. Only tag images for upload that you want to upload.
- Bluetooth Settings – Seamless Transfer: OFF. This will kill your battery and fill up your phone like nothing else. It’s best to do this manually.
- Bluetooth Settings – Smartphone Sync Setting: TIME&LOCATION. As long as your phone is showing the correct time, this is very useful. I do turn off Geotagging manually in the General Settings when I want to protect vulnerable places or populations while traveling.
- Instax Printer Connection Setting: If you travel with an Instax printer – and I love doing that! – this is where you enter your printer’s unique ID for pairing.
- General Settings – Resize Image for Smartphone: ON. Images transferred to your smartphone will be resized to 2048 pixels on the long edge – plenty big for transferring to blogs & social media from your phone. This speeds up the transfer time for multiple photos and dramatically reduces storage needs on your smartphone.
- General Settings – Geotagging: OFF. When you don’t want to record your location. Otherwise, turn it on.
- General Settings – Button Setting: WIRELESS COMMUNICATION. Quickly connect to your phone.
Format: Format before using a new memory card with each camera and before each shoot.
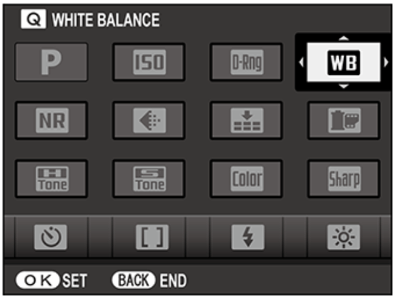
Programming the X-T100 “Q” Quick Menu
The X-T100 allows you to customize your own special menu, so you can access your most commonly used functions by pressing the Q button on the back of the camera.
Why use the Q Menu?
There are some functions that you might want quick access to but don’t have their own dedicated camera button. You can more quickly access these setting instead of having to wade through the menus.
Programming the X-T100 Q Menu
- Press and hold the Q button.
- Use the rear selector pad to select the item you’d like to reprogram and press OK.
- Select the new option you’d like to program and press OK.
- Repeat as necessary.
What to program in the Q Menu
You get 16 items in the Quick Menu. I’m not going to assume to know what you want in your menu, so I can only suggest that you keep mental notes on the settings you access a lot. You won’t know what to program in this menu the day you get your camera. It’ll take quite a few outings before you have it wired down, so just keep working on it.
It will definitely help your workflow once you do!
My recommendations are pretty darn close to the defaults (except the flash) and I rearrange them to what makes sense to me:
- Shooting Mode
- Film Simulation
- ISO
- White Balance
- Noise Reduction
- Sharpness
- Image Quality
- Dynamic Range
- Highlight Tone
- Shadow Tone
- Color
- AF Mode
- Self-Timer
- Shutter Type
- Face/Eye Detection
- EVF/LCD Brightness
How to use the X-T100 Q Menu
Press the Q button and use the rear selector pad to select the item you want to change. Then scroll through the possible settings using either the command dial or the sub-command dial. Press the Q button or shutter half-press to exit.
Customizing the X-T100 Fn Buttons
These recommendations are just that – recommendations. After working with mirrorless cameras for years, these are the functions that I’ve found work best in travel photography. But that’s just me – something else may work better for you.
Programming the X-T100 Fn Buttons
To program the Fn buttons, press and hold the DISP/BACK button. It will take you straight to the Fn Setting menu.
Learn more about using and setting up the X-T100
I hope this helped you get started with your X-T100. I know it’s a lot of information, but it’s just one small piece of my travel photography course.
You can download a PDF version of this guide with even more information when you sign up for the Fujifilm X Course Membership (save 20% on your first 3 months).
Please let me know if you have any questions!
Arlie
Thursday 17th of June 2021
Is xt100 able to save custom profile? Cause i want to copy fujifilm recipes ive seen.
John Peltier
Sunday 20th of June 2021
Unfortunately no, this feature isn't available in the X-T100 or X-T200. You can still use most of those recipes but they can't be saved to the camera.
Yan sagita Roi
Monday 7th of June 2021
Hi John Thank you for your guides. they are really useful. you know how to transfer bigger size videos from the camera? my Fuji x-T100 seems to have problem when transferring video file size more than 2gb, it auto disconnects every time. I don't have any problem transferring files lesser than 2gb. What is the problem? Thank you Roi
John Peltier
Monday 7th of June 2021
Sorry I’m not sure what that problem could be, I’ve never heard of it before. Just make sure the camera firmware is up to date. Try changing the Auto Power Off time also. Otherwise you might need to take the SD card out of the camera and use a card reader with the computer.
Gareth lewis
Friday 1st of May 2020
Hi John Have just got the xt100 and am setting up. Your guide is really useful. Thankyou. One problem I have had is trying to set the FN button as AE lock. The menu allows me to set it but pressing the button does not engage A&E lock. I would like it to switch on/off on each press. Am I missing something here. Thankyou Gareth
Piers
Thursday 17th of March 2022
@John Peltier, Hi there, I've recently bought an X-T100 and I've found the same issue for video only. On Manual mode, you can lock the exposure by half pressing the shutter, but on video there doesn't seem to be a way to use AE Lock and the Fn button doesn't seem to work. Any help would be appreciated, Thanks, Piers
John Peltier
Saturday 2nd of May 2020
You're welcome Gareth. It's not working at all? Like "EL" doesn't come up in the display when you press it? The only thing I can think of is that it won't work when the exposure lever is set to AUTO since the camera really won't let you do anything concerning exposure. It also won't work in M mode. And I can't remember from using the X-T100, but I think that you have to hold down the AE-L on this camera to lock it - you don't have the "on/off switch" capability on this camera. Or my memory on that could be incorrect.