Disclosure: This post may contain affiliate links. I earn a small commission of product sales to keep this website going.
In my last post, I tried to simply describe the Fujifilm X film simulations without getting too technical. I hope I succeeded.
I also promised to follow that up with a post about how to use these Fujifilm film simulations to create your own in-camera custom settings. Film recipes unique to you, and not ones you’ve copied from other people. And here it is!
If you want to learn an approach to make your own custom settings for your Fuji X, this is what I will attempt to do here. I’m not going to tell you what’s right and what’s wrong, I’m just going to share my process for creating them because I struggled for over a year. This is an approach that works for photographers of all styles.
Try out the interactive version of this blog post in one of my newest online courses – Creating Unique Fujifilm Custom Settings.
The three-step method for Fuji custom settings
There are three steps to this method and they’ll work with all styles of photography.
- Identify the styles and genres you want to create recipes for
- Study the visual characteristics of your own photographs and similar photographers
- Create the recipes in Fujifilm X RAW Studio
I think a lot of people, out of excitement, just start playing around with the different settings. This happens a lot in post-processing too – you’ll just end up moving sliders around forever if you don’t have a vision in mind when you go into it. But you’ll have much more success if you can be organized and methodical.
We’ll go into these three steps in detail next.
Please note that this method requires two things:
- A collection of your own Fuji RAW files – the more diverse the better. If you don’t have any RAW files, that’s fine. Take some time and go create some! Change your settings to record both RAW+JPG, make some photographs in the style you normally do, and come back to this process.
- Fujifilm X RAW Studio, a free RAW converter from Fujifilm. Download it here. You’ll plug your Fuji X camera into the computer and the program will use the camera’s processor to make the JPEG. It’s simply a computer interface with your camera’s RAW converter. You can use any Fuji RAW (RAF) file on your hard drive as long as you have the same model camera that created it.

You can certainly follow this process without Fujifilm X RAW Studio, doing all of this on your camera, but I wouldn’t recommend it.
Watch the video:
Step One: Identify your genres and styles
You can program seven recipes into your Fujifilm X camera for your JPEG settings. How will you organize them and break them up?
- If you only shoot color landscapes, maybe you have presets for the Golden Hour, midday sun, overcast days, sun-kissed mornings, flowers, etc.
- Or if you shoot landscapes in color and black-and-white, maybe you have four color styles and three black-and-white styles.
- A travel photographer might have presets for urban scenes, landscapes, indoor portraits, and outdoor portraits.
What about you?
Step Two: Study photographs & take notes
Study your own photographs if you already have a body of work that you’ve processed into the styles you’re trying to recreate in-camera.
How do you normally process RAW files? Add contrast? Add vibrance? Drop the saturation? Push the shadows?
You should also study other photographers who have the same genre and style. This’ll help give you more ideas and broaden how you look at that style. Look at their portfolio websites, Instagram feeds, and books.
Write down the VISUAL characteristics
As you study these photographs of the style you want, take notes and write down the following visual characteristics:
- Genre (which recipe are we creating?)
- Color balance (warm tones, cool tones, neutral white balance…?)
- Color characteristics (subdued colors, high saturation, normal saturation, rich, dull, etc)
- Highlight contrast (how bright are the brights? Harsh? Flat?)
- Shadow contrast (how dark are the darks? Harsh? Flat?)
- Sharpness (is there an overall softness or are they overly sharpened?)
- Grittiness (how “smooth” are the photos? Film grain? Noise reduction?)
You’ll take this list and then apply it to the settings in the next step.
Step Three: Create the recipes in Fujifilm X RAW Studio
1. Collect a handful of RAW files into one folder
Before you open up X RAW Studio, it’ll help to have a collection of RAW files in one place.
Copy a smattering of different RAW photos to a folder on your desktop. Some of your favorites, photos that run the gamut of the genres you shoot.
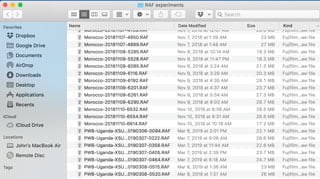
If you’re a landscape photographer, get a collection of sunny landscapes, overcast, sunrise/sunset, winter, etc. If you’re a travel photographer, get a collection of landscapes, architecture, portraits, street scenes, etc.
Remember that they’ll have to be from the same model camera that you’ll have plugged into your computer for this.
Copying your favorite photos from across the board into one folder makes this process easier and faster when working with the RAW converter.
2. Open Fujifilm X RAW Studio
You’ll need to connect your camera to your computer with a USB cable. Turn it on, and open X RAW Studio.
Navigate to the folder where you’ve collected the sample RAW files and pick one.
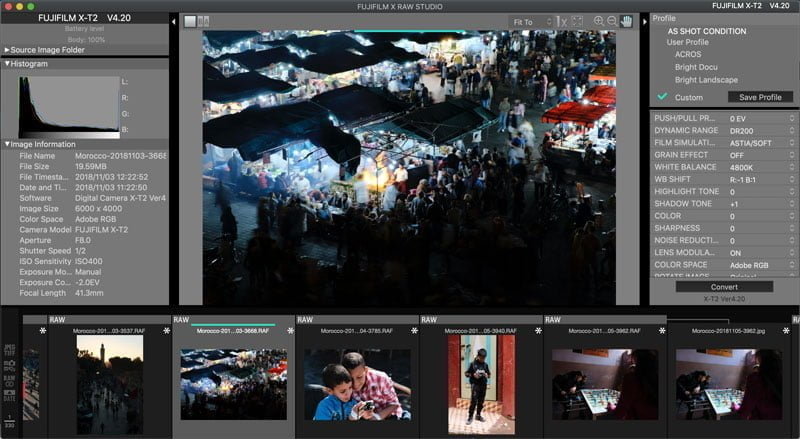
3. Process your first photo
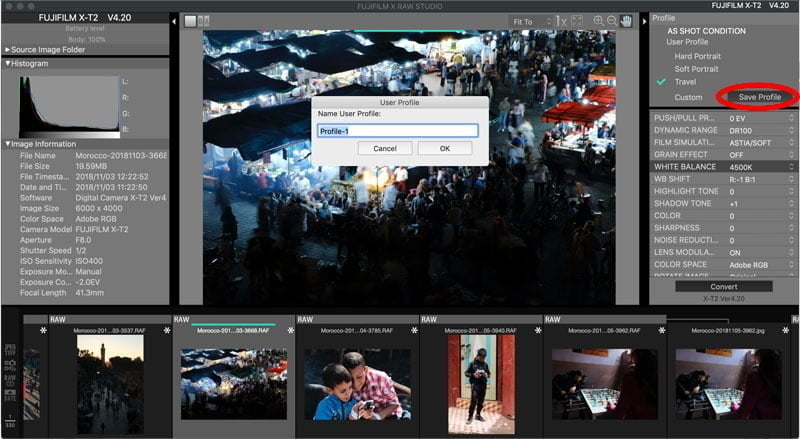
You’re then going to go down the list of settings on the right side of the program and “fill in the blanks” from the list you created earlier, trying to recreate the characteristics you identified.
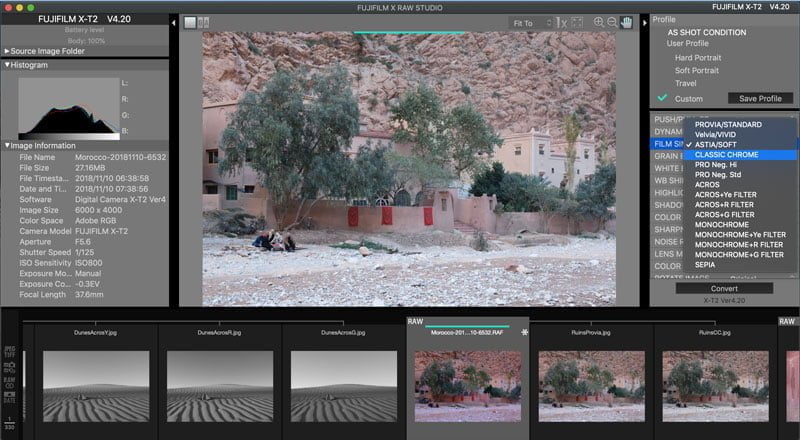
Check out my Fuji film simulations comparison page if you’re not familiar with these simulations. Identify the characteristics that would best suit the styles you’re going for.
Here are some other things to consider when going through the settings:
- Push/Pull Processing: You can’t program this into your custom settings but it’s useful if you’re trying to create “high-key” or “low-key” images, adjusting the exposure for these RAW files.
- Dynamic Range: I really wish this was useful when using Fujifilm X RAW Studio to create custom settings, but you won’t be able to use it for all of your photos. Read the caveats about Fujifilm’s Dynamic Range setting in this post. Anyways, if you want a high-contrast image, select DR100 or Dynamic Range Priority OFF. Otherwise, try AUTO.
- Highlight & Shadow Tone: This is probably the most difficult setting to tune, but it’s also responsible for giving your photos the most character. Read more about Highlight Tone and Shadow Tone here.
- Newer Model Users: “Dynamic Range” just preserves highlights while “Dynamic Range Priority” can push the shadows too. If you choose to set Dynamic Range Priority to anything but OFF, you won’t be able to program Highlight & Shadow tone.
- White Balance: You’d probably just think of leaving this in AUTO for all of them, right? The whole point of making these presets is to get consistent JPGs, and AUTO WB can sometimes vary too much from one photo to the next. Try setting Kelvin values or other WB settings that generally match the lighting conditions you’d use for that preset, if that preset has consistent lighting.
- WB Shift: As of now you can’t program a shift into individual presets. But I’ve found this useful for fine-tuning Custom WB settings and general camera color casts.
Process this custom setting how you envision and then go to “Save Profile,” naming it with the style name you’ve already identified.
4. Repeat with other photos and fine-tune
Then find another photo that would look well in that style and apply it to that photo. How does it look? Too saturated? Maybe you need to massage the Color setting. Then go back to the first photo and see how it looks with that new Color value.
Re-save the profile with the same name and go on to the next photo, repeating this process for all of your photos and styles.
Remember that there may be different paths to the same ending.
This should take a long time. Like days. Work on a handful of photos. Step away for a few hours. Come back and work on some more. Repeat. This is the best way to keep yourself honest without rushing into it.
And remember that you won’t get Fuji custom settings that work for every photo. If you can get to at least a 75% solution, you’ll have a starting point. When you’re out in the field you can go to that setting and make small, temporary adjustments using the “Q” button as the situation dictates.
Repeat this process for all of the recipes & styles that you want to create.
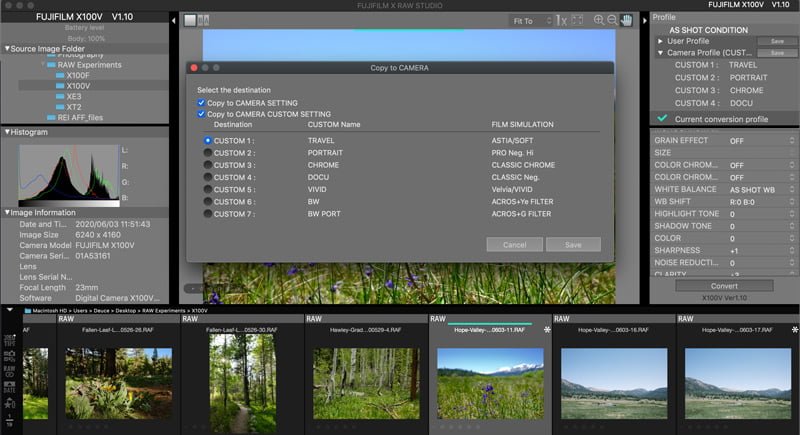
5. Copy to your camera
Newer Fujifilm cameras will let X RAW Studio save these settings to your camera. Just go to “Save” next to Camera Profile and select which slot you want to save these settings to.
With older Fujifilm cameras, you’re going to have to set these manually in your camera:
- Go into your Image Quality menu
- Select “Edit/Save Custom Setting”
- Input your final settings into each of the seven slots, naming them if your camera allows
Step Four: Practice and Refine!
You’ve done all that hard work, now go reward yourself!
Go out and try your different Fuji custom settings for all of the different situations for which you created them. Do they look how you expected?
Take notes on anything you might want to change and adjust your custom settings based on your real-world experiences with them.
This is a good time to practice overexposing/underexposing if your styles warrant them, and using manual white balance.
In conclusion
I wish that this was a quick, simple process. It’s not. I constantly refine my Fuji custom settings based on evolving styles and it took me a while to even get to that point.
Your end goal – at least mine – is to get it right in-camera as much as possible to minimize/negate the need to post-process most files.
Reclaim time to enjoy your family, explore more, pursue other interests, and so on. Photographers, in general, tend to spend so much unnecessary time in post-processing software.
Creating beautiful “film recipes” that you can switch on the fly, depending on the scene and your mood, makes the whole thing about the moment rather than the anticipation to get back to the computer.
Check out the free previews for the online course version of this blog post, complete with a worksheet, several videos, a quiz, and live chat support.
Johan
Thursday 14th of July 2022
Hi, great article about X RAW Converter. Is the X100F to old to save custom profiles to? (I can't see that choice in the software)
John Peltier
Thursday 14th of July 2022
No, the X100F is "too old" to have that functionality. You'll have to enter them manually.
Randy Preising
Tuesday 22nd of March 2022
Thanks for posting this. I’ve been a long time Fuji shooter, but haven't really used the desktop app much. I got tired of manually setting up the custom settings on the camera, so this helps.
I wish Fuji would rethink how custom profiles were sent to the camera.
Let’s say you know you need a specific set of profiles for a particular day, trip or shoot. You’re just loading up your camera with the “film” you need. A simple drag and drop from the Profile menu to the Camera Profile menu, hover over a particular profile, with a pop-up saying “Doing this will replace ‘CustomName". Or, command click on a profile to get a sub-menu of profiles to replace it with.
John Peltier
Wednesday 23rd of March 2022
Yeah I agree, they could improve the UI to make this kind of customization easier/faster since they've proven it could be workable...but they're not the best at updating their apps/software :)
Miklos
Monday 16th of August 2021
Hi John, Thank you for this great info! I did nor realize that the software from fujifilm is so great and gives those unique and great possibilties. One thing i do not understand/question: i normaly use(d) capture one only. With the new tools and working in layers, i like this very much. But.. i work from raf files with sim embedded from camera and want/need that this is the original RAF file. ( think of recovering details , high lights etc). When i use x-raw first and from there choose / even change my simulation.. from that point it is converted into a jpeg. Then i can not use capture one any more in the same way/quality. Working first in capture and then in x raw is also not possible. How can i solve this. I wish i could embed a simulation from x raw to a raf file ( no conversion like the raf files come sooc from fujifilm) and then use this in capture one. Or can i import my self created simulations from x raw to capture one? That would also solve this. Maybe i want to much…:)
John Peltier
Wednesday 18th of August 2021
Hi Miklos, you can't really pull your actual Fujifilm presets from your camera/X RAW into Capture One. But you can easily "fake it." Capture One does include the film simulations from Fujifilm. If you go to the Base Characteristics tool and then click on Curve, you'll see all of the film simulations available for the sensor that was used. From there you can adjust the highlights/shadows/contrast/saturation, etc in Capture One to make it look like your Fujifilm preset. Then you can save all of those adjustments as a User Style.
Jerry R
Thursday 13th of May 2021
For the life of me, I can't seem to get Dynamic Range or DR Priority available to change for any custom recipes. I've looked around YouTube and searched as well as played with settings. Not sure what I'm missing here. Any advice?
John Peltier
Thursday 13th of May 2021
What do you mean, "change for any custom recipes"? Are you talking about reprocessing a photo in X RAW Studio? Or saving them to your camera after creating a recipe in X RAW Studio?
You can only "go down" in DR levels when reprocessing a photo in X RAW Studio. So if your photo was created in-camera at DR 200, you can only go back and forth between DR 200 and DR 100 for that photo. If your photo was recorded at DR 400, you can go to DR 100 or DR 200. And if your photo was recorded at DR 100...you're stuck there in X RAW Studio.
The DR settings you have in X RAW Studio can't be saved to a camera Custom Setting. I think it's the only setting that doesn't save to the camera. You have to go in and manually edit your custom setting to a different DR level after creating and saving it from X RAW Studio.
Do either of those answer your question?
Jason B
Saturday 6th of March 2021
Hi John. Thanks for all this! Very well done and useful! Just a quick question... I have both an X-H1 and x100v. When I have my x100v plugged in, I see all the custom simulation slots that I have on the camera currently. When I have my X-H1 plugged in, I don’t see any from the camera. The only thing there is, of course, the settings for the current RAW file I took with camera. Is this linked to what you wrote about newer and older cameras? I was really hoping that I could flick through all my camera sims (slot C1 - C7), but they are not showing up in XRaw like they do for the x100v.
John Peltier
Saturday 6th of March 2021
That's correct Jason, the X-H1 isn't set up to show you your custom settings in X RAW Studio like the newer cameras are.