How to Lock Focus and Exposure Separately on Fujifilm Cameras
Disclosure: This post may contain affiliate links. I earn a small commission of product sales to keep this website going.
By default, pressing the shutter button on a Fujifilm X or GFX camera does two things at once: it commands autofocus and locks the exposure. But there are plenty of situations where you want independent control of both, like locking your exposure on a bright sky, then recomposing to focus on your subject as one example. Here are the two methods for making that happen.
Method 1: Back Button Focus + Shutter Half-Press AE Lock
This is the simpler setup and a great way to build the habit of managing focus and exposure as separate actions.
Step 1: Disable autofocus from the shutter button
Go to Setup Menu > Button/Dial Setting > Shutter AF and turn it off for both AF-S and AF-C. The shutter button will no longer trigger autofocus.
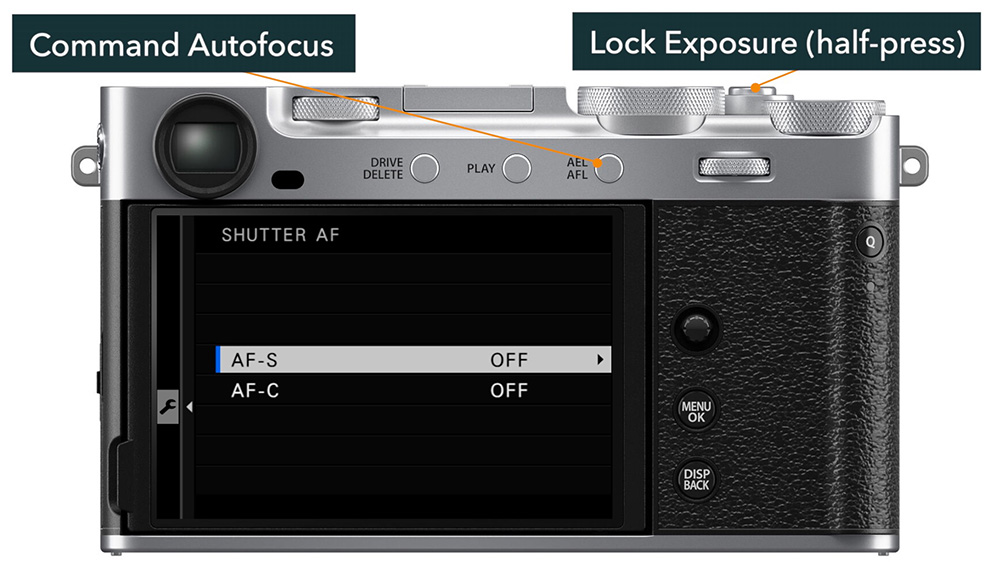
Step 2: Assign AF-ON to your back autofocus button
In Button/Dial Setting > Function (FN) Setting, find your back AF button (labeled AF-ON, AFL, or AEL/AFL depending on your model) and assign it AF-ON. This means pressing that button commands autofocus. In AF-S, it locks once focus is acquired; in AF-C, it tracks continuously for as long as you hold it.
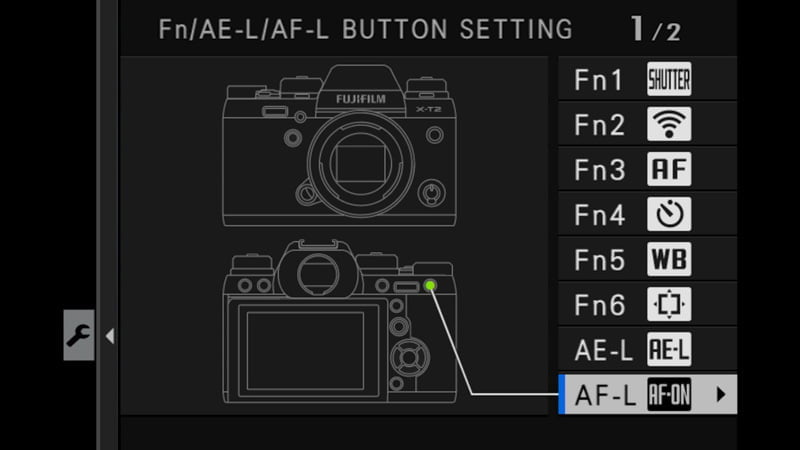
Note: Don't confuse AF-ON with AF Lock. AF Lock holds focus at its last position after a shutter half-press, which is a different workflow and not what you want here.
Want to learn more about back-button focus, like why and how to use it? You can read this article: Back-Button Focus is Still Relevant.
Step 3: Confirm shutter half-press locks exposure
In Button/Dial Setting > Shutter AE, set this to On for AF-S and MF at minimum. This ensures a half-press of the shutter locks your automatic exposure variables (shutter in Aperture Priority, aperture in Shutter Priority, etc.).
How to use it:
- Point your focus point at your subject and press the back AF button. Once the square turns green, release it - focus is locked.
- Recompose as needed.
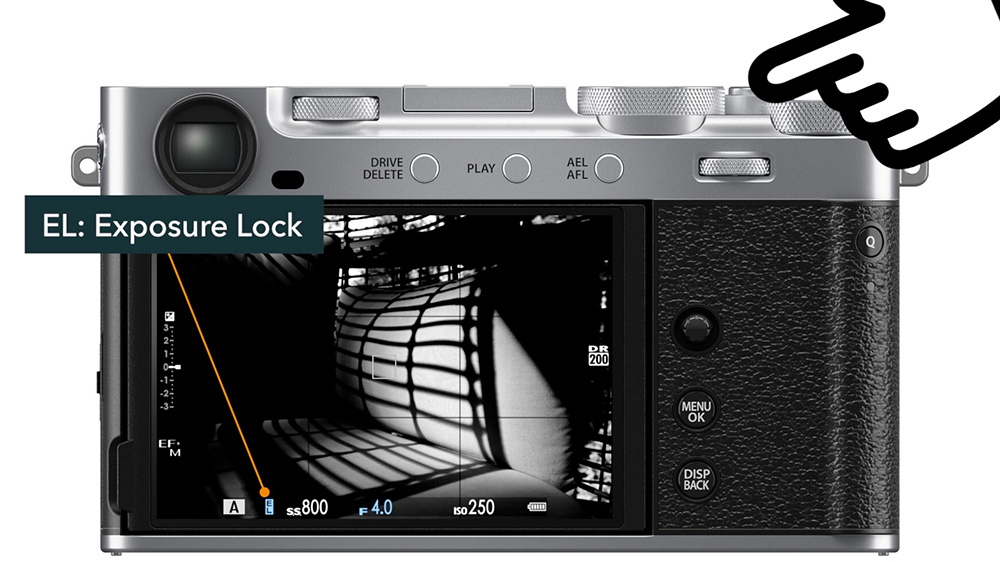
- When your exposure looks right, press the shutter halfway. You'll see a blue EL indicator in the lower-left corner confirming exposure is locked.
- Press fully to shoot. To keep the exposure locked between shots, don't fully release the shutter; just let it return to the halfway detent.
The drawback: The shutter button's halfway point can be touchy. It's easy to accidentally take a shot when you just meant to lock exposure, or to accidentally release and lose your exposure lock. This method works well if you only occasionally need to lock exposure and aren't doing a lot of camera movement between shots.
Method 2: Back Button Focus + Dedicated AE Lock Button

This method gives you a more robust, hands-free exposure lock by removing AE lock from the shutter entirely and assigning it to a separate button.
Step 1: Set up back button focus as described in Method 1.
Step 2: Disable shutter AE lock
Go to Button/Dial Setting > Shutter AE and turn it off for both. The shutter button now does one thing only: take the picture.
Step 3: Assign AE Lock to another button
In Button/Dial Setting > Function (FN) Setting, assign AE Lock to a programmable button, like the front or top function button if nothing else is available. Cameras with both an AFL and AEL button can assign one to AF-ON and the other to AE Lock for an ideal setup.
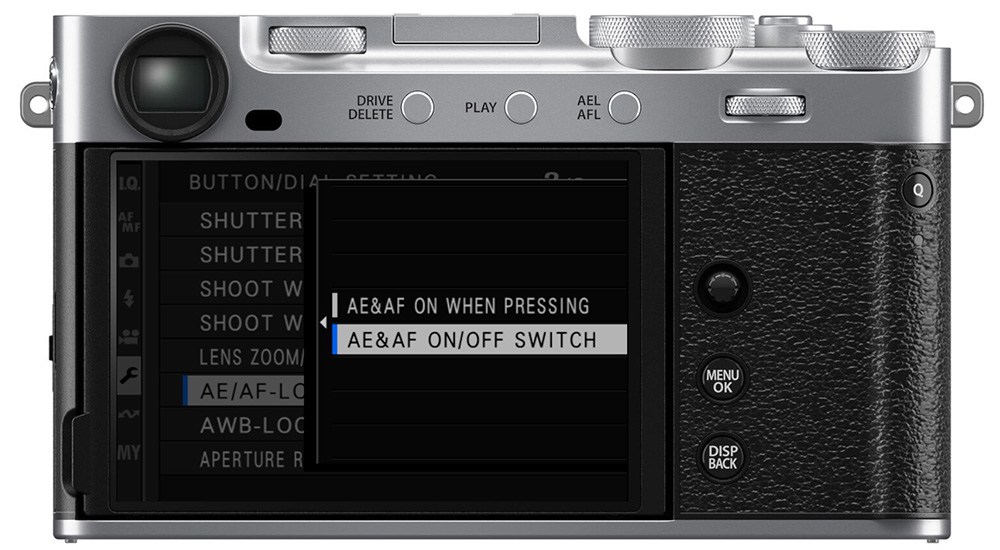
Step 4: Set AE Lock behavior to On/Off Switch
Go to Button/Dial Setting > AE/AF Lock Mode and set it to On/Off Switch (rather than "As Pressing"). This lets you press and release the button to toggle the lock, so you don't have to hold it down while also managing the AF button and shutter.
How to use it:
- When your exposure looks right, press and release the AE Lock button. The blue EL appears, indicating your exposure is locked.
- Recompose freely. No buttons need to be held.
- Place your focus point on your subject and press the back AF button. Release once focus locks.
- Both focus and exposure are now locked. Shoot when ready.
- When you want to unlock exposure, press the AE Lock button again. The blue EL disappears.
The drawback: You need to dedicate a physical button exclusively to AE Lock; touchscreen controls can't be used for this function. If your camera has limited programmable buttons, this may require some trade-offs.
Which Method Should You Use?
Method 1 is the easier starting point. It's a minimal setup, and it works well for occasional exposure locking with minor recomposing.
Method 2 is the better long-term solution if you frequently need to hold an exposure lock across multiple shots or significant camera movement. The on/off switch behavior keeps your fingers free and eliminates the shutter sensitivity issue.
Try both and see which one fits your shooting style! If you have any other comments or questions, please leave them below.
And if you want more tips about becoming a more efficient Fujifilm shooter, check out my Fujifilm tutorial courses (get 20% off with code "blog20").