Disclosure: This post may contain affiliate links. I earn a small commission of product sales to keep this website going.
I was preparing for a lesson where my student wanted to learn about the Zone System and it made me realize I’ve never written about it! So here we go, revised for current times. How to apply the zone system for digital photography and mirrorless cameras.
Disclaimer: This is a big-picture approach, not a detailed technical analysis. I’m aware that there’s logarithmic curves involved, variations in dynamic range from sensor to sensor, terms like densitometry, and so on. Let’s just keep it simple for now.
I’m going to talk about the Zone System in more of conceptual terms, since that’s how I use it, and feel is the most practical.
You can scroll to the bottom if you want to see how to apply the Zone System for today’s digital cameras.
This is a great followup to my recent post about using your mirrorless camera’s histogram in the viewfinder. Adding a Zone System technique to histogram use is a great way to determine exposure.
Zone System photography background
The Zone System was developed in a collaboration with landscape photographer Ansel Adams and portrait photographer Fred Archer right around 1940. It was intended to be a simple way of determining exposure for making prints.
There has been much confusion throughout the years, particularly when digital cameras came onto the scene, and especially now as the technology develops faster than we can keep up with.
Is the Zone System relevant for digital photography? Is there a way to use our viewfinder’s histogram with the Zone System?
A basic application of the Zone System
Just like the “Rule of Thirds” is merely more of a suggestion than a rule, so is the Zone System. It’s a good place to start — a way of avoiding blown-out clouds or making sure that you have rich shadow textures. If your gut tells you something different, go with that instead. This is just another tool for the old toolbox.
What is the Zone System?
The Zone System is a representation of tones from pure black to pure white. The conventional system used Roman numerals from 0 to X, with 0 representing pure black and X (ten) representing pure white. There are nine gradations of tones in between, each representing one stop.
From Wikipedia, since I found no sense in recreating this exact same diagram myself:

Ehhh, I need a refresher on stops…
A stop is a doubling or halving of light. It’s the difference in the following values that make up the components of our exposure triangle.
If you increase one stop, you’re doubling the amount of light. Conversely, if you’re decreasing one stop, you’re halving the amount of light (or, brightness to put it simply).
Common values listed in increasing order (moving right doubles the exposure in each setting):
- Aperture: f/22, f/16, f/11, f/8, f/5.6, f/4, f/2.8, f/2
- Shutter (in seconds): 1/1000, 1/500, 1/250, 1/125, 1/60, 1/30, 1/15, 1/8, 1/4
- ISO (sensitivity): 100, 200, 400, 800, 1600, 3200, 6400
If this is all still foreign, you can take my basic exposure triangle course (for free) and take a few quizzes and complete exercises to make sure you understand exposure and stops.
The basic Zone System
So Zone 0 is pure black. No texture.
Zone X is pure white. No texture
Zone V is what we call “middle gray.” It’s the shade that your camera assumes the world should be. When you’re leaving exposure up to your camera, it wants to average everything into Zone V.
This is why we don’t use AUTO as photographers, because not everything is in Zone V. And it’s why the Zone System can be so helpful. You decide which zone things should be in, not the camera.
- Zone I will just barely start to show tonal differences and not much texture.
- Zone II will finally start to show some texture. If you have deep shadows but want to see some of that texture, try putting the shadows in Zone II.
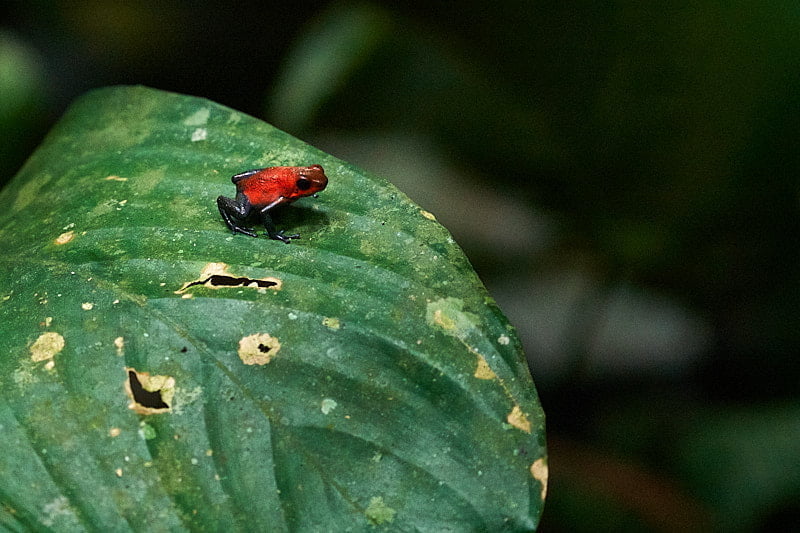
- Zone IV is usually where green foliage will sit and is where landscape photographers put this foliage if they want deep, saturated greens. It’s also a good start for African skin.
- Zone V is normally where clear blue sky belongs, though it can vary between IV and VI.
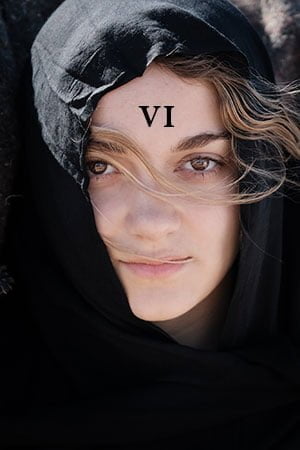
- Zone VI is an average Caucasian skin tone.
- Zone VIII is usually the limit for showing texture in snow, whitewater, and clouds.
- Zone IX will still show some texture in the above items but risk getting washed out.
Because each zone represents one stop in the basic model, using the Zone System for digital photography is a breeze.
Finding the Zone
What’s important to you?
- If those clouds are fascinating and your priority is to keep their texture, put them in Zone VIII to start.
- Taking portraits outside, your subject’s face should typically be in Zone VI to avoid nasty glares and maintain rich skin tones.
- And if you don’t want those shadows to be pure black because the texture is important, put them in Zone II.
This methodology works especially well for high-contrast scenes where you’ll need to pick what’s the most important to you. Expose for what you want to expose for and everything else is just going to fall where they fall.
But more broadly it’s an excellent way for us, the photographers, to control exposure. The camera is going to do its voodoo magic and take readings everywhere, applying complex formulas we can’t control, based on the metering mode. The Zone System makes us better drivers.
Applying the Zone System to digital photography
Make sure your camera is in Spot metering mode to use the Zone System. Consult your manual if you’re not sure how to do this.
Properly putting something in the zone you want it in requires precision metering. You could get a $600 professional light meter, but I prefer to use my camera’s spot meter and fill the frame as much as I can with what I’m metering. If you’re measuring someone’s forehead, fill the frame with as much of their forehead as you can. Don’t take the picture though because that won’t be flattering to them.
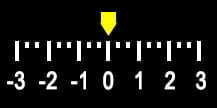
Precisely meter the object you want to meter. We’re also going to use Manual mode because there are some disadvantages to using Program, Aperture Priority, or Shutter Priority with this method (you’ll come to love Manual after using this). Adjust your exposure until the meter reads “0”. You’re in Zone V.
Now just increase or decrease the stops (using aperture, shutter, and/or ISO) by the same amount of zones you want to move.
Zone System Example
You want dark shadows but you don’t want them pitch black. This would correlate to Zone I. You also want an aperture of f/11 and ISO 200 in this scenario; shutter speed is less important. So we’ll set that aperture and ISO and solve for shutter speed.
- Zoom in on the shadows with spot metering.
- Adjust the shutter speed until the meter reads “0” (Zone V). You see this is a shutter speed of 1/30.
- You want to move the shadows from Zone V to Zone I where they belong. This is four zones darker. Or in photographer-speak, decreasing four stops.
- From the list at the beginning of this post, we see that a decrease in four stops from 1/30 is 1/500. Set your shutter speed to 1/500 and you’re set! Recompose and make those photos.
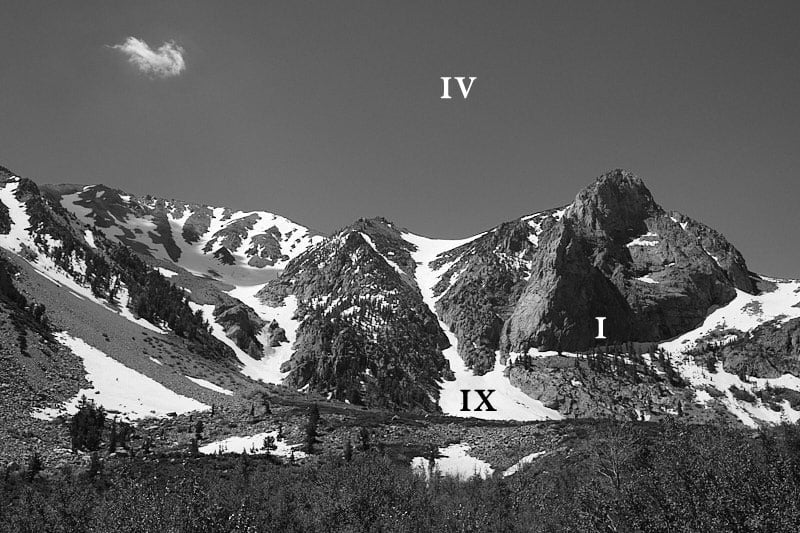
In putting the shadows in Zone I in the example below, metering around the rest of the scene showed that this caused the snow to fall in Zone IX and the sky to fall in Zone IV (I was using a B&W red filter to darken it intentionally). This is just what I wanted. If putting the shadows in Zone I caused the snow to be in Zone X, perhaps I’d rather put the snow in Zone IX, which would cause the shadows to fall in Zone 0. Make sense?
So how does the Zone System correlate to the histogram?
The histogram in our viewfinder gives us a darn good guess about how our exposure will look – read this post for more.
But the histogram is not a linear representation of brightness – it’s logarithmic, just like exposure and the zones. So when we redraw the Zone System chart you find on the Internet (and above), you get a digital zone system chart that looks something like this (with exposure compensation/exposure meter numbers too):
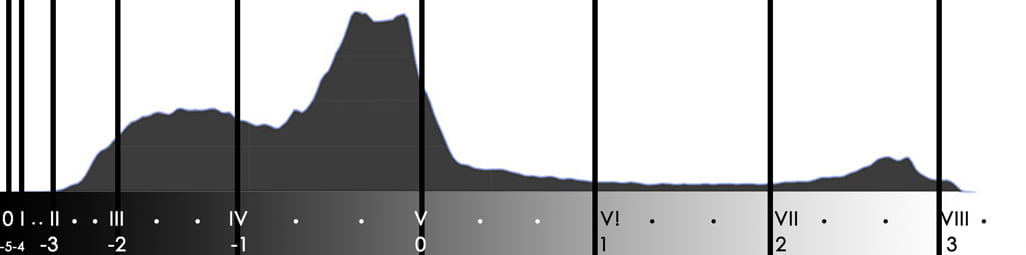
The left edge of the histogram represents pitch black, or Zone 0. The right side is pure white, however, in digital cameras this occurs somewhere between Zone VIII and Zone IX. It depends on the camera and the camera’s processing.
Using the Zone System with the histogram
The Zone System is a great addition to histogram use in a high-contrast scene where you’re forced to pick between exposing for the shadows or highlights.
Use the Zone System to make your exposure decision and then look at the histogram to see where the rest of the image will be.
Perhaps you want to put your bright areas in Zone VIII, but this causes the rest of your image to fall in Zones 0-I. Your histogram will instantly show you this. It may help you decide to expose differently or bracket exposures for combining them later.
Without a histogram, you’d have to meter each area differently to determine this. These two tools work great together.
The truth about the Zone System with today’s digital cameras
The Zone System was developed with the assumption that there are ten stops between pure black and pure white. It worked for the darkroom and was a nice round number.
When digital cameras first came out, there were only about 7 stops between black and white.
Many of today’s high-end cameras let you process a photo with 14 or 16 stops with advances in sensors and processors. Moral of the story: it’s fluid.
So is the Zone System, as it was developed, entirely accurate today? No. But the concept won’t change.
Having a higher dynamic range just gives you more zones to play around with.
If you know that your camera has a spec’d range of 14 stops between black and white, then use your own zone system with 14 zones. Zone 0 is black, Zone 7 is middle gray, and Zone 14 is white. It’s best to see what your camera can do – how many stops above middle gray is pure white?
The Zone System isn’t a rule, it’s not gospel, and it’s not rocket science
We have some great tools that come with our digital cameras. But we’re artists, not button-pushers, and should approach our camera’s automatic abilities with that mindset. Elaborate automatic metering modes can’t read our minds, and they can get tricked with complex lighting situations.
This is where the Zone System for digital photography can help. You don’t have to use it all the time. You don’t have to use 11 zones if your camera has 14 stops of range. You don’t have to put dark shadows in Zone II.
Play around with it. Adapt it to your own camera. Use it when other tools won’t work. Practice. And make better exposures!
Jim D
Friday 27th of January 2023
John, thank you for this. I am just getting back into photography after a way too long hiatus. I’m coming from large format film cameras to DSLR’s (I miss film) and am very familiar with the Zone System. This makes perfect sense to me. Looking forward to using your tips.
Rita
Thursday 7th of October 2021
Wow !! Now this makes sense. Finally, after shooting with spot metering for my exposures and using both the histogram and applying the zone system, I feel I'll be ready to move on from the auto priority settings; use the manual setting. Thanks
John Peltier
Thursday 7th of October 2021
The histogram definitely makes manual exposures much easier!
Digital Zone System For Creative Photography
Saturday 17th of July 2021
[…] adjustments that must be made to bring out the desired print. The digital photographer has tools to adapt the zone system to his or her vision. The self-same considerations for film photography are applicable to digital imagery. One must […]
Chris
Wednesday 17th of July 2019
Really well written. I would rather expose correctly then bracket all my photos to get the correct exposure. Your explanation is perfect!????
John Peltier
Wednesday 17th of July 2019
Thanks Chris! Yeah, who’s got the time, patience, and/or storage to bracket every single shot?!?! Just do it right the first time :)