Disclosure: This post may contain affiliate links. I earn a small commission of product sales to keep this website going.
I recently wrote a post about how I’ve managed a completely computer-free workflow in my travel photography. Lightroom is an integral part of that workflow, and in this post, I’m going to outline how to use Lightroom Mobile while traveling.
Even though this version is officially just called “Lightroom” now, I’m going to refer to it as Lightroom Mobile to avoid confusion with Lightroom Classic.
Why use Lightroom Mobile?
Lightroom Mobile (formerly known as Lightroom CC, now just “Lightroom”) has impressively evolved from an app aimed at smartphone photography enthusiasts to a lightweight full-workflow solution for even professional photographers.
You can import RAW files directly from your camera onto your phone or tablet, organize them into albums, add keywords and ratings, make edits, and publish to online portfolio sites like SmugMug.
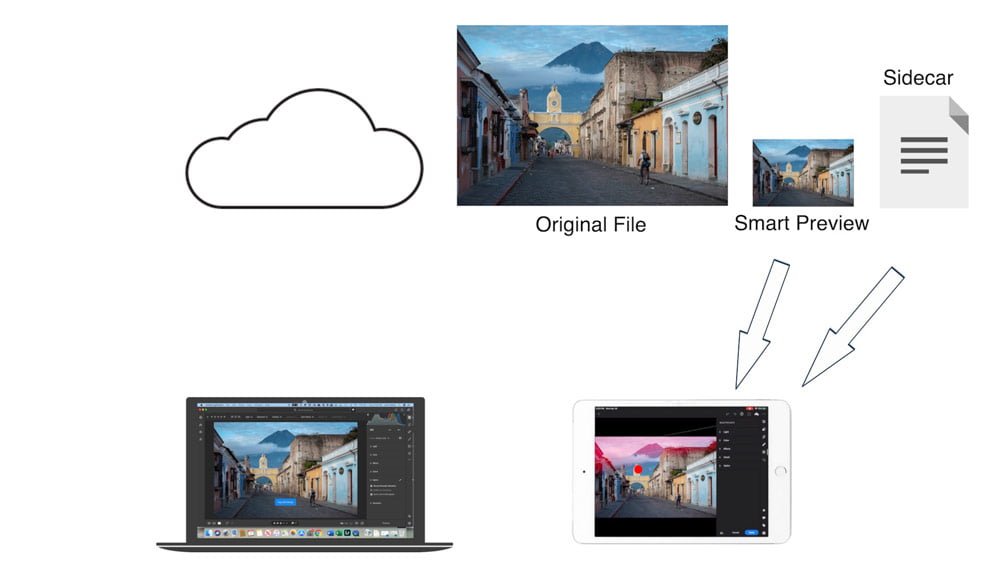
When you have an Internet connection, the files will upload to the Creative Cloud not just for backup, but for syncing to the desktop version of Lightroom so you can continue your workflow when you get home.
But you don’t need to make your edits to the original, huge RAW files. Lightroom Mobile will only download the Smart Previews from the cloud, where you can make all of your edits on a smaller photo. It’ll only download the original file if you tell it to, or it needs it to render an export.
Lightroom Mobile has a clean, easy-to-use interface while maintaining most of Lightroom Classic’s editing tools. The cataloging and metadata tools aren’t as robust, but you can import your Lightroom Mobile photos into your Lightroom Classic catalog to finish this part.
A perfect storm of numerous factors had me leave Lightroom for Capture One a few years ago. But after several international trips where I was pressed with deadlines, I realized just how much this mobile workflow is perfect for travel photographers.
How to Import Photos into Lightroom Mobile
Import photos from an SD card or camera
You can import photos into Lightroom Mobile directly from your camera or SD card. You may need adapters or special card readers like the Apple Lightning SD card reader.
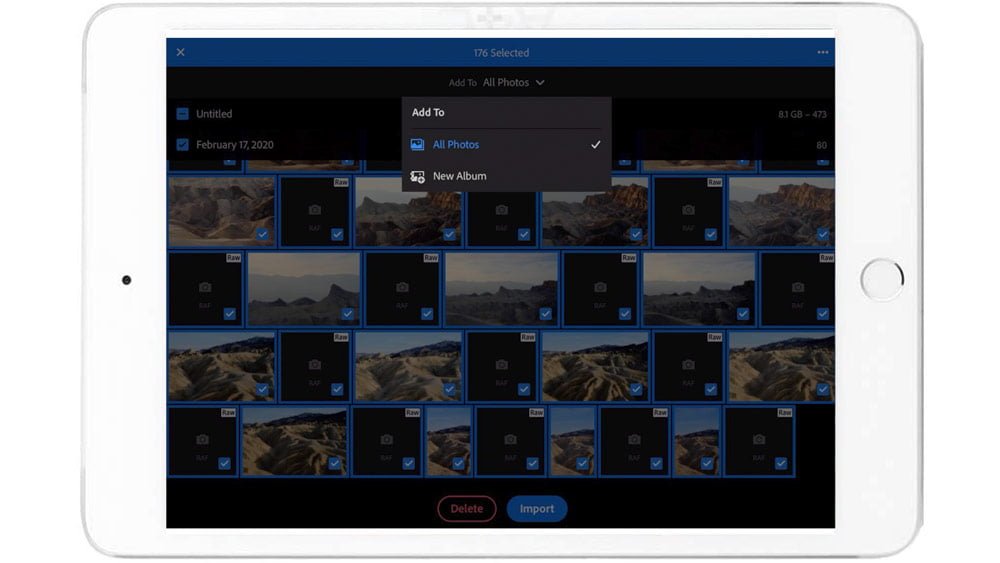
- Open Lightroom Mobile and connect your storage device. Lightroom Mobile will detect the card and opens an import dialog. If it doesn’t, select “Add Photos” then “From Camera Device.”
- Select the photos you wish to import (you can filter photos by type, and Select All).
- Create a New Album as the import destination and give it a name
- Hit Import!
Import photos from a wireless hard drive
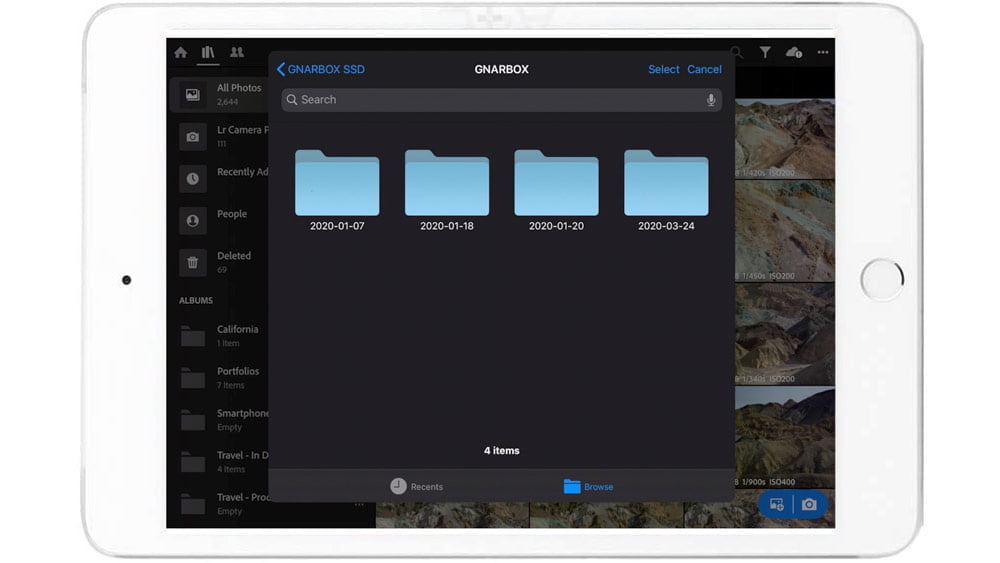
You can also import photos from a wireless external hard drive like the GNARBOX 2.0 or WD My Passport Wireless Pro.
- Turn on your wireless hard drive and connect your tablet or smartphone to its network.
- Open Lightroom, create a new album, and tap Add Photos in that album – select “From Files”.
- Select the app that you use to interact with your wireless hard drive (GNARBOX or My Cloud for WD Passport).
- Navigate to the folder containing the photos you want to import and select the photos.
- Tap Open/Done.
Organizing Photos in Lightroom Mobile
Organization is critical – do it in the beginning so your photo album doesn’t grow way out of control!
Albums & Folders
You can create Folders to hold other Folders and Albums, and Albums to hold photos.
I have a “To Develop” folder and a “Processed” folder. In each of those, I’ll have albums to organize trips and shoots. I’ll obviously keep them all in the To Develop folder as I’m developing them, then move that album to the “Processed” folder when everything is done. From there I can export them to Lightroom Classic.
Reviewing Photos in Lightroom Mobile
Early in your workflow, you’ll want to review which photos you want to edit. Don’t just start editing photos! Pick the ones that contribute to your story and only work on those (for now).
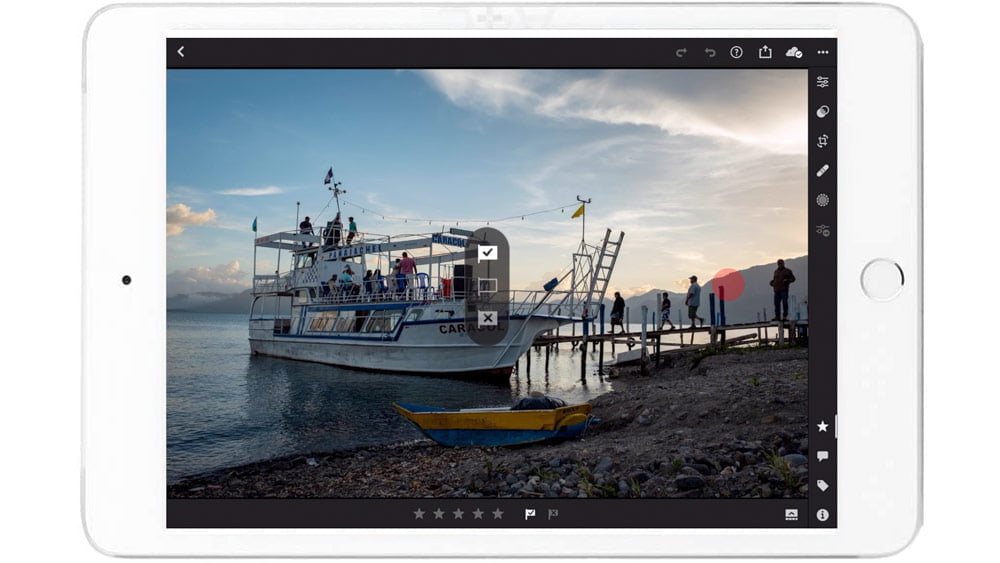
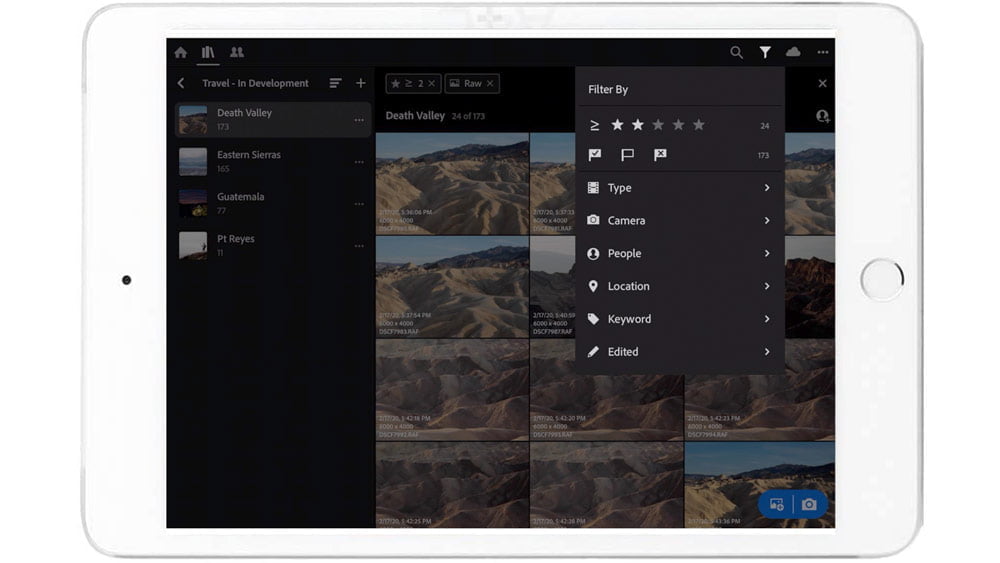
For the first round, you can go through all of your photos and assign them either a “Pick” or “Reject” flag. The rejects are photos you’re going to delete – they’re out of focus, the gesture/moment is totally wrong and embarrassing, exposure is botched, etc.
Swipe up to assign it a “pick” flag and swipe down to assign it a “reject” flag. Then use the Filter feature to show you only the Rejects. Select all of them and Delete them. They’re no use to you.
In the second round, I’ll assign either a 1 or 2-star rating. The 1-star photos aren’t technically imperfect, but I have no interest in processing them. The 2-star photos are ones I want to further look into for processing. Then I use the Filter to only show me photos with 2 stars or more.
In the third round, I’ll assign 3 stars to the, “yes, these photos will definitely contribute to my story!” photos. They’re the ones I want to process. Ideally, now I’m down to like 10% or less of what I started with before the reviewing process. Then I’ll use the Filter to only show me the photos with 3 stars or more.
That’s just how I do it, but make sure you have a system so you’re not just blindly picking photos and throwing the Edit sliders around!
Keywords and descriptions
It’s not as easy to keyword photos in Lightroom Mobile as it is in Lightroom Classic, but there are some shortcuts.
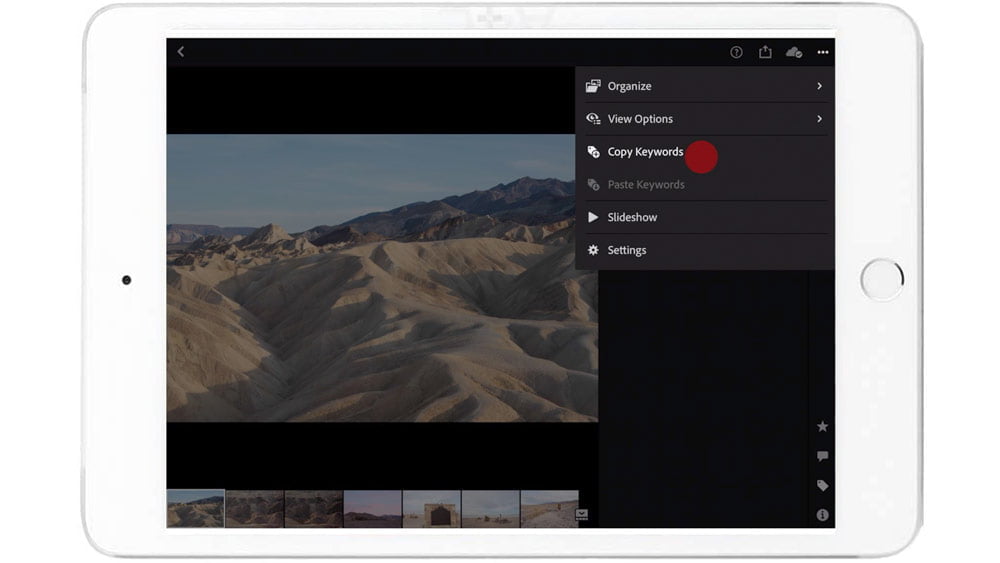
- If your entire album is different parts of California, then add “United States” and “California” to one photo’s keywords. Select “Copy Keywords” from the menu, then select all the other photos. Go back to the menu and select “Paste Keywords”.
- Then if half of your photos are in San Francisco and the other half are Napa Valley, go to the first San Francisco photograph and add “San Francisco” to the keywords. Copy those keywords, select all the other San Francisco photos, then paste keywords. Do the same for Napa Valley.
- Continue this process as you “drill down” to the specifics, copying and pasting keywords for similar photos.
Don’t forget to add Descriptions to your photos in the Info menu.
How to Process Photos in Lightroom Mobile
Oh boy. I can’t possibly go into all of the processing tools here. That would make this post like 30,000 words long. But I will go over the process for how to edit photos in Lightroom Mobile. You can reference the online course to learn about the specifics.
Perspective adjustments
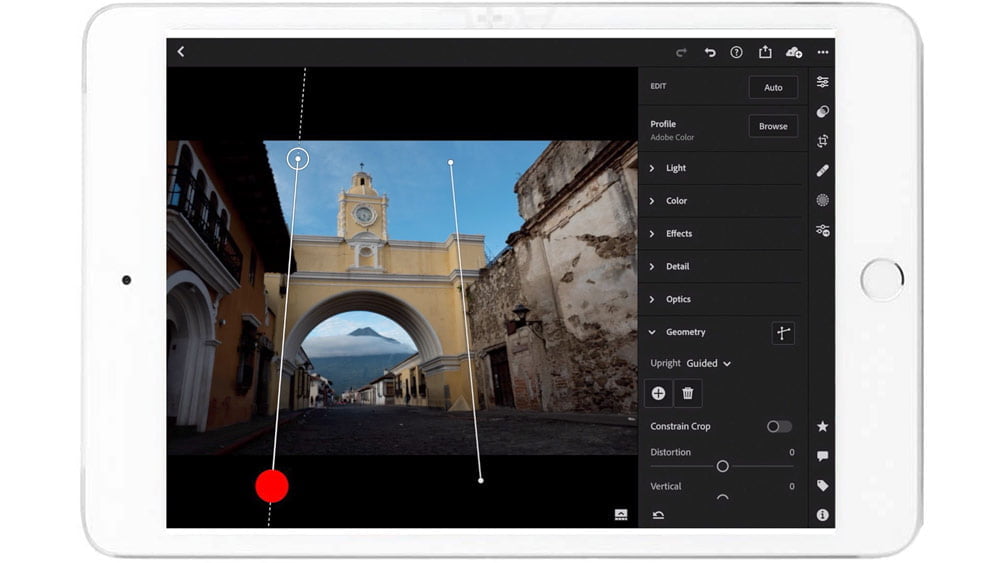
The first thing I’ll do when editing photos in Lightroom is make perspective & cropping adjustments. You can go into the Geometry panel where you have a number of options to have Lightroom Mobile correct perspective with horizontal and vertical lines, or do it yourself.
Then if there’s any cropping that needs to be done, you can do that in the Crop panel, along with changing the aspect ratio, orientation, and horizon leveling.
Light & color
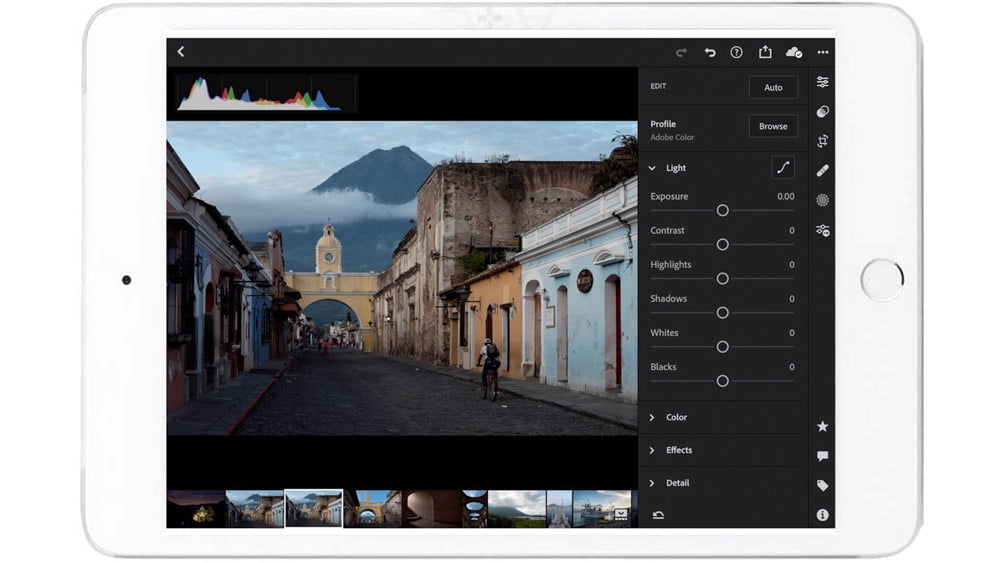
In the Light panel, I’ll make corrections to basic exposure first. Then either bring down the highlights or push the shadows up with those respective sliders. Adjust the white & black point, add some contrast, and that’s it!
Moving on to the Color panel, I’ll first adjust the white balance if necessary. Lightroom Mobile also has an eyedropper tool for you to set the white balance off of a neutral gray object in your photo.
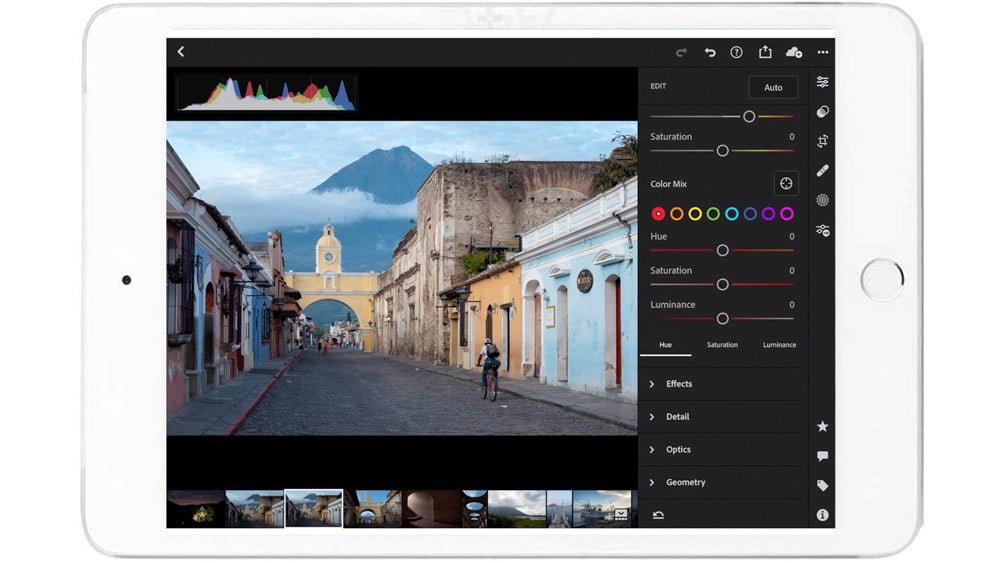
Lightroom Mobile also has an “HSL” panel where you can make adjustments to individual colors, adjusting the hue, saturation, and luminosity of eight separate colors, or make targeted adjustments on colors you choose.
Then finally there’s the favored Vibrance slider, along with Saturation.
These are all “global” adjustments made to the entire photo. I’ll make “local” adjustments to individual parts of the photo next.
Don’t forget that Lightroom also has a pretty amazing “Auto” adjustment option to take care of all of your toning and color for you – sometimes it can read your mind and save you the trouble!
Local adjustments
Want to remove stray hairs or dust? Lightroom Mobile also has a “heal” and “clone” brush when you tap on the bandage icon.

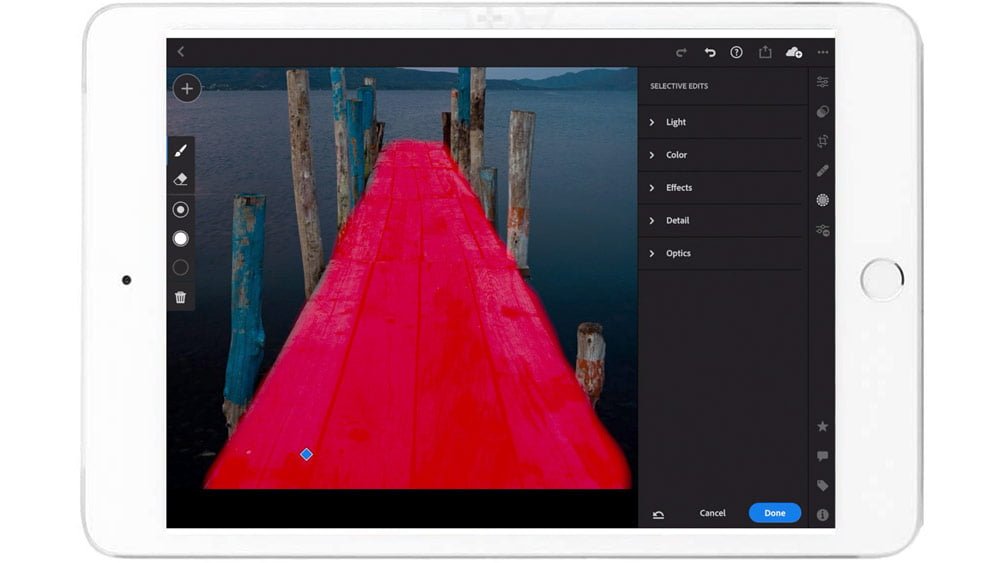
Then there are three separate adjustment brushes for making selective edits. Tap on the segmented circle icon then tap the Plus sign to add an edit. Select from either the Brush, Radial Gradient, or Linear Gradient. I use these adjustments to either draw or push my viewer’s eyes around the photo.
Use the Brush to draw irregular shapes. You can adjust the brush size and blending via the Feather and Opacity options. Adjust tonal, color, clarity, and noise & sharpening to the area you drew on.
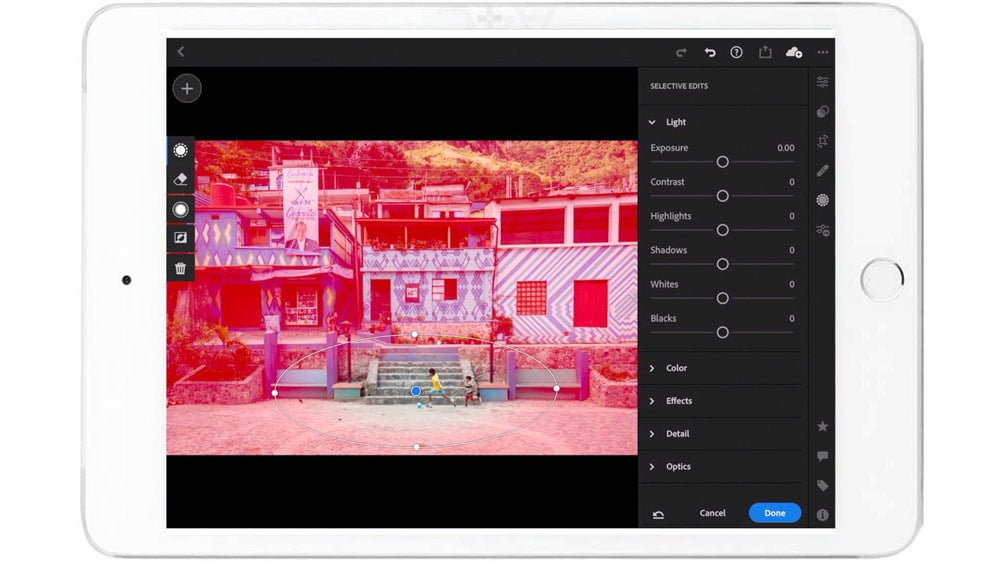
The Radial Gradient brush is great for making selective edits to faces, circular areas, and making your own vignettes. Draw the circle, adjust the size and rotation, set the blending, or invert it to make the adjustments outside the circle instead.
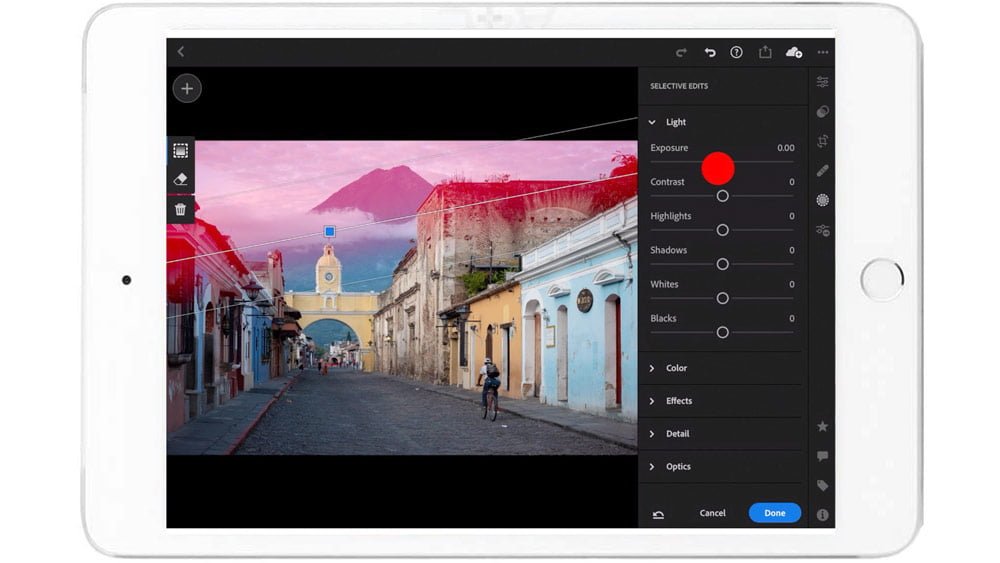
The Linear Gradient brush is perfect for making adjustments to skies, or other adjustments with straight lines. Draw where you want the adjustment to start to where you want it to end. Hold and drag the lines to change the “feathering” and rotation.
Details
Lightroom Mobile also has a Clarity slider, Texture slider, Dehaze, and Vignette, just as in Lightroom Classic. Be subtle with these corrections or else it’s totally obvious!
Then there’s the standard Sharpen, Luminance Noise, and Color Noise sliders. Lightroom Mobile gives you the same controls as you have in Lightroom Classic, including Sharpen Masking, which I love for “blocking” sharpening from happening in skies or other even-toned areas that don’t benefit from sharpening.

Presets
You can create your own presets in Lightroom Mobile or import presets from others. However, pre-created presets can only be imported in the desktop version of Lightroom Mobile. Once they’re imported, then they’re synced across the cloud to your mobile devices.
To use a preset in Lightroom Mobile, just tap on the icons that look like filters and select a preset.
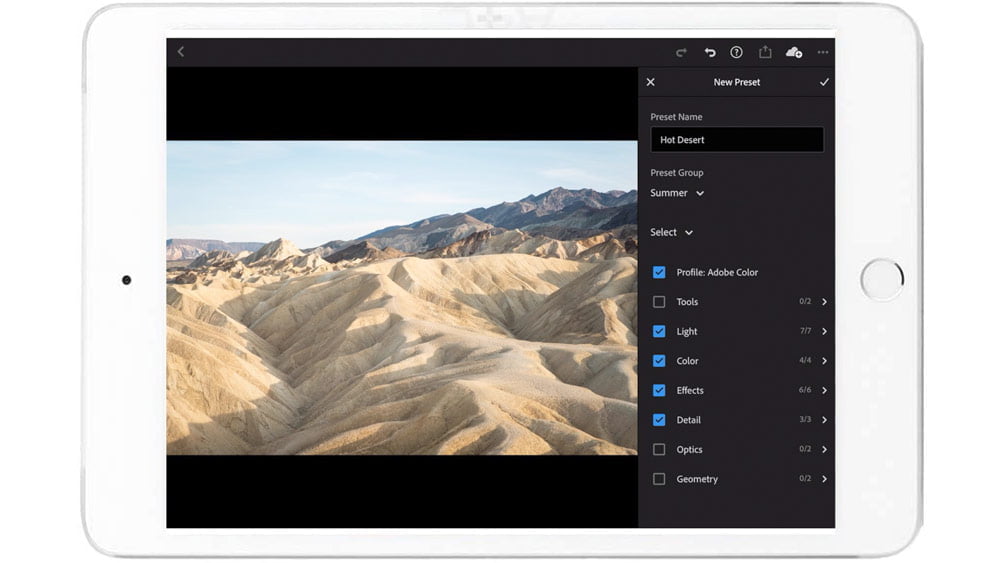
You can also create your own preset after making your edits, to apply to other photos. Select “Create Preset” from the menu, check the edit adjustments you want to include in the preset, name it, and tap the checkmark to save it.
Publishing Photos in Lightroom Mobile
Exporting photos
Lightroom Mobile offers numerous options for exporting photos. You can export directly to your Camera Roll, Files, external editing programs like Photoshop Express, email, and social media apps, just to name a few. Select the photo(s) you wish to export, tap the Share icon, and select how you want to share it.
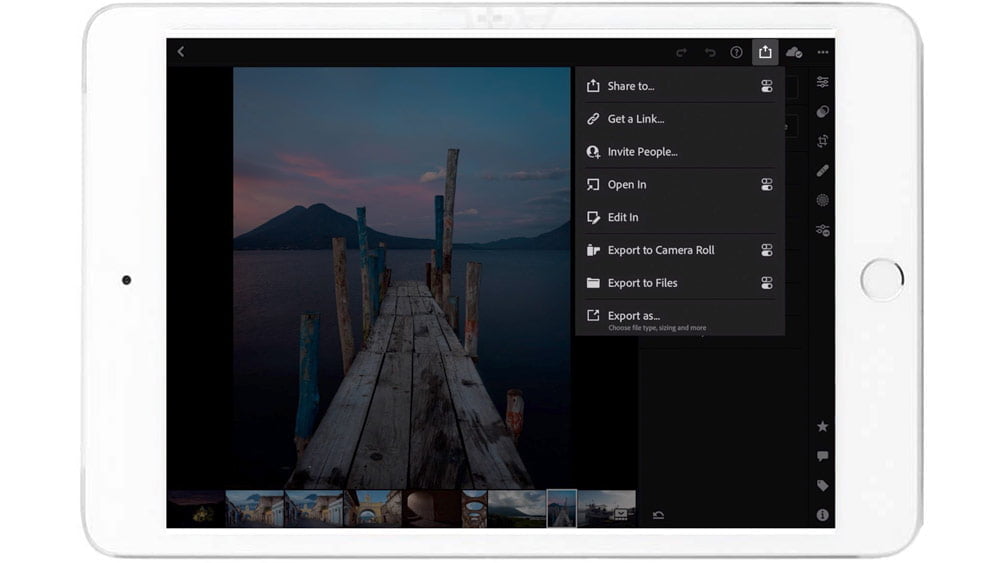
- “Share To” exports to an app where you can share the photo with others via social media, text, etc.
- “Open In” exports to an external editing app, like Photoshop Express.
- “Edit In” starts a “round-trip” edit to specialized Photoshop tools before returning the photo back to Lightroom.
- “Export to Camera Roll” does just that.
- “Export to Files”…ditto.
- “Export As” is a miscellaneous catchall where you can make a separate export setting and destination to wherever you want.
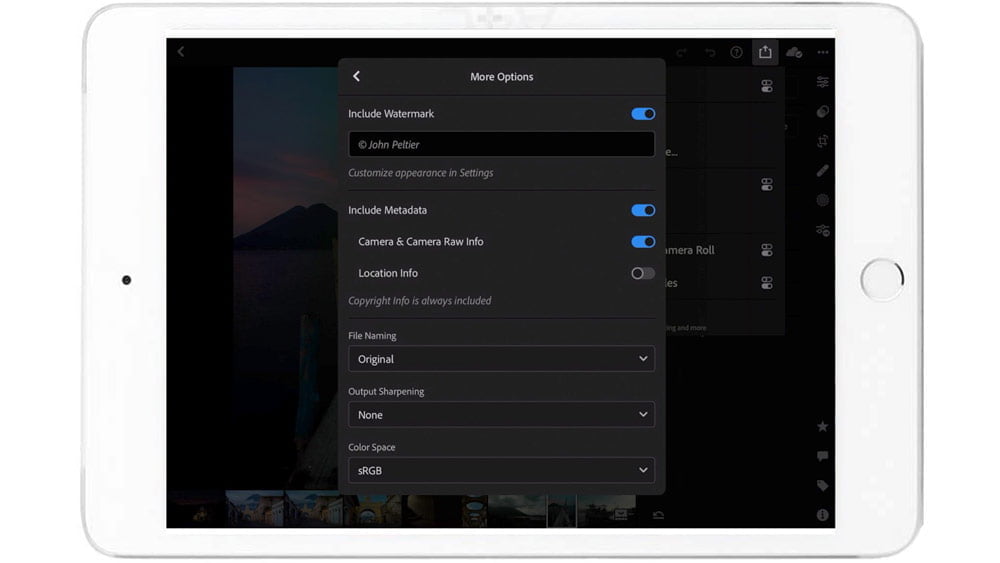
You can also create “export presets” for Share To, Open In, Export to Camera Roll, and Export to Files. Have different settings depending on where you’re exporting the photo, changing the file type, size, quality, and watermarking.
Publishing photos
This is really cool. If you have an online gallery at places like SmugMug or Flickr, you can export straight to your galleries from Lightroom.
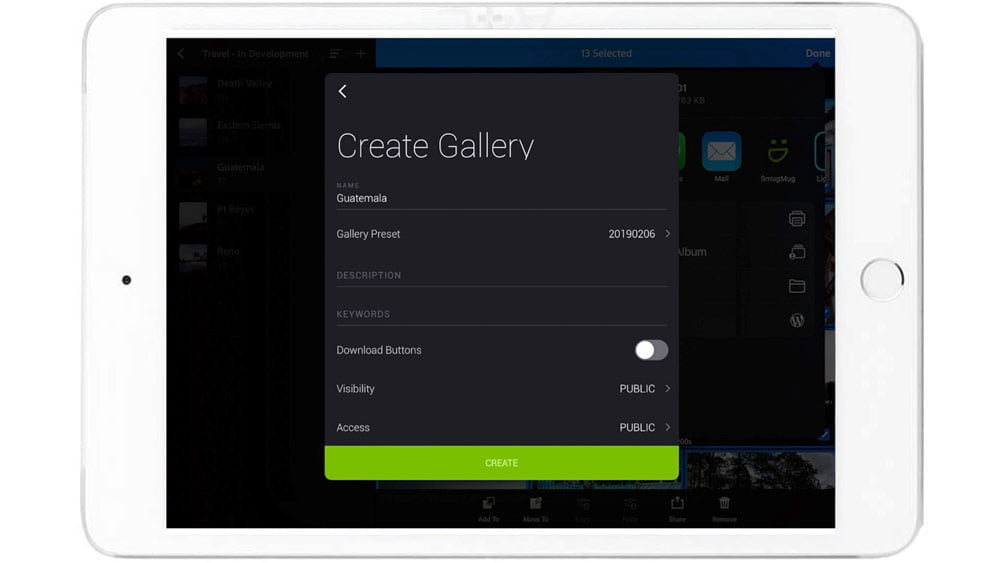
Select the photos you wish to publish, go to Share To, then select the gallery app you use. For me, when I select Share To, I tap on the SmugMug app. The SmugMug app opens within Lightroom with the “Create Gallery” dialog. I just name my gallery, add a description and keywords, set a gallery preset if I have one, and publish! Then it’s added to my online portfolio site – all without touching a computer!
If you don’t have your own gallery like this, Adobe can host a simple one for you on the Creative Cloud. Just select “Share & Invite” from the album you want to share and get the link for it.
Practice how you use Lightroom Mobile!
This post just skims the surface of what you can do with Lightroom Mobile. But I just wanted to highlight my workflow and demonstrate that yes, it does work as a total editing solution for travel photography!
If you want to further explore how to use Lightroom Mobile, click this link for free previews of my course and have 20% taken off the price. The course includes video demonstrations, downloads, exercises, and quizzes to help you become a Lightroom Mobile master!
Julian Stumm
Friday 17th of January 2025
Great article, thanks. I used to be an expert level user of Lightroom 6 (the last desktop version before they changed to a subscription model) I do miss the catalogue functionality on Lightroom Mobile. It seems that you can no longer just lift and shift a catalogue of photos, edits, presets etc etc so its impossible to archive off a project to an external drive in order to save cloud storage space.
John Peltier
Saturday 18th of January 2025
Yeah, it's a great solution for mobile, on-the-go photography. But integrating it into any kind of archive is a pain, if not impossible.
Shannon
Monday 1st of August 2022
Hi, I am learning to use Lightroom mobile when I am traveling. My question is how to move the original files from iPad to external hard drive connected to mac for permanent storage. My normal workflow at home would be from SD card to external drive, then import to Lightroom on Mac. So if when traveling, I load from SD card to iPad camera roll and import to Lightroom mobile, when I get back home I want to transfer original files to my external drive with all my other original photo files and remove from iPad. Can anyone suggest the easiest way to do this.
Best Lightroom Tutorials For Beginners | Light Stalking
Wednesday 27th of April 2022
[…] 14. How To Use Lightroom Mobile In A Full Travel Workflow […]
Ugo
Monday 20th of December 2021
It's a pity you can't merge bracketed photos to hdr in Lightroom mobile. In my opinion that ruins the whole full travel workflow.
15 Best Lightroom Tutorials For Beginners – KoodabellBlog
Wednesday 21st of April 2021
[…] 14. How To Use Lightroom Mobile In A Full Travel Workflow […]