Disclosure: This post may contain affiliate links. I earn a small commission of product sales to keep this website going.
Is real travel photography without a laptop possible?
And I mean with a phone or even a small tablet, not even with something like an iPad Pro.
If you asked me this question a few years ago I would have said no. But now I don’t take my laptop anywhere! It’s a liberating feeling with several advantages. But it also comes with its challenges.
In this post, we’ll look at how to do travel photography without a laptop, from planning to publishing.
Here’s what we’ll cover in this long post if you want to skip ahead to something:
Power
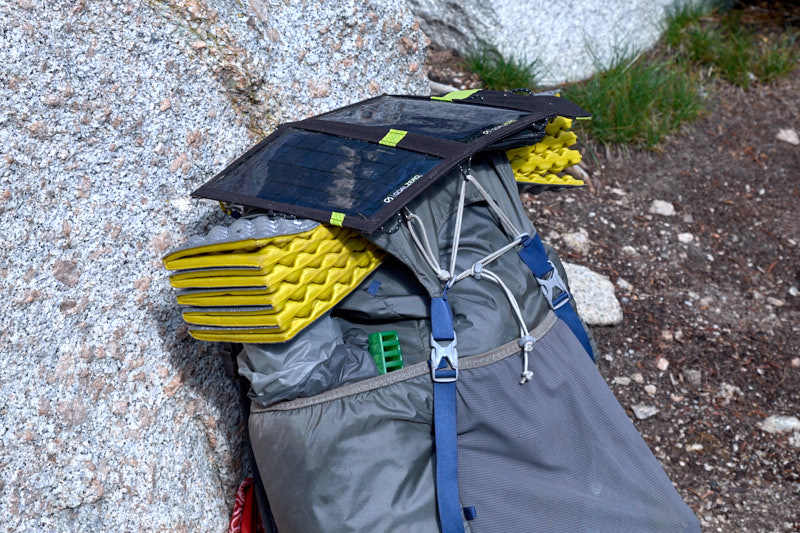
Everything that we’re going to use for our travel photography workflow without a laptop can be charged via USB. Most cameras these days can be charged through their USB port; if not, you’ll want to get a USB-powered third-party charger from companies like Wasabi or Newmoa (so you can use them with a solar charger or high-capacity battery pack).
Solar chargers like the Goal Zero Nomad 7 are great for backpacking and travel to remote, sunny places without immediate power available.
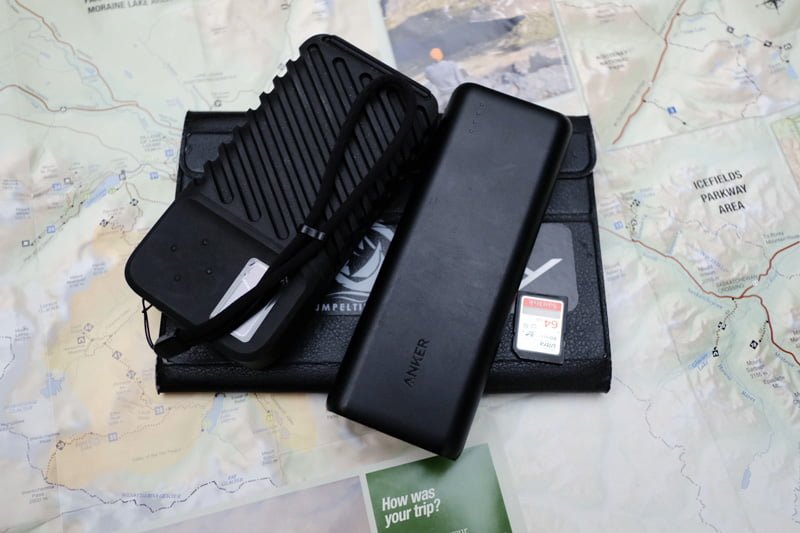
Portable battery packs like the Anker PowerCore are perfect to last you a few days away from power when you can charge them back up again.
Planning
There are several great ways to plan your travel photography without a laptop. Numerous great apps for smartphones and tablets can take care of all of this for you.
Language apps
Pimsleur and Rosetta Stone are the premium language apps if you’re trying to become fluent or at least proficient. They’ve been around the longest, and you can read a detailed comparison of these apps in this post.
But you don’t need an app that will teach you fluency in a language. Many other great apps and language “pocket guides” on your phone will help you learn the essentials like asking, “may I please take your photo?”
And if you’re somewhere with a WiFi or cellular data connection, nothing beats Google Translate’s ability to speak, read, listen, and write. It’s becoming more and more accurate every day. You can now even download offline translation files and select regional dialects.

Photo Planning
I love spontaneous photography, but proper photography planning is also crucial. It’ll help you be in the right locations at the right times, know where the light will be, choose the proper lens in advance, and visualize the views to expect.
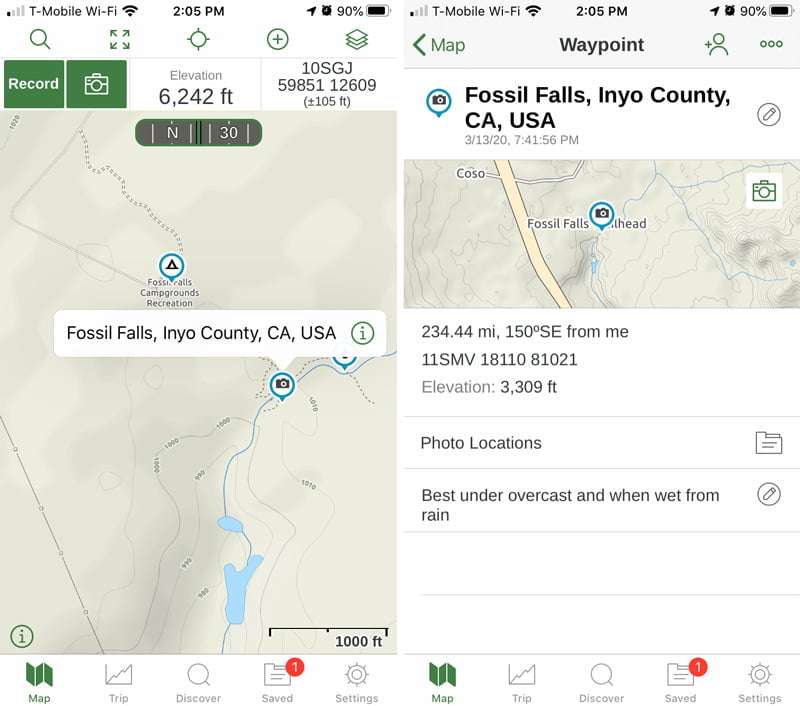
Photography-specific apps like PhotoPills and The Photographer’s Ephemeris contain celestial almanacs and will tell you where the sun will be throughout the day. They’re great for planning photo shoots near sunrise and sunset. Read more about the PhotoPills and The Photographer’s Ephemeris comparison of features.
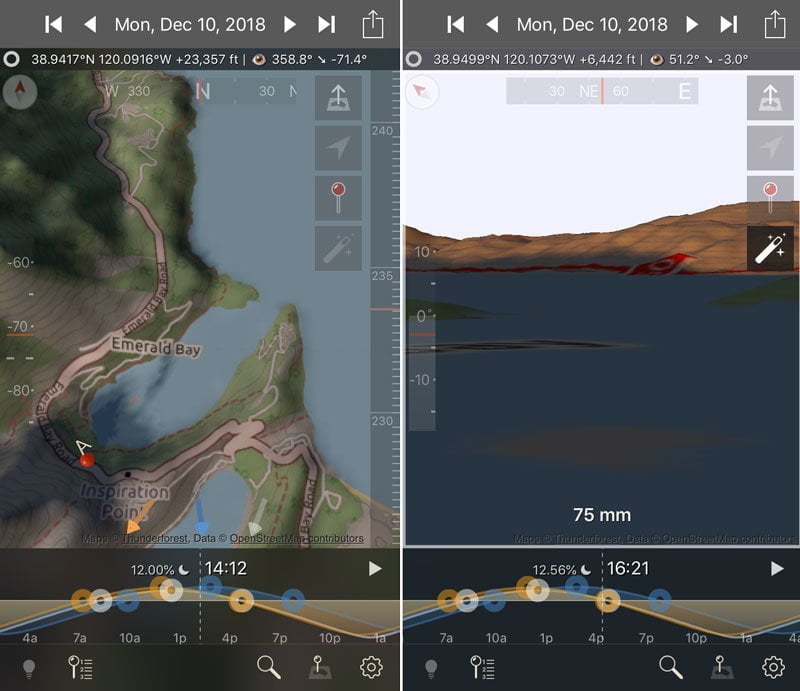
When you know where and when you want to shoot, you’ll need to keep track of all your points-of-interest. Your phone’s native map app, Google Maps or Apple Maps, lets you mark locations.
But I prefer Gaia GPS. I can go a step further and organize my photo locations into folders and add notes to each waypoint, as well as add photos to the waypoint file.
You can read this post to find out about more great photography apps.
Storage & Backup Without a Computer
I certainly hope you’re backing up your photos and not just leaving them on the memory card in your camera! Don’t believe that you can’t backup your travel photos without a computer. There are a number of ways to do this.
But why is this important? What happens if something happens to your camera like it gets lost or stolen? What happens if the memory card becomes corrupt? What if, when you’re changing out those little tiny SD cards, you misplace it or drop it somewhere you can’t retrieve it?
You should always have your photos backed up to another location when traveling, if not two extra locations. This applies to everyone regardless of if you’re shooting RAW or JPEG on your travels.
Techniques for doing this need their own articles, and I’ll get there, but here’s an introduction. You should be doing this at least once a day.
Directly to your MOBILE device
This is the simplest and cheapest option for storing and backing up your photos without a computer. At least I’m assuming everyone reading this already has a smartphone or tablet?
Wired
A wired connection is the way to go if you’re transferring RAW files. If you’re shooting RAW you should transfer those files both for backup and to start initial post-processing.
Android-based phones and tablets play nice with everything else. All you need is that USB cable to plug your phone into your device and start transferring your photos.
Apple, on the other hand, is a pain in my ass with all the required dongles and card readers to adapt various things to my phone and iPad. The iPad Pros do have a USB-C port, and it’d be nice if the rest followed suit. I digress…
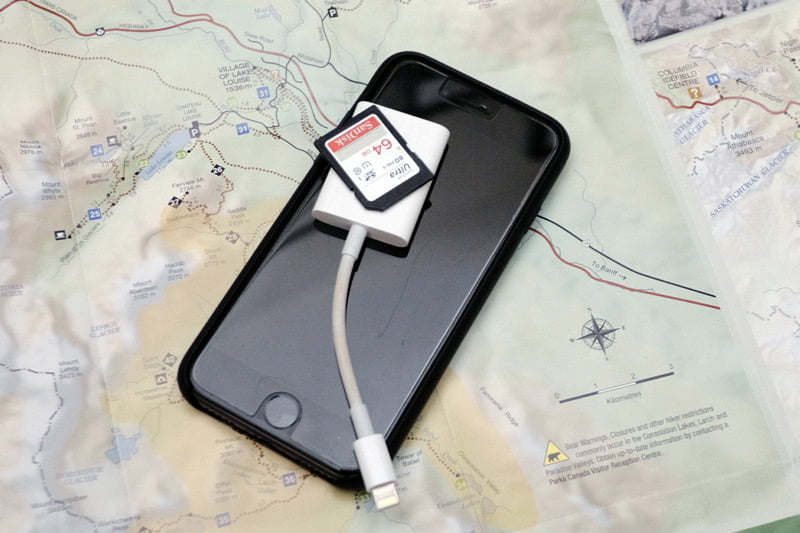
You don’t need to transfer all of your daily photos, especially if you’re transferring the RAW files and are limited on storage. Transfer your initial “selects” so you at least have the best shots of the day.
Wireless
Many of today’s cameras have wireless capability for transferring photos directly to your phone or tablet. This is really only a good option for transferring JPEG files. Transferring multiple RAW photos takes forever. Most cameras don’t even have the option to wirelessly transfer RAW photos.
To the cloud
When Internet connections are fast and plentiful, nothing beats a backup to the cloud. Your photos are safe and secure in multiple other locations across the globe.
Concerned about data loss and/or intellectual property theft? Don’t be. The laws still protect you and most of these services keep your files in several locations. Phone/tablet backup combined with the cloud is 99.999% loss-proof.
With many of these, you can create a folder on your device to store & backup your photos and they’ll automatically sync to the cloud when you have an Internet connection.
If you want enough storage to be able to adequately back up your photos without a computer – especially RAW files – you’re going to need to pay for it. But most of these will give you terabytes of storage for around ten bucks a month. Some cloud backup & storage services include:
- iCloud (for Apple users)
- Google Drive (for Google users)
- OneDrive (native Microsoft service, available elsewhere)
- Dropbox
- Adobe Lightroom (we’ll get to that in a minute)
- Western Digital My Cloud (in the next section)
- SmugMug (an example of an online portfolio site that can also serve as cloud backup)
Watch your data usage if you’re doing this over cellular! Or better yet, disable cellular data transfers in the apps.
To a portable hard drive
How do you back up photos to a hard drive without a computer? There are several great solutions, my favorites coming from GNARBOX and Western Digital. These companies make portable hard drives complete with SD card slots, USB connections, and internal batteries.
Whatever you do, make sure your portable hard drive is an SSD drive and not an HDD drive. SSDs are more expensive, but there aren’t any moving parts and are more robust. HDDs are far too fragile to travel with. I’ve had numerous portable HDDs throughout the years, including the “rugged” Lacie drives, but they always break.
Complete workflow system
My favorite system now is the new GNARBOX 2.0. It’s a huge improvement over the original GNARBOX, which I abandoned for the WD My Passport. This is a complete workflow solution for travel photography without a laptop.
Update 12/29/21: It appears the GNARBOX may be dead. Read this article from PetaPixel.
This advanced system is super-rugged and water-resistant, with SD, USB-C, and HDMI ports. It comes with its own apps that let you do batch functions like organize, rename, rate, and keyword. It also integrates with Adobe Lightroom for the next step in our workflow.
You’re going to pay a premium but it’s definitely worth it – it’s basically an ultra-portable, rugged computer you wirelessly connect to your phone or tablet. It comes in sizes from 256GB to 1TB.
Just storage
The Western Digital My Passport Wireless SSD was my favorite solution between my GNARBOX first-gen and GNARBOX 2.0. It’s similar to the GNARBOX, in that you can automatically backup from an SD card and use its app to organize photos. It also comes with its own cloud backup service, My Cloud.
But it’s not as rugged as the GNARBOX 2.0, its functions are limited, and it is significantly slower. Still, if all you want is backup, then this is a more economical option. This comes in sizes from 250GB to 2TB.
Lacie makes a similar system with their Rugged BOSS SSD, but after my experiences with their Rugged HDDs, I think I’ll pass.
Editing Your Photos Without a Computer
Whether you’re working with RAW or JPEG files, you’re going to want to start some sort of editing & processing while you’re on the road – either during downtime or in transit. Get ahead of the work so you have less to do later on! This is a crucial but often ignored piece of travel photography without a laptop.
Reviewing photos
The first step is to review and identify your “selects.”
If you’re backing up photos directly to your mobile device you’ve probably already done this. The apps that come with Western Digital and GNARBOX drives also allow you to do this. Flag your keepers, assign a star rating, or whatever else you normally do to identify the selects.
Lightroom and the GNARBOX app allow you to rate photos; you’ll have to come up with other solutions with other browsers like moving your selects to a “Selects” folder.
See this post for further details about the editing workflow using the GNARBOX 2.0.

Developing Photos
Google’s Snapseed is a great FREE photo developing app with all sorts of important, useful, and fun features. It’ll process both RAW files and JPEGs. But if you’re processing RAW files in Snapseed, whatever changes you make will be stuck in Snapseed (i.e. you can’t export your RAW processing history anywhere else). It’s a good immediate solution to process & publish photos if you need to get them out now.
I prefer Adobe Lightroom as an all-around mobile photo processing solution. It’s not as robust as Lightroom Classic, but my RAW processing workflow is pretty basic. I can do it all in this app and then import them to Lightroom Classic when I get home to seamlessly continue my workflow. Again, it’s all about getting ahead! But the mobile app is good enough to be a complete workflow solution.
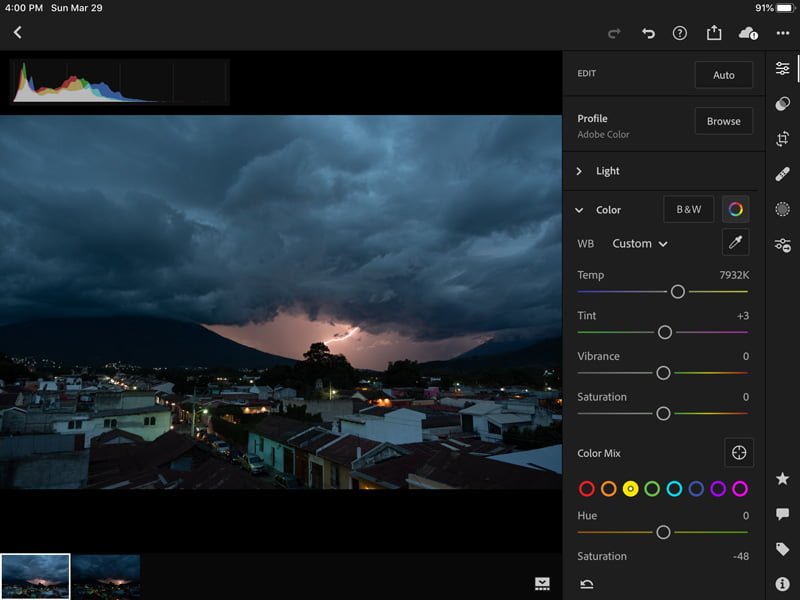
I used to use Capture One but went back to Lightroom all due to this mobile workflow.
Typing on a tablet
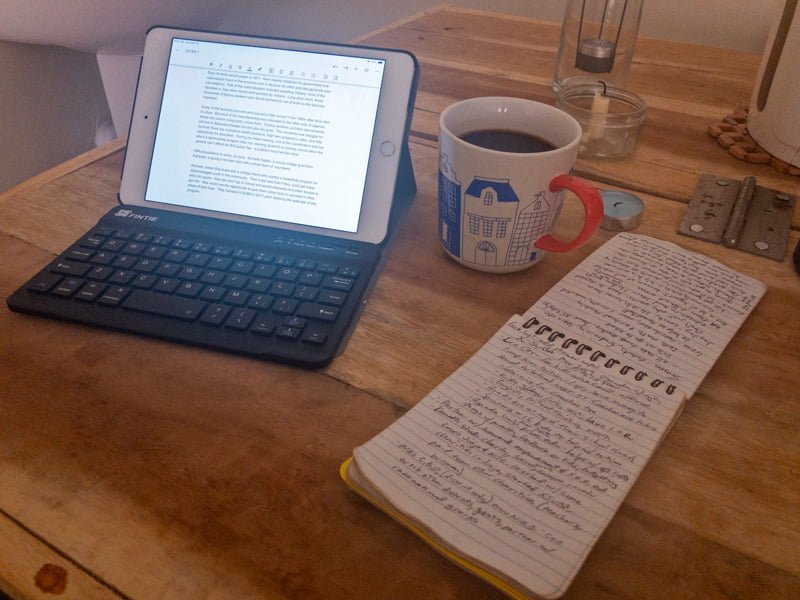
How can you efficiently type out all of these descriptions, notes, and keywords without a laptop? I use a BlueTooth keyboard, and even for the iPad Mini, it didn’t take long for me to get used to this small keyboard. This one I’m linking to Amazon comes with a sturdy magnetic case.
Sharing to Portfolios & Social Media
You’ve backed up, organized, edited, and developed your photos, now what?
Depending on what you do with your photos, the last step in your travel photography workflow is going to be publishing your photos.
If you have a cloud account, you’ll definitely want to upload your processed files here too. Lightroom, GNARBOX, and Western Digital can all be configured to do this automatically.
To an online gallery site
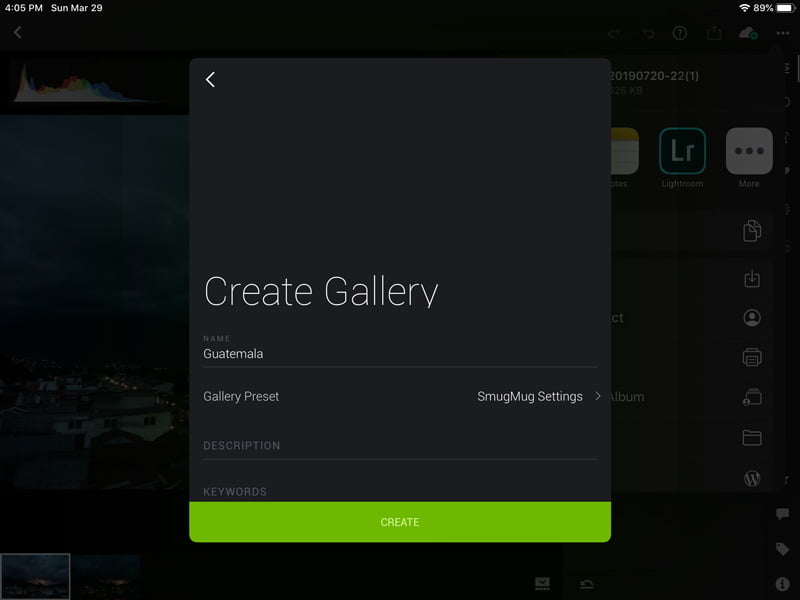
SmugMug is a slick online gallery site that allows you to customize the look of your site and set up pricing for digital downloads and all sorts of prints. It also has a mobile app that is now almost on par with its desktop site.
With the mobile app, you can create folders and galleries with setting presets you’ve already created, set password access, and upload photos complete with camera metadata and Title, Description, and Keywords from Lightroom and GNARBOX.
You can also export straight from the Lightroom app to your SmugMug app, eliminating the middle step of exporting processed JPEGs to your mobile device first.
To social media
It’s a given that you can upload straight from a mobile device to social media.
But when you’re traveling, you’re likely going to be away from Internet access for long periods. And how do you keep track of all of the photos you want to post to social media? Which captions and hashtags will you use?
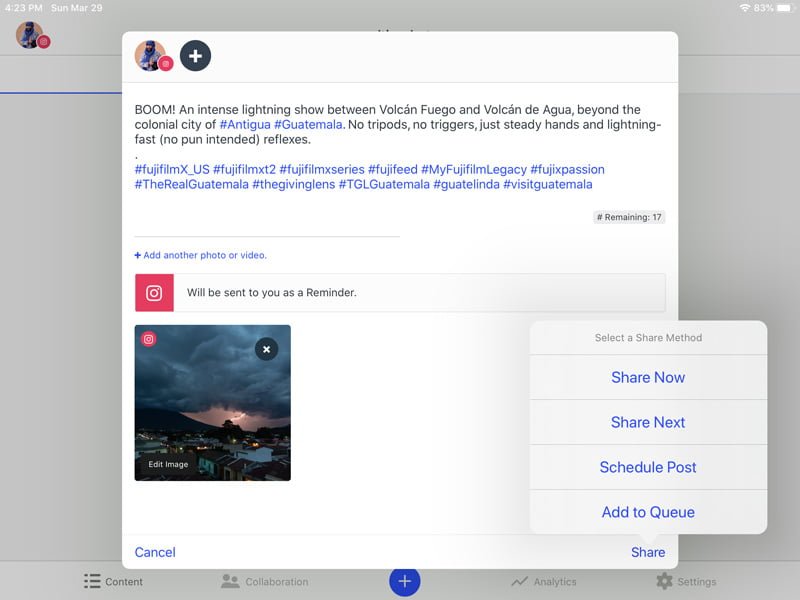
You used to need a laptop for these things, but many apps today will let you create a social media posting schedule on your mobile device. You can schedule the posts, complete with captions and hashtags, from these apps. Then it’ll automatically post them for you, or send you a reminder that it’s time to publish, depending on your app and account settings.
Buffer, Later, Hootsuite, and Crowdfire are all examples of social media managers you can use without a laptop. Compare their features and pricing plans (including free) to determine what’s best for you. After trying all of them throughout the years I’ve settled on Buffer since it’s the most capable and easiest to use on a free plan.
The Advantages of Having a Travel Photography Workflow Without a Laptop
And that’s my workflow for travel photography without a laptop! It’s been incredibly liberating to be able to do everything from planning to backup to publishing with just a tablet and small hard drive.
So now you’re asking, but doesn’t a tablet, portable hard drive, and battery pack weigh & cost as much as a laptop? What’s the advantage?
First off, it is a more economical solution to have a smaller modular system like I just explained. In terms of both money and electricity.
Second, the modular nature allows you to swap out different pieces, upgrade, pare it down to the minimum, and adapt for the job. When it’s time to back up, just pull out the portable drive. When you’re done backing up and tagging your “selects” on the portable hard drive, you can put it away and just work on developing with a tablet or phone. It’s much more manageable.
Third, most of us have our entire lives on our laptops. Even if we constantly back up our hard drives, I don’t know about you but I’d be absolutely devastated if my laptop were stolen or lost. A used iPad Mini I bought off eBay? Not so much.
Anyways, I hope you got some good ideas out of this! Which different solutions would work for you?