Disclosure: This post may contain affiliate links. I earn a small commission of product sales to keep this website going.
Update 12/29/21: It appears the GNARBOX may be dead. Read this article from PetaPixel.
Some of us just like to travel and make photos, saving all the “work” for when we get home. And some of us like to get ahead of photo editing before we get home. Using the GNARBOX 2.0 in your photography workflow will save you loads of time upon your return.
What is the GNARBOX?
The GNARBOX started as a Kickstarter project years ago. It was a rugged portable hard drive, one that could back up all of your movies and photos, and then allow you to edit those via a mobile app interface.
The first version wasn’t very versatile, and I eventually switched over to the Western Digital My Passport Wireless SSD for wireless backup & editing workflow while traveling.
But then the GNARBOX 2.0 was released with a mountain of improvements and new features. I was always a fan of the concept and was curious to see if the second version addressed the shortcomings of the first. After a few weeks with it, I ditched my Western Digital in favor of the GNARBOX 2.0.
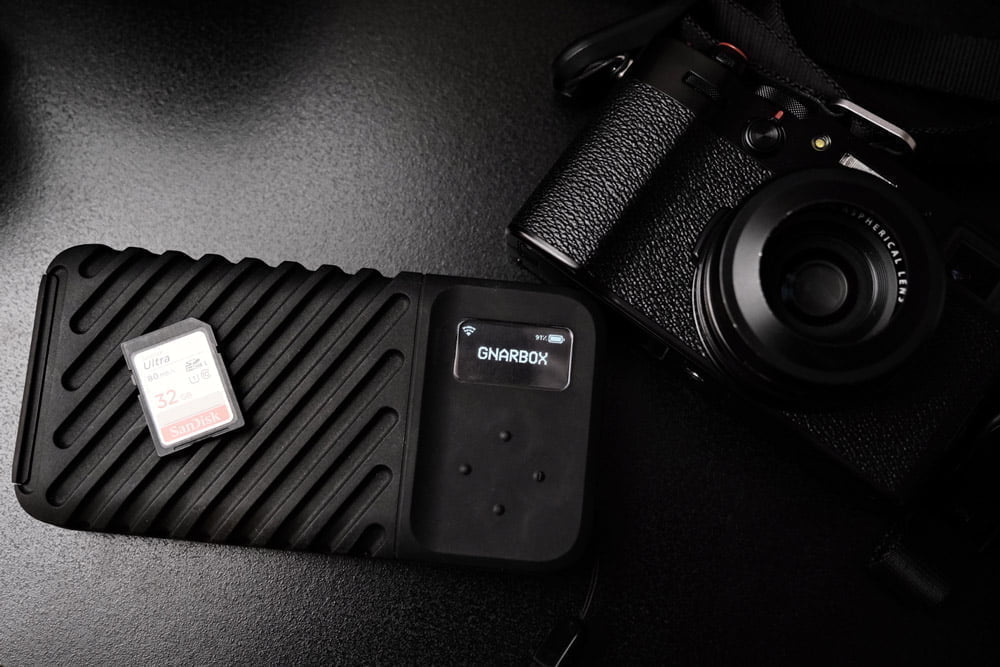
GNARBOX 2.0 Overview
- Connections: SD, USB-C (x2), Micro HDMI, WiFi
- Supported files & codecs: RAW, TIFF, JPG, PNG, MOV, MP4, ProRes, H.264, H.265, MTS
- Removable 3000mAh battery
- Storage: 256GB, 512GB, or 1TB
- 6″ x 3″ x 1″, 0.8 pounds
- MIL-SPEC protection from water, dust, drops, and crushes
The GNARBOX 2.0 can start an automatic backup when you connect it to a memory card containing your photos and videos. If you’ve created backup presets in the Safekeep app, you can have those files copied to a dynamic folder structure you specify for easy organization.
With the files copied to the GNARBOX 2.0, you can browse through them on the GNARBOX app, assign star ratings, add keyword tags, and rename files. Export your selects to any mobile editing app you use, like Lightroom CC, LumaFusion, or Affinity Photo. Once you have a strong Internet connection, start an automatic backup to your Dropbox account for extra safekeeping.
Don’t have a GNARBOX 2.0 yet? Check out B&H Photo for current deals (affiliate link).
GNARBOX 2.0 Setup
There are a few housekeeping steps to set up the GNARBOX 2.0 for an efficient travel workflow.
We’re going to do these in the GNARBOX app, the mobile app you’ll use to interface with the box.
UPDATE 2/21/2021: GNARBOX finally consolidated both of their apps, Safekeep and Selects, into one GNARBOX app. If you see “Safekeep” and “Selects” throughout this article, just know that all of these functions are now in one house in the GNARBOX app.
So with the GNARBOX 2.0 powered on and our mobile device connected to its WiFi network, let’s go to the GNARBOX app.
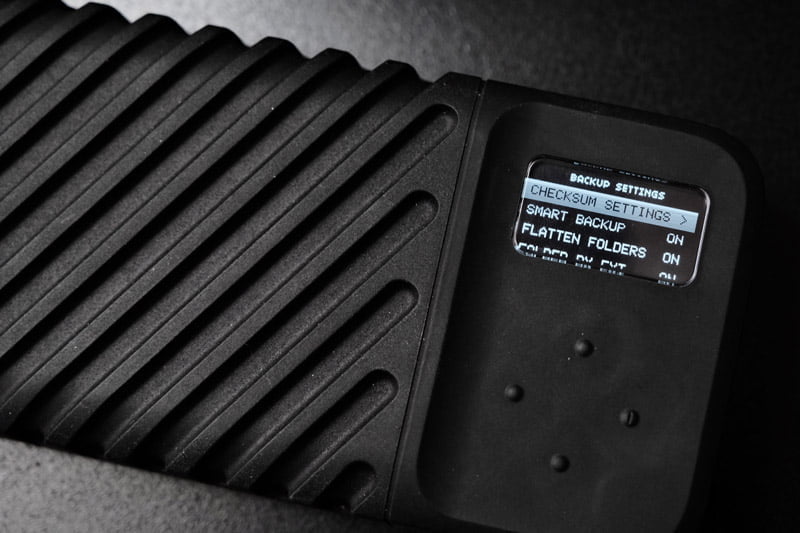
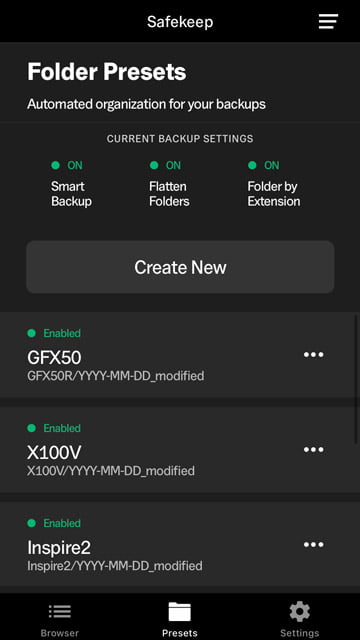
Backup settings
Go to the Settings menu and check the following options under Backup Settings:
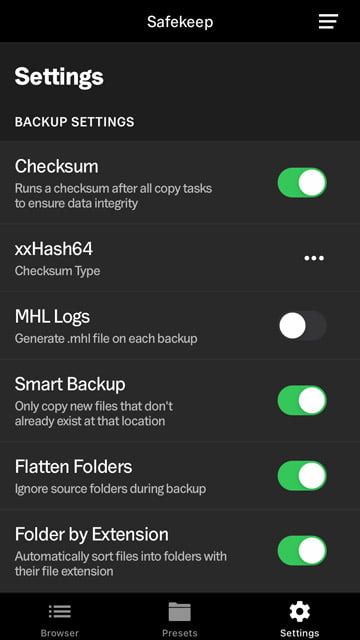
- Checksum: Recommend having this ON. It’s a verification that everything copied over to the GNARBOX 2.0 without issue. Your backups will take a smidge longer but it’s good to know everything was copied.
- Checksum Type: In new software versions, xxHash64 is the default method.
- MHL Logs: I don’t use this. It’s an advanced feature I don’t see a need for with basic photography workflows.
- Smart Backup: I have this enabled so that only new files are automatically backed up; I back up at least once a day and only want the new photos since the last backup copied.
- Flatten Folders: Most cameras put some kind of folder/subfolder structure on memory cards. Having this enabled will ignore all those and just copy the files (not the source folders) into the GNARBOX folders you specify.
- Folder by Extension: If you work with RAW+JPG files, I recommend having this enabled so that RAW files go into one folder and JPGs into another. This speeds up your editing process. My next article will show you how to deal with this when importing into Photo Mechanic.
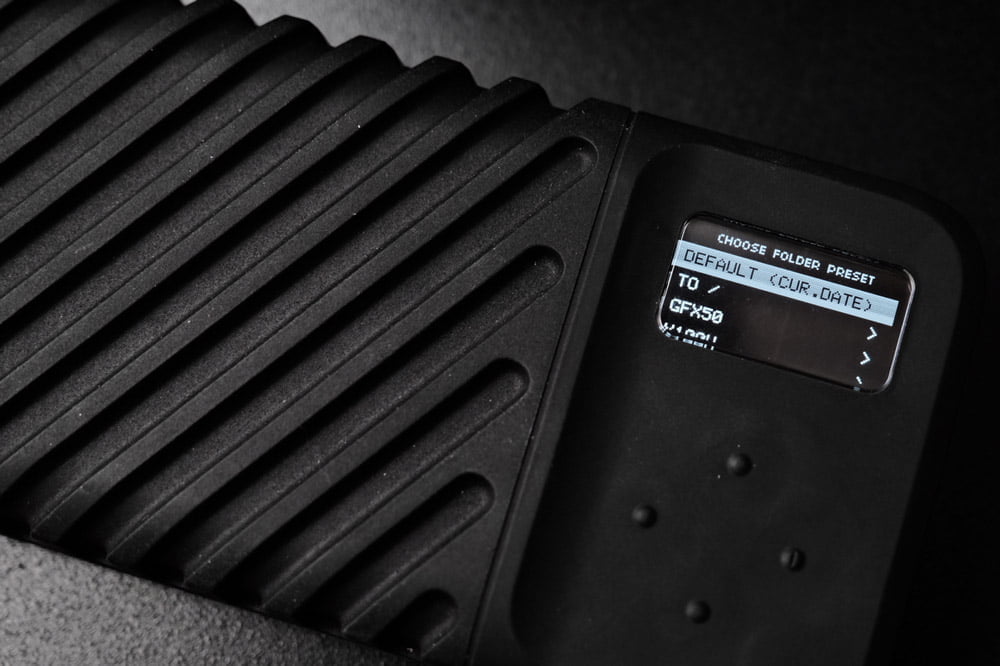
Folder presets
The next thing you want to do – especially if you have multiple cameras, or just like organization – is to create import presets.
In the GNARBOX app, go to the Presets menu. This will show you what your current file/folder backup options are, and where you can see your presets and create new ones.
To create a preset, select Create New.
Enter the name for this root folder. I do it by camera model so I can quickly browse photos created with certain cameras.
But if you’re using the GNARBOX 2.0 while out on multiple jobs, like you shoot for one client one day then a different client on the next, then back to the first client, you could create a folder preset named for each of them. Or do it by location, event, etc. Whatever your needs are.
You can name several subfolders for each preset. Just enter the text and hit “Add” for each subfolder.
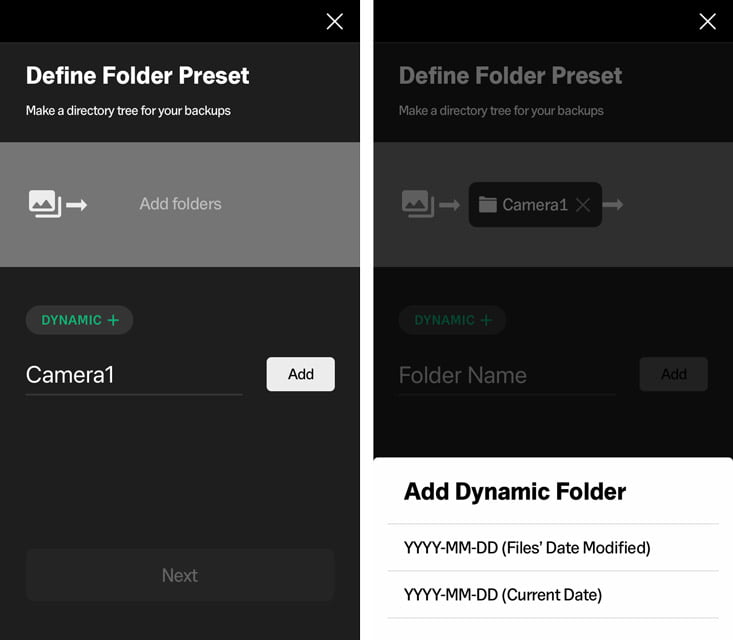
Use “Dynamic+” to create a folder that uses either today’s (backup) date or the capture date. I use the capture date (date modified).
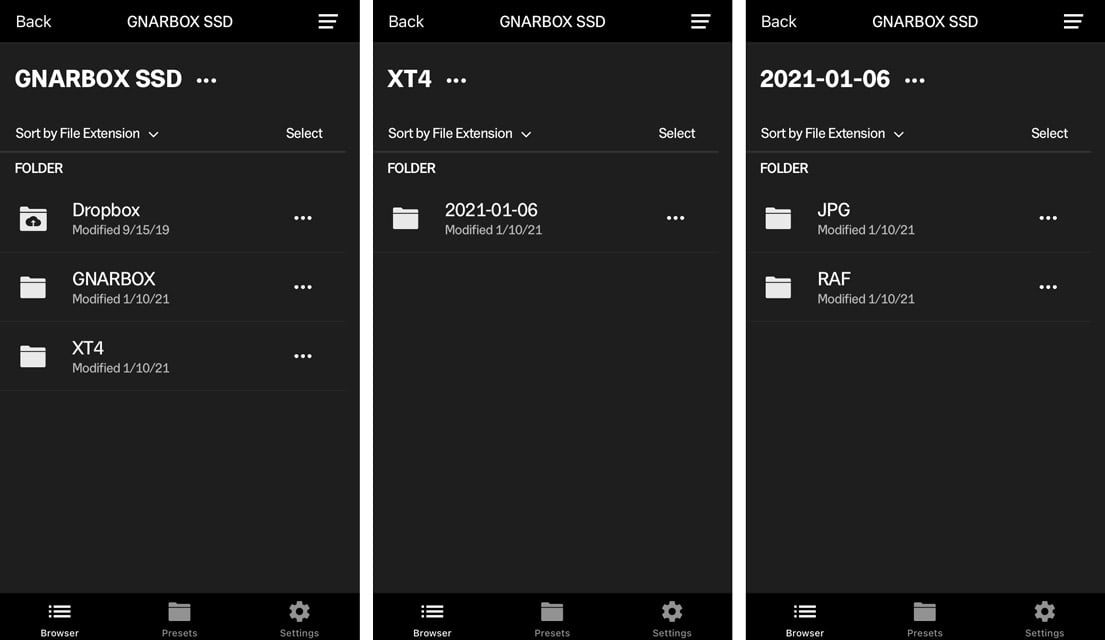
So all of my JPGs taken with my X-T4 on January 6th would automatically be backed up here: XT4/2021-01-06/JPG. RAW files would be in a RAW subfolder. That’s because I use Folder by Extension. If I didn’t have that enabled, then everything – both RAW files and their JPG copies – would go into the 2021-01-06 subfolder.
GNARBOX 2.0 for Backup
Once your GNARBOX 2.0 is set up, back up! As in back up your files. When is it one word versus two? I’ll try my best.
Anyways, while traveling, I back up at least once a day, at the end of the day when I’m back at the hotel or getting ready for bed. If I have any downtime on a bus or train between locations in the middle of the day, I might pop in my memory cards to start a backup of the morning’s photos.
Why back up so much?
Well, what happens if someone steals your camera? Or you drop the SD card down a storm drain? Or it becomes corrupted?
I back up every chance I get so that if something bad happens, it happens to as few photos as possible. And I keep the GNARBOX 2.0 in a location separate from my camera, like a different bag.
Automatic backups
You don’t even need to connect your mobile device to the GNARBOX 2.0 or open the app to start a backup. Just pop the card in the slot or connect a USB-C cable to your camera as a card reader.
If you just want to start the backup and don’t want to choose your presets, select Backup Now and press the right pad to start.
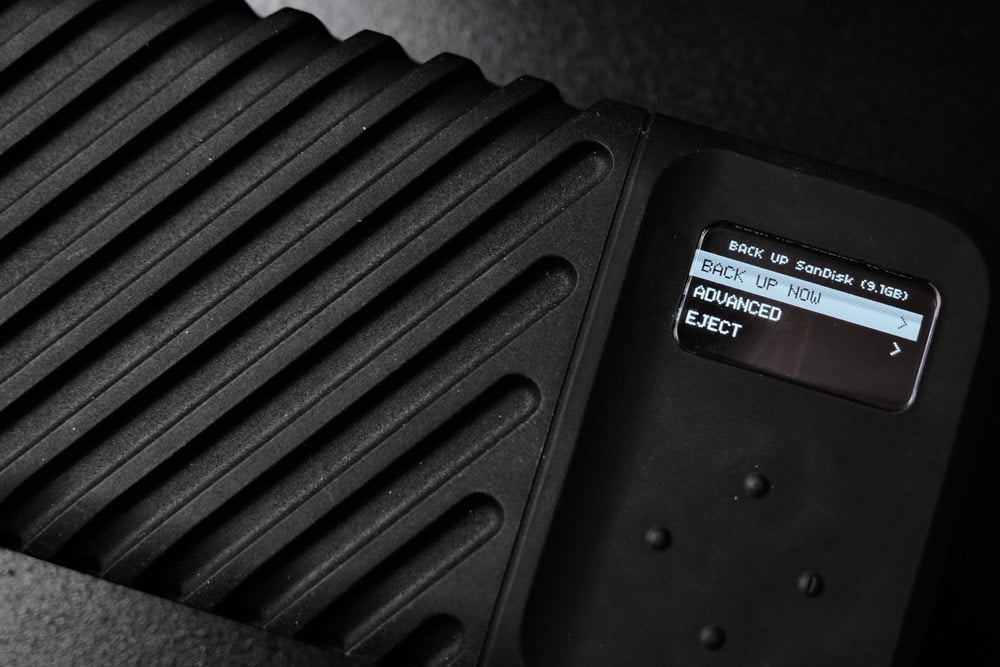
If you do want to use your presets, select Advanced, use the right pad to enter your list of presets, select the preset you want to use, then press the right pad again to start.
So if I’m out with my X-T4 and X100V, I’ll take the card out of my X-T4 and select my X-T4 preset to put them in my X-T4 folder. Then I’ll put the card from my X100V in and select my X100V preset to put them in the X100V folder. Organization nerd, but I love it.
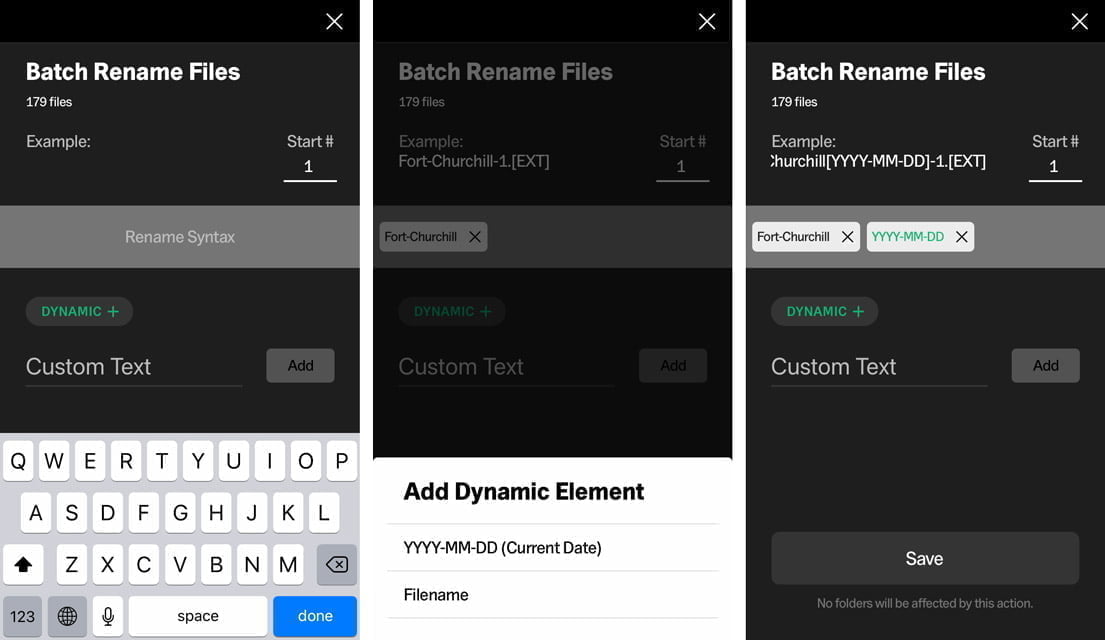
Additional organization in the GNARBOX app
If you want to do any extra functions, like backing up to your Dropbox, renaming the files, moving them to a different folder, or exporting them to your device’s Camera Roll, you can do all of that in the GNARBOX app while your mobile device is connected to the GNARBOX 2.0.
In the app, go to the Browser. You can navigate to any folder or any photo(s), then use the “three dots” to bring up the menu of options, which will depend on what you have selected.
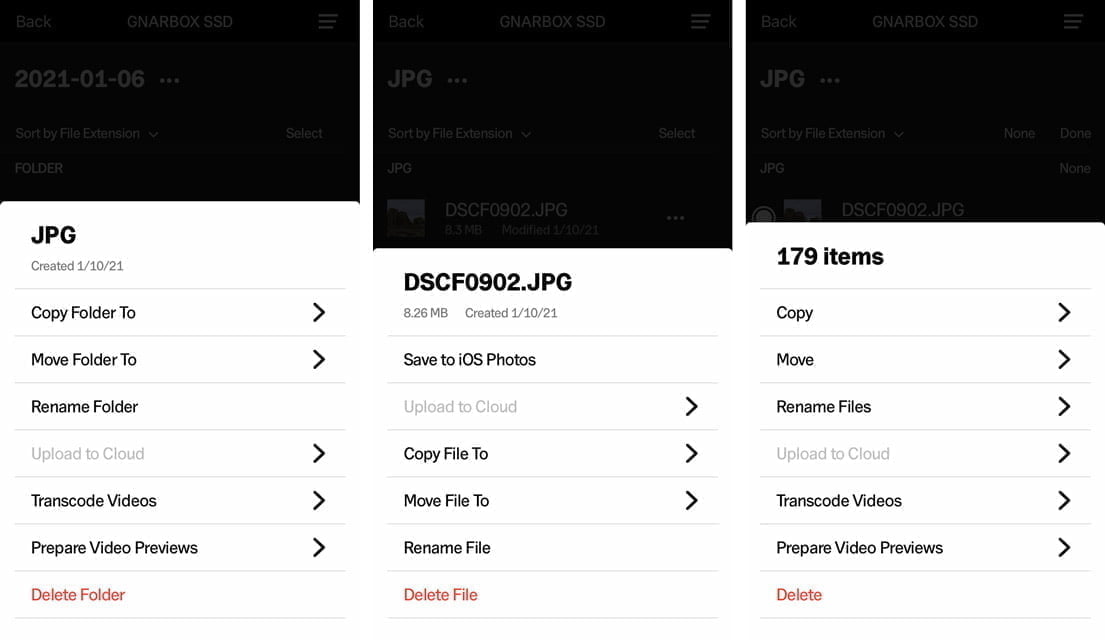
I typically don’t do any of these things while on the road, at least not until after a round of editing.
Editing with the GNARBOX 2.0
Awesome, now all of your photos are backed up. They’re organized into folders that make navigation easy, and when it comes time to transfer them to your main drive, that’ll be easy too.
If you have the time to get started with editing photos while on the road, GNARBOX 2.0 makes that easy too. And when I say editing, I’m referring to rating your photos, selecting the keepers, picking your favorites, and trashing the rejects.
Doing this step now can save a lot of time in front of the computer later on.
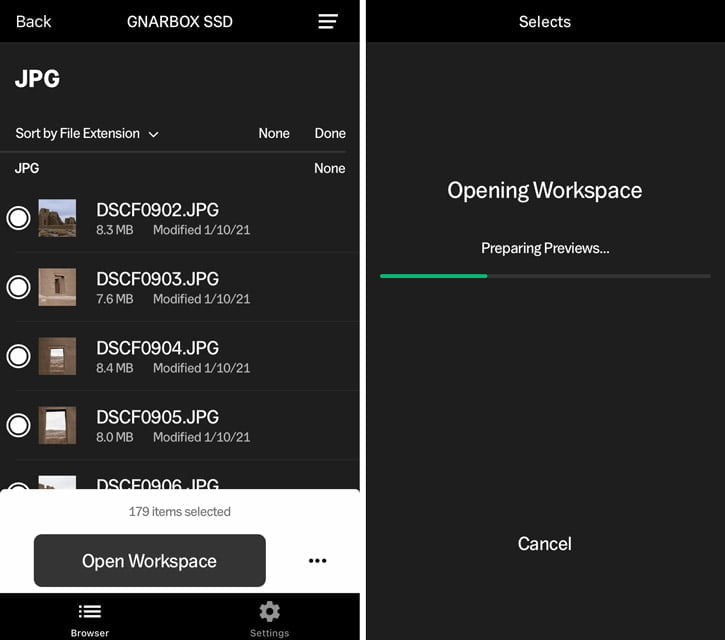
All of the editing is done in the GNARBOX app. Go to the Browser menu and open the folder you wish to edit.
A note to photographers who record RAW+JPG: The reason for separating RAW files and JPG files into separate folders is because the GNARBOX 2.0 doesn’t pair them. I edit the photos in the JPG folder. When importing into Lightroom or Photo Mechanic, the RAW and JPG files are then automatically paired and use the metadata from the JPG file.
Editing Workspace
Once in that folder, tap Select, then All. From there, Open Workspace. This will open those photos in the Editing workspace.
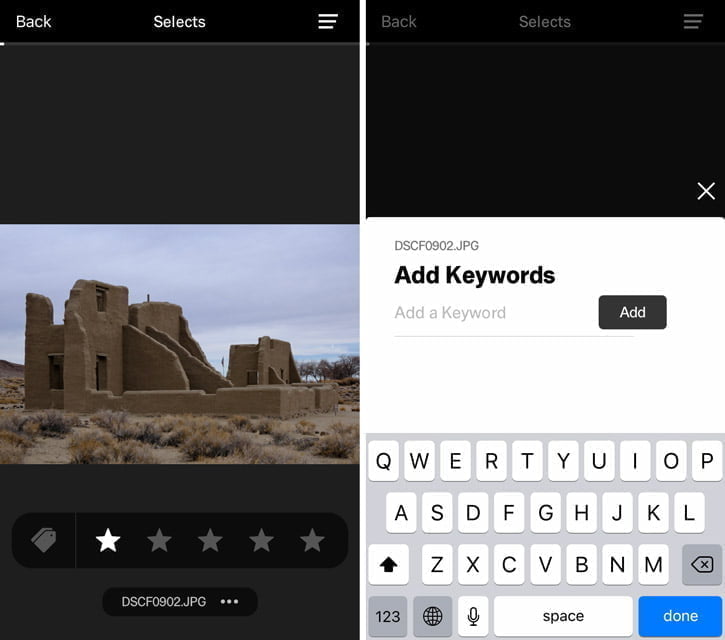
This workspace is really easy to use. Tap on how many stars you want to assign a photo. Tap the right side or left side of the screen to scroll to the next or previous. You can tap the Tags icon to assign keywords that will be read by Lightroom or Photo Mechanic when importing; I prefer to do this step in those programs.
There are several different techniques to assigning star ratings on the GNARBOX 2.0; this is how I do it:
- 1 star: Trash. The photo is out of focus, exposure is way off, awkward timing with my subject, etc. But none of this stuff ever happens to any of us, right? 🙂
- 2 stars: Keepers. These photos have earned the right to stay in my catalog, though they may not necessarily make it to my portfolio.
- 3 stars: Selects. Out of the photos with two stars, I’ll promote the best of them to 3 stars. These have the potential to make it to my portfolio.
- 5 stars: Share now. These photos should be processed on my mobile device and pumped out to social media for one reason or another.
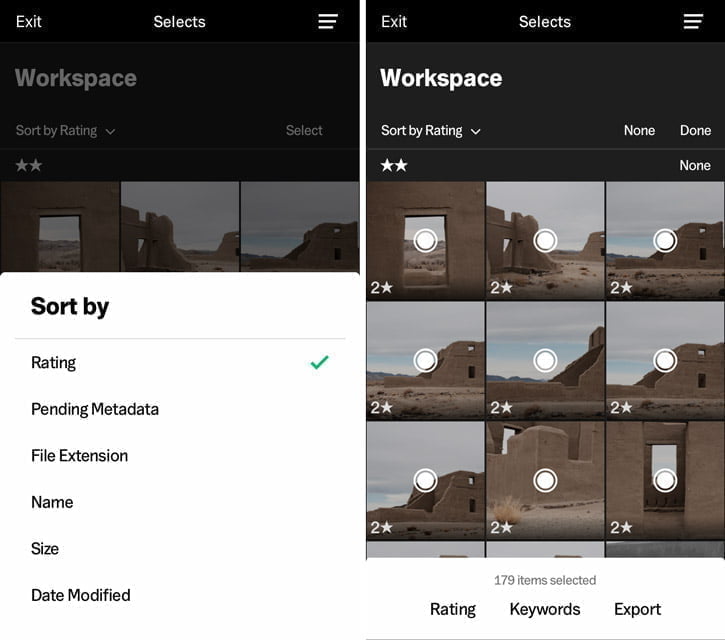
If you select Back, it will take you back to the workspace browser where you can sort your photos by rating, date, etc. You can select multiple photos and assign batch keywords, ratings, and export to external apps like Lightroom CC.
Saving Metadata
After you’ve assigned ratings and keywords, you’ll see a Save All button in the workspace. Those ratings and keywords aren’t saved to those files until you tell the GNARBOX 2.0 how to do it. When you tap Save All, you’ll see three options:
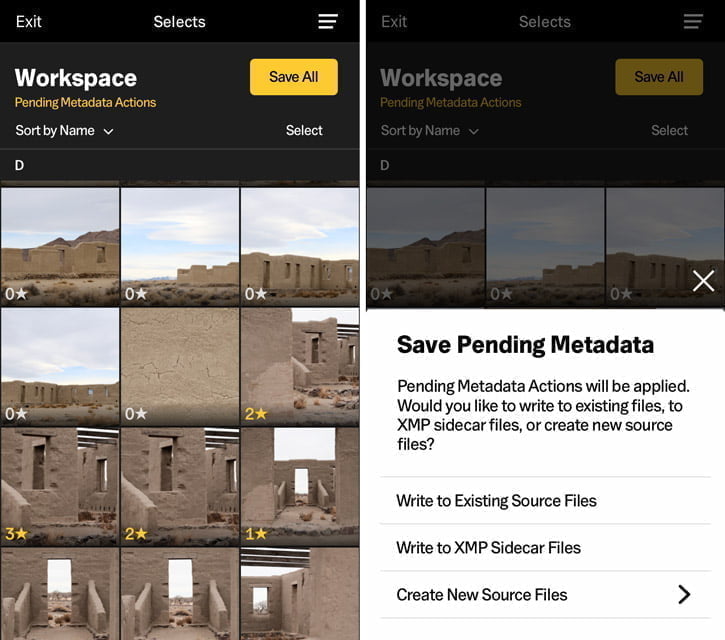
- Write to Existing Source Files: Just as it sounds, this metadata will be written to the original file. This is my preference.
- Write to XMP Sidecar File: An external sidecar file will be created for your RAW file with the associated metadata; this can be read by Lightroom or Photo Mechanic upon import to those programs.
- Create New Source Files: This will create copies of all of those files selected. The GNARBOX 2.0 will ask you where you want to put those copies, and if you want to write the metadata to the source file or create an XMP sidecar file.
What next?
Accomplishing as much of this workflow on the GNARBOX 2.0 as you can will make your life a lot easier when you get back home. Especially if you’ve worked with multiple SD cards or multiple projects.
Instead of having to download each individual card into your editing program of choice, you can just plug in your GNARBOX 2.0. Everything is on there, already organized for you, and with ratings to give you a leg up on your editing process.
- Power on your GNARBOX 2.0.
- Press the Down pad and go to SETTINGS.
- Go to DUAL ROLE USB and press the right pad.
- Select MASS STORAGE and press the right pad.
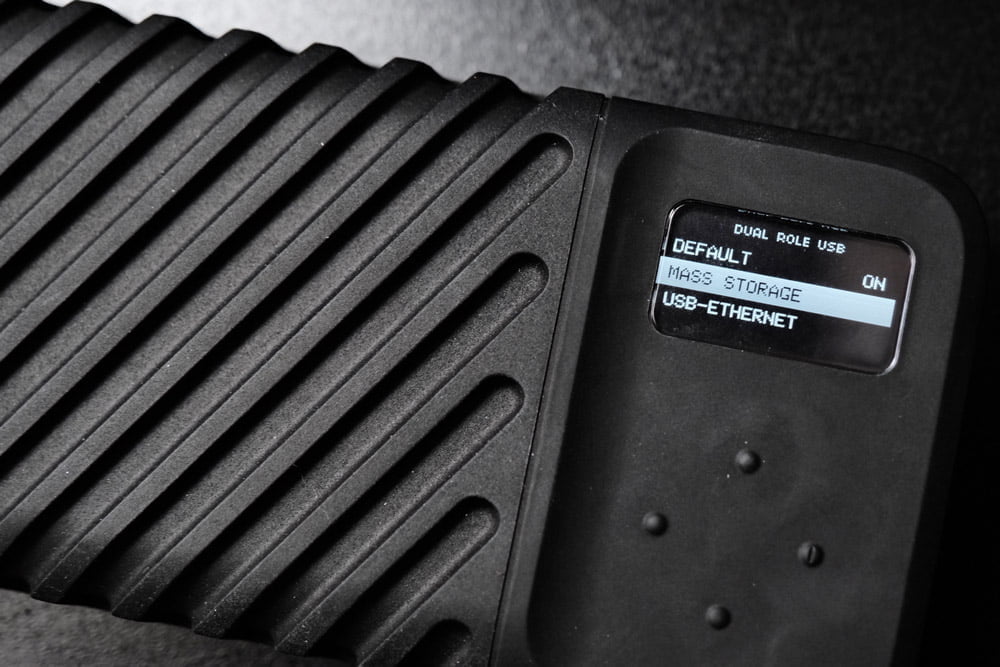
The GNARBOX 2.0 will then reboot into mass storage (external drive) mode. Plug it in to your computer when that’s complete and import your photos! The tedious part is already done!
It’s been a huge timesaver for me, will it be for your workflow too?
Don’t have a GNARBOX 2.0 yet? Check out B&H Photo for current deals (affiliate link).
Building your Fujifilm Photography Kit Part 3: Essential Accessories - DIY Photography
Tuesday 1st of March 2022
[…] editing: GNARBOX 2.0, charging cable, microSD adapter in an f-stop Small Accessory […]