Disclosure: This post may contain affiliate links. I earn a small commission of product sales to keep this website going.
Fujifilm’s Dynamic Range setting is a powerful tool for managing contrast, but it has a minimum ISO requirement that can cause headaches when saving to custom settings or film recipes. Here’s how ISO and Dynamic Range interact when you save both in your custom settings.

The ISO Minimum Requirements
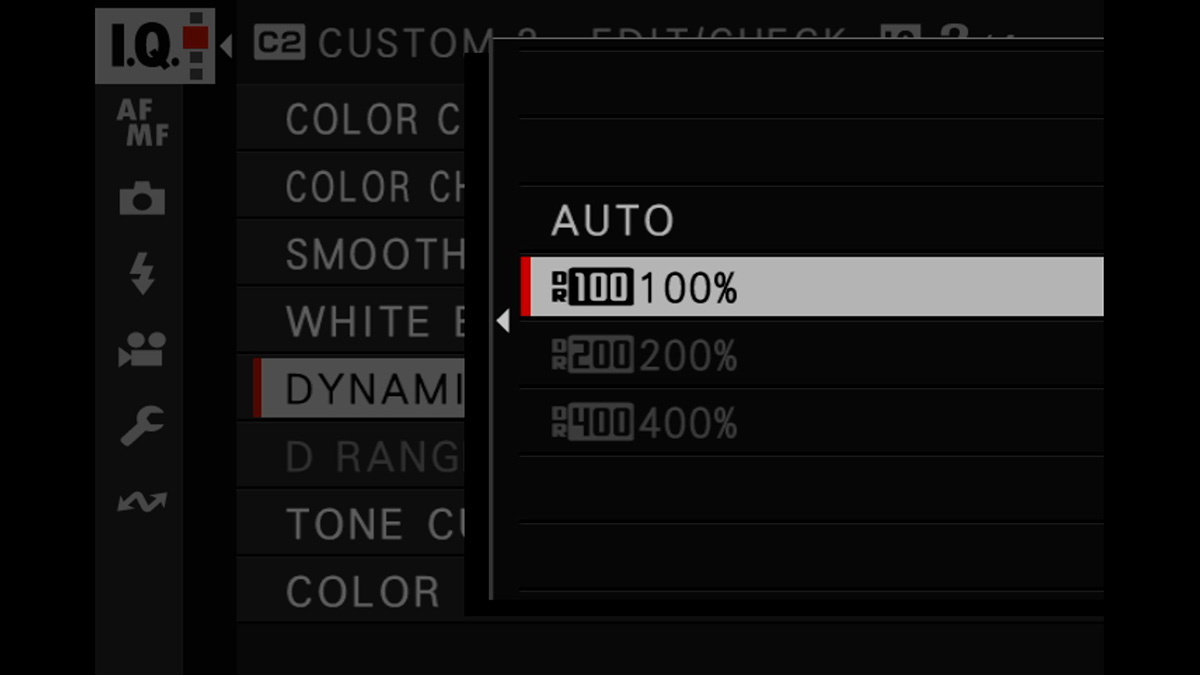
Dynamic Range settings don’t work at any ISO; they require a minimum threshold. The exact requirements vary by camera generation, but on cameras with the X-Trans 5 sensor (X-T5, X-E5, X-T50, X100VI, and X-H2), as an example, the rules are:
- DR100 (off): Available at any ISO, including the native minimum of ISO 125
- DR200/DR Auto: Requires a minimum ISO of 250
- DR400: Requires a minimum ISO of 500
If your ISO doesn’t meet the minimum for your desired Dynamic Range setting, that setting will be grayed out and unavailable.
You can read this article to learn more about what Dynamic Range does and the minimum ISO requirements.
Setting Up Custom Settings Correctly
When building a custom setting (C1-C7) that includes a Dynamic Range setting, there’s an order you need to follow to ensure things work correctly.
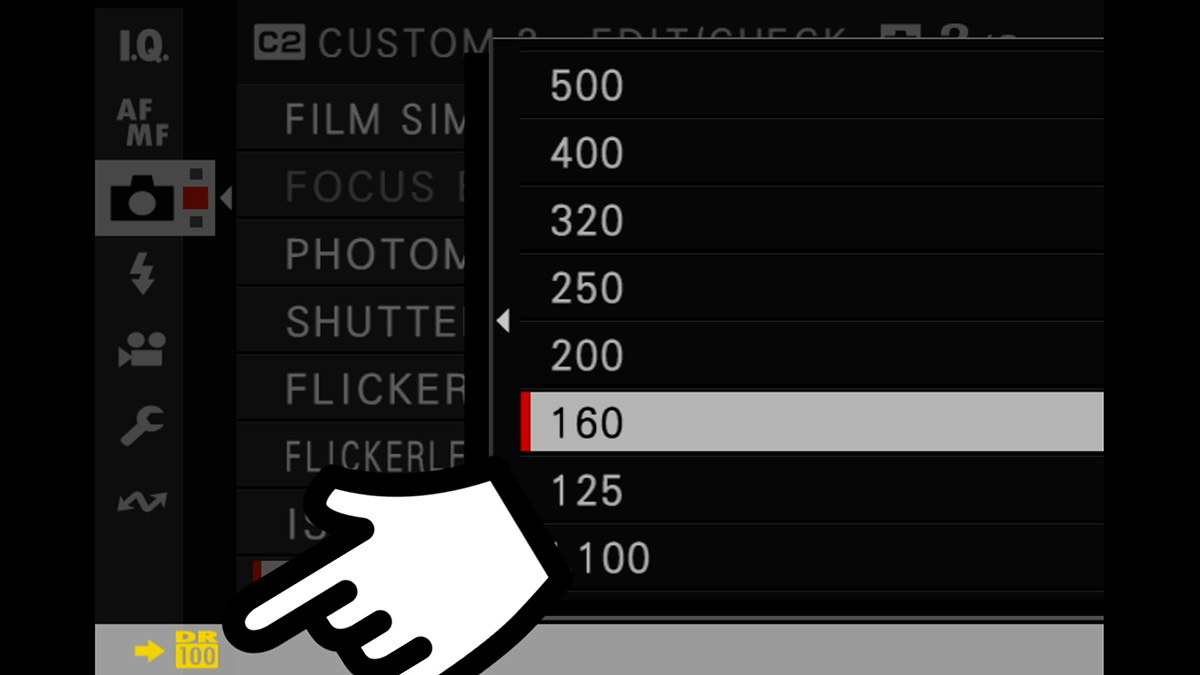
Set your ISO first, then set Dynamic Range. If you set Dynamic Range first and later lower your ISO, the camera will downgrade the Dynamic Range setting to match what’s available at the new ISO. Sometimes, without making it obvious that anything changed.
For example, if you want to save DR Auto to a custom setting, start by setting ISO to at least 250 (or an Auto ISO program with a maximum above 250). Then go into the Image Quality menu and set DR Auto. If you do it in the wrong order, the DR setting may be unavailable or will revert when you lower the ISO.
The camera does offer a hint when this happens. The ISO screen will display a small yellow warning indicating the highest Dynamic Range available at your current ISO. This warning is easy to miss, however, so just set your ISO first.
The Auto Update Trap
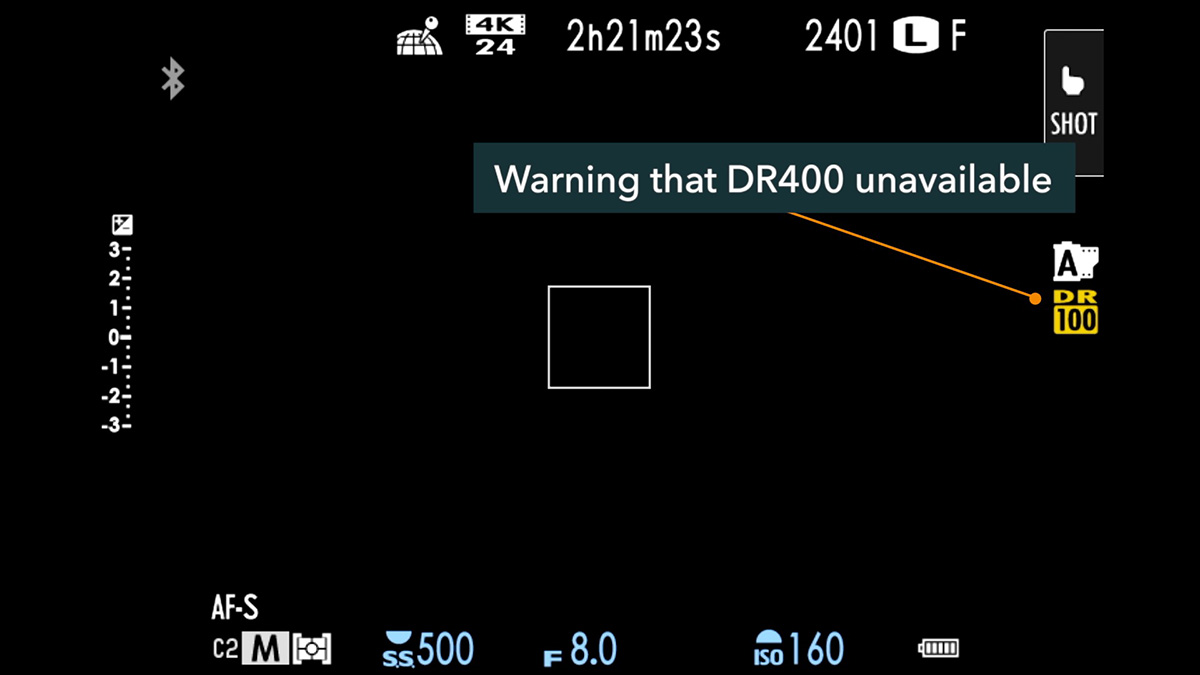
On cameras with Auto Update Custom Setting enabled (found in the Image Quality menu), any change you make to your ISO while using a custom setting gets permanently saved to that preset.
This means that if you saved DR400 to your C2 setting with Auto ISO, and then switched to a manual ISO of 160 during a shoot, the camera would save ISO 160 to C2. The next time you load C2, only DR100 will be available, even though you originally saved DR400. And you may not realize it until you’re in the field, wondering why Dynamic Range is greyed out.
The Simple Solution: Use Auto ISO
The easiest way to avoid all of this is to save Auto ISO to any custom setting that uses Dynamic Range. As long as Auto ISO is active and its maximum is high enough to meet the DR minimum requirement, your saved Dynamic Range setting will always be available when you load that preset.
If you want to use a manual ISO while shooting, just be mindful that dropping below the minimum threshold will downgrade your Dynamic Range. And if Auto Update is on, that change will be permanently saved to the preset.
Film Simulation Dial Recipes (X-E5 and X-T30 III)
If you’re using the FS1-FS3 positions on the film simulation dial on the X-E5 or X-T30 III, ISO is not saved to those recipes, but Dynamic Range settings are. That means whenever you use one of those dial positions, the Dynamic Range setting in the recipe is only available if your current ISO is high enough to support it. The same minimum ISO requirements apply, just without the ISO being baked into the preset itself.
Older Cameras Without ISO Saving
Older Fujifilm cameras that don’t save focus or shooting settings (including ISO) to custom presets work similarly to the film dial recipes above: you can save any Dynamic Range setting you want, but when you load that preset, your current ISO determines whether that setting is actually usable. If you’ve saved DR400 but your ISO is too low when you load the preset, the camera will use a lower DR setting instead.
Conclusion
Best practice: Set ISO first, then Dynamic Range. Use Auto ISO in any preset that includes a DR setting to avoid accidental downgrades.
The minimum ISO requirements differ across camera generations:
- X-T2, X-Pro2, X100F, X-T20, X-H1, X-E3: ISO 400 for DR200 & DR AUTO, ISO 800 for DR400 (ISO not saved to custom settings)
- X-T3, X-T4, X-Pro3, X100V, X-T30/II/III, X-E4, X-S10: ISO 320 for DR200 & DR AUTO, ISO 640 for DR400 (ISO saved to custom settings in X-E4, X-S10, X-T30II/III)
- X-T5, X-E5, X100VI, X-T50, X-S10, X-H2: ISO 250 for DR200 & DR AUTO, ISO 500 for DR400 (ISO saved to custom settings)
To learn more about your Fujifilm camera, check out these Fujifilm tutorial courses (use “blog20” for 20% off).