Nikon Z5IIC Initial Setup Guide for Beginners
Disclosure: This post may contain affiliate links. I earn a small commission of product sales to keep this website going.
You’ve just taken the Nikon Z5IIC out of the box and want to start making pictures. This guide covers the basics: attaching a lens, preparing the memory card, and a quick pass through the settings you'll want to check before your first photo.
This is a summary of my full Nikon Z5IIC Tutorial Course. You can watch free previews and purchase the full course at the link (use code BLOG20 for 20% off).

Step 1: Battery and Memory Card
Start with a charged battery.
- Pull the tab on the battery door on the bottom of the camera.
- Insert the battery with the metal contacts going in first, facing the lens. It only fits one way.
- Open the memory card door on the hand grip by sliding it back.
- Insert your SD card with the metal contacts facing the front of the camera. To remove it later, push it in and it pops out.
- Close the door.
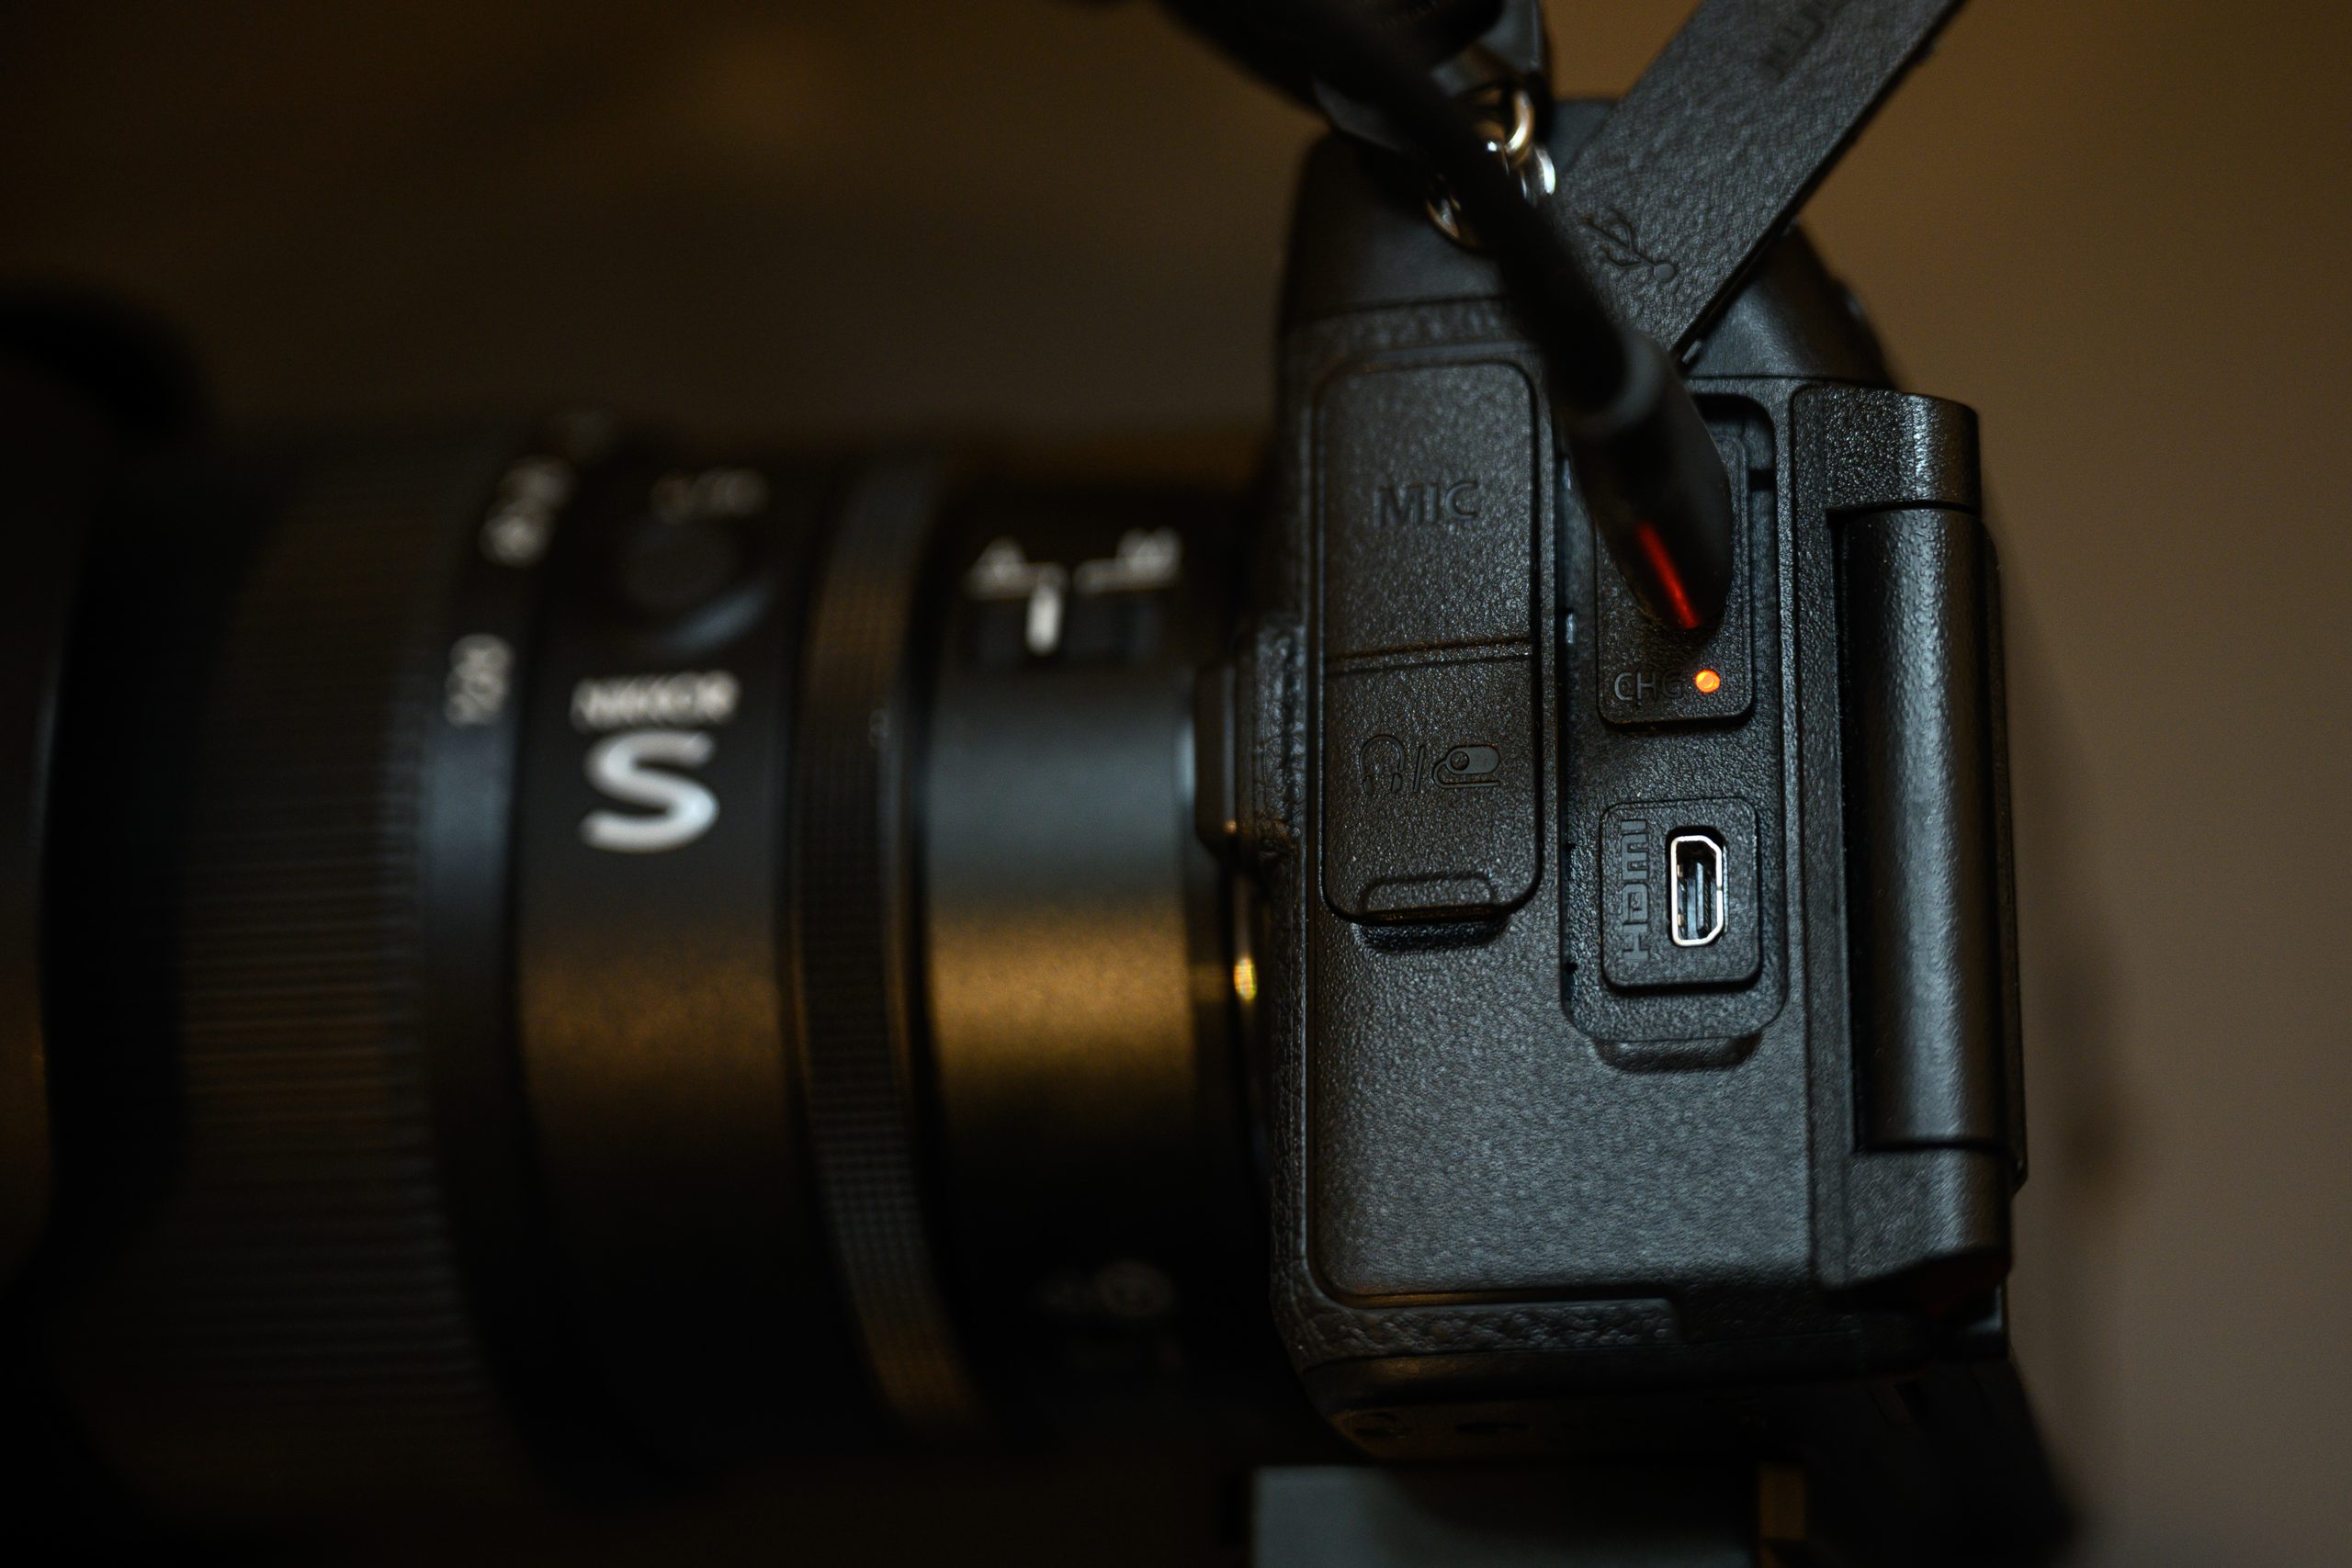
You can charge the battery in the camera. Plug the supplied USB-C cable into any AC power adapter, then into the USB-C port under the small door on the left side of the camera. A light below the port stays on while the battery charges and goes out when charging is complete.
You may also want to learn how to get more shots out of each battery charge.
Step 2: Attach a Lens
When changing lenses, keep the camera’s body open for as short a time as possible so dust and fibers don’t get onto the sensor. Get the lens ready first.
- Remove the rear cap from the lens and set it down on a hard, clean surface so the rear element is protected.
- Remove the body cap from the camera, twisting it clockwise.
- Line up the dots on the lens and the camera mount.
- Turn the lens a quarter turn counterclockwise until it clicks.
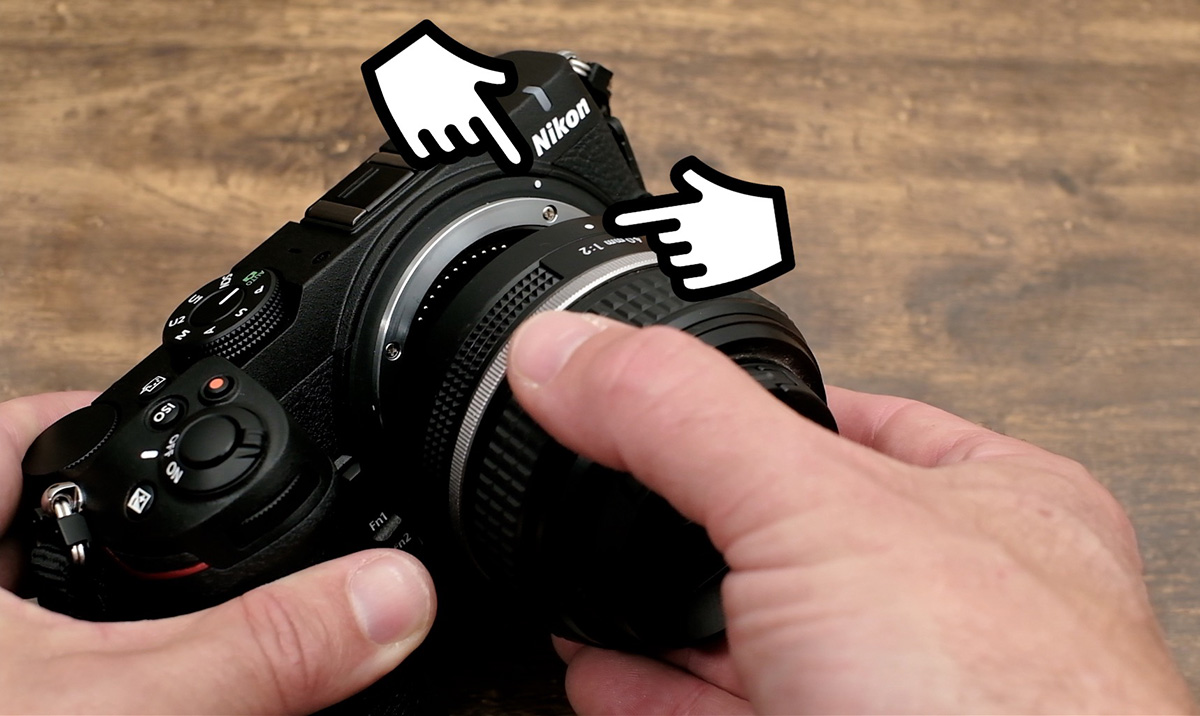
To swap lenses, do the same in the same order. Have the new lens ready with its rear cap off, press the button to the right of the lens mount, and turn the old lens a quarter turn clockwise to remove it. Mount the new lens, then cover the rear element of the lens you just took off.
Step 3: Setup Menu Basics
Turn the camera on with the power switch on the top. Press the Menu button and use the multi selector (the directional pad to the right of the screen) to go down to the wrench icon. That’s the Setup menu.
Format the memory card: This is the first item in the menu, and you should do it before you take any pictures. Highlight Format and press OK. The camera warns you that everything on the card will be deleted, so back up anything you want to keep first. Then highlight Yes and press OK. Many people skip this step, but it's important. It sets the card up to work with this specific camera.
Language: Pick the language you want the menus in.
Time zone and date:
- Turn on daylight saving time if you’re currently observing it (the summer months in the US).
- Choose your geographic time zone with the up and down keys.
- Set the date and time. Use left and right to jump between fields and up and down to change them, then press OK.
Distance units: Switch between meters and feet. This shows up in things like the focus scale and focus distances.
Copyright information: Enter your name under both Artist and Copyright, then turn on Attach Copyright Information if you want it added to your photos. It goes into the image metadata only. It doesn’t appear on the picture itself.
Silent mode: A lot of people turn this on right away so the camera doesn't make any sounds. It does, however, come with a lot of restrictions. Only use it if you understand these restrictions.
Firmware: Updates contain bug fixes and new features. Here’s how to check:
- At the bottom of the Setup menu, highlight Firmware Version and press OK. The “C” version number is what’s installed on your camera.
- Compare it to the current version on Nikon’s website (go to the Firmware tab).
- If Nikon’s version number is higher, download the update file to your computer and copy it to the SD card.
- Put the card back in the camera and choose Update from Memory Card.
There are a lot of other options in the menus, many of which you don't need to mess with right away. The Z5IIC Tutorial Course goes over all of them in a logical order.
Step 4: The Main Controls
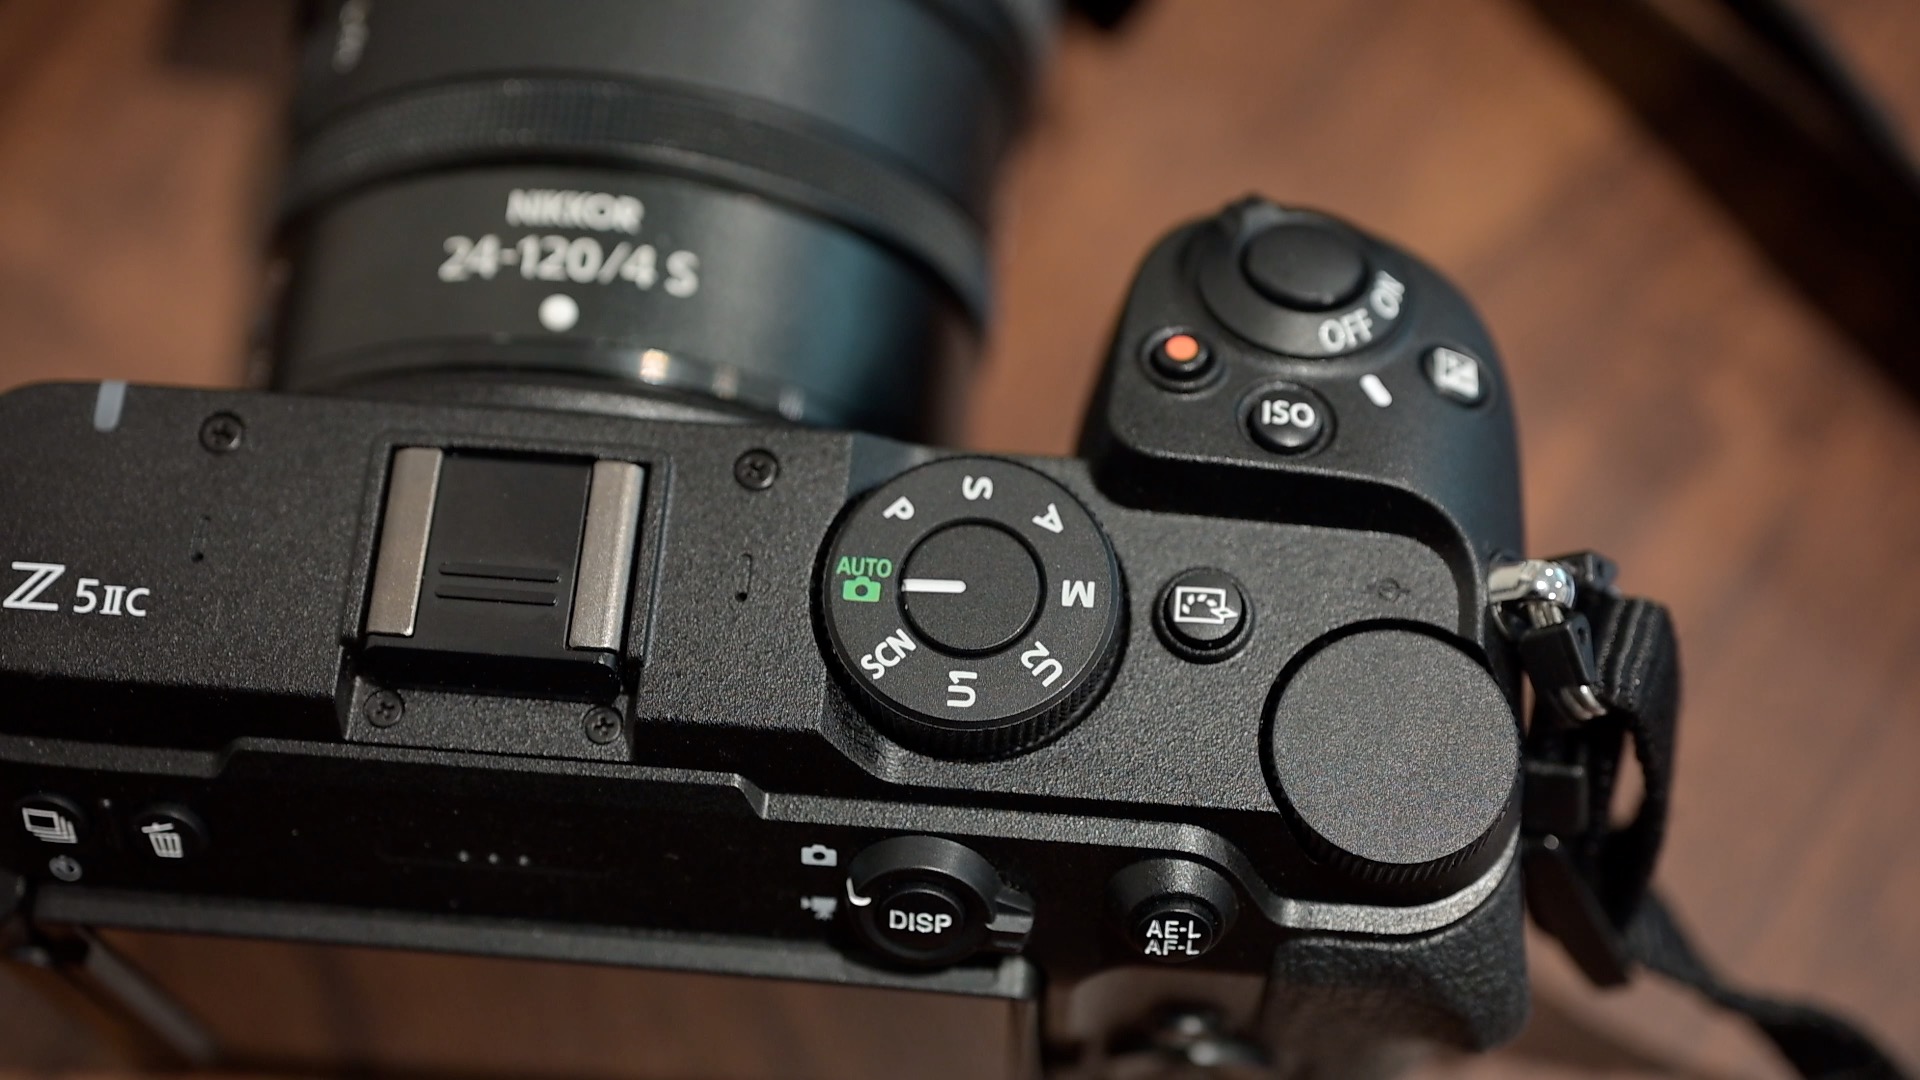
Mode dial (top plate):
- Green (Auto): the camera handles focus and exposure. If you just want to start shooting, set it to Auto, and it works fairly well.
- SCN: tell the camera what kind of scene you’re shooting so it can optimize for it. Turn the main command dial (the other large dial on the top plate) to pick the scene.
- P, S, A, M: the exposure modes: program auto, shutter priority, aperture priority, and manual.
- U1 and U2: user settings where you can save camera settings for a type of shooting, such as landscapes on U1 and portraits on U2.
Other top-plate controls: you have the power switch, the shutter button, the ISO button, and the +/- button, which is exposure compensation. Exposure compensation makes your photos brighter or darker.
Tip: Make exposure compensation easier. By default, you have to find the +/- button, hold it, turn the main command dial, and let go when you're done. That isn’t convenient while you’re shooting, so here’s the first change I make on my Nikon cameras:
- Press Menu and go to the pencil icon (Custom Settings).
- Open the b group (metering and exposure).
- Go to b3 Easy Exposure Compensation and set it to On.
Now you don’t need to hold the button. Turn the sub command dial (the front dial) to change exposure compensation in P and S modes. In A mode, turn the main command dial. If you forget which dial does what, go to Custom Settings f2 (custom controls), then Command Dials, then Exposure Setting.
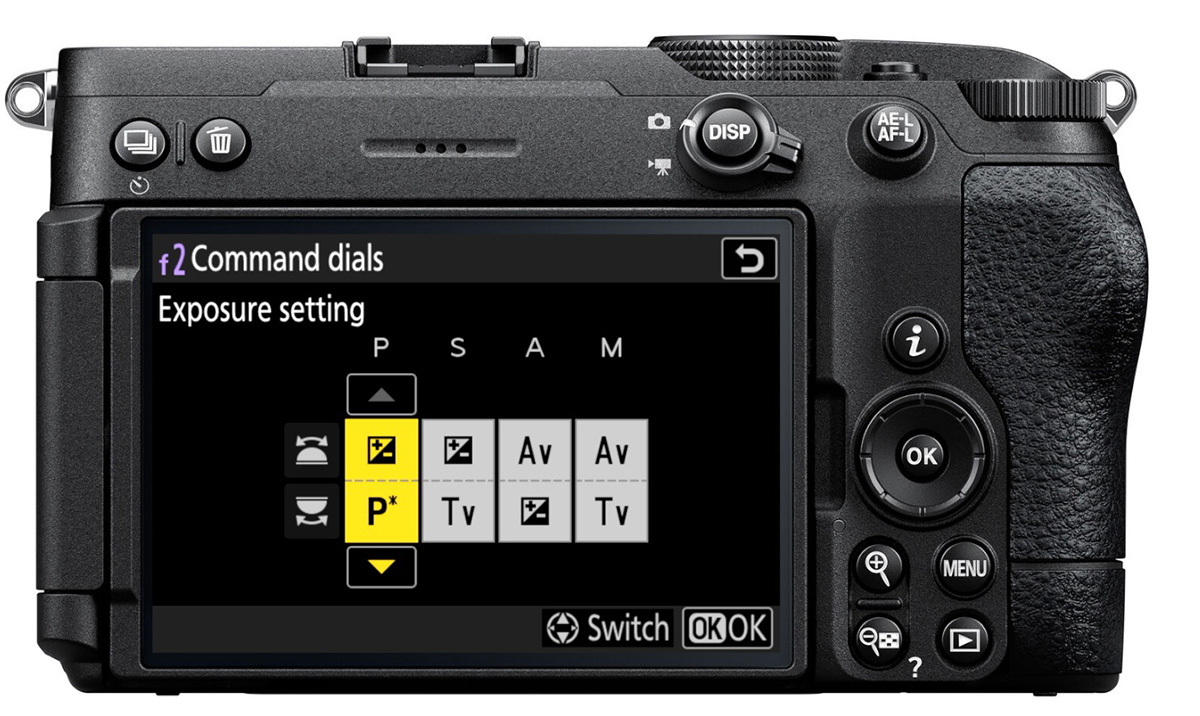
Back of the camera:
- Release mode button (the little rectangles): if you want to take a burst of photos while holding the shutter button, choose one of the available burst frame rates (L, H, H*, C15, C30). Otherwise, choose single frame (S). A self-timer is also available here.
- Trash can button: deletes photos in playback.
- DISP button: cycles through the different screen overlays.
- The switch around DISP: moves between photo mode (camera icon) and video mode (movie camera icon).
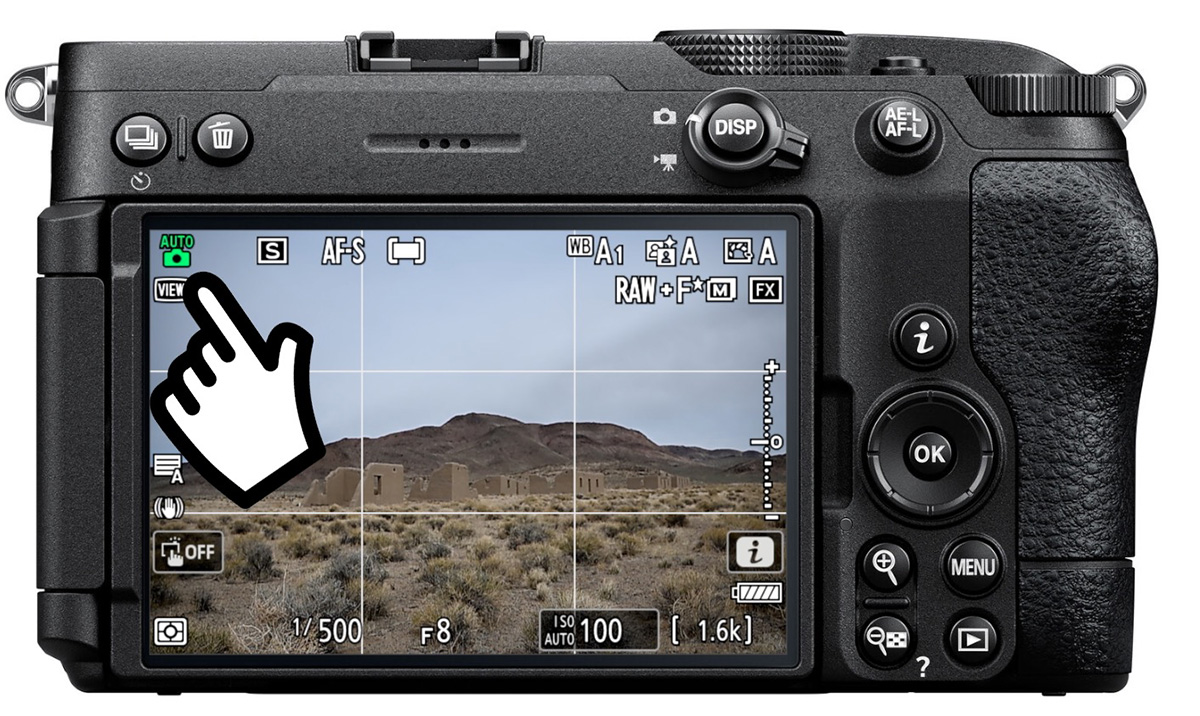
Touchscreen: Anything with a box around it on the screen can be changed by tapping it, such as ISO, aperture, or shutter speed, depending on your mode. The icon on the lower left sets how touch focus works:
- Move focus point: tap where you want the focus point. It focuses there when you press the shutter halfway.
- Touch AF: the camera moves the focus area and focuses wherever you tap.
- Touch shutter/touch AF: like a smartphone. Tap, and the camera moves the focus point, focuses, and takes the picture.
- Off: keep tapping the icon until it says off.
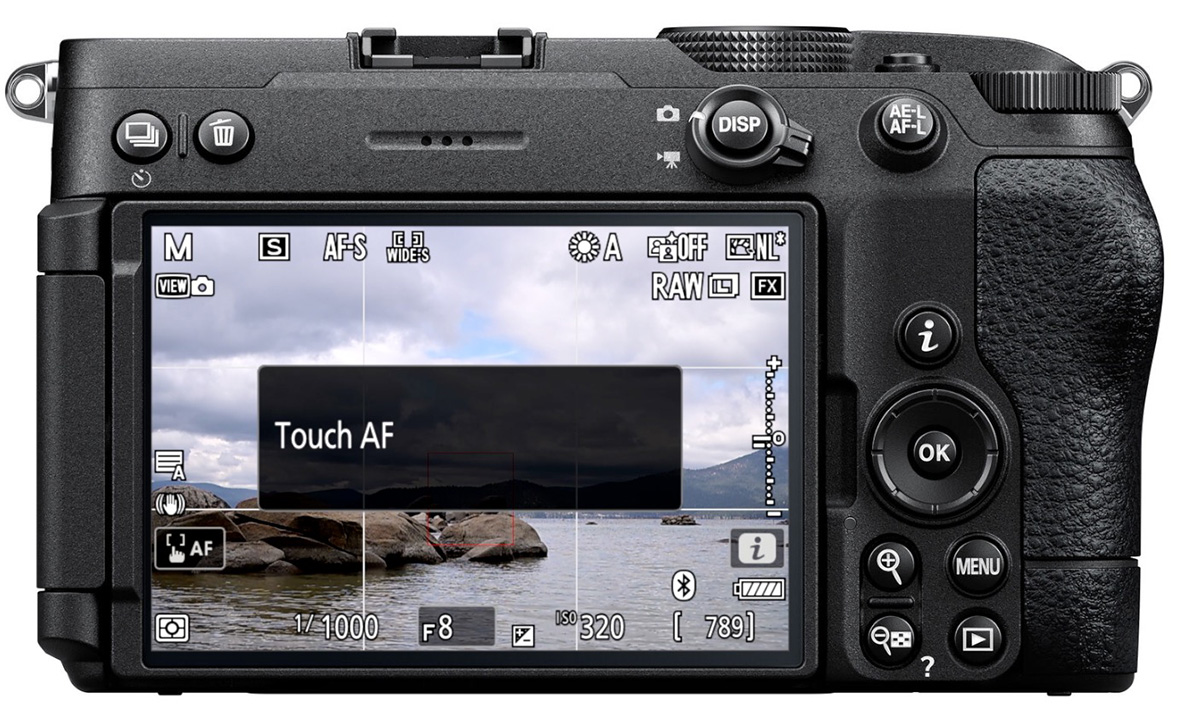
Step 5: A Few Other Settings Before Your First Photo
Press Menu and open the Photo Shooting menu (the top item).
Image Quality:
- To share photos right away without processing them, record JPEG. Choose JPEG/HEIF fine⭑, the highest quality.
- RAW gives you more control over how the image looks, but it needs processing software on a computer or other device. It takes time and is a whole new discipline to learn.
- To get both, choose RAW + JPEG/HEIF fine⭑. That gives you a picture you can edit later and one you can share right away.
Image Size Settings: This only affects JPEGs, not RAW. I’d recommend Medium. It’s plenty large for a portfolio site and more than enough for social media, and the files are smaller and easier to manage, so more fit on your card.
ISO Sensitivity Settings: Auto ISO is one of the best things a beginner can use. Leave ISO sensitivity at 100, turn on Auto ISO Sensitivity Control, and choose the maximum ISO you want the camera to go up to. That’s personal preference. You can set it to 12800 or leave the default. Either way, it’s one less thing to worry about.
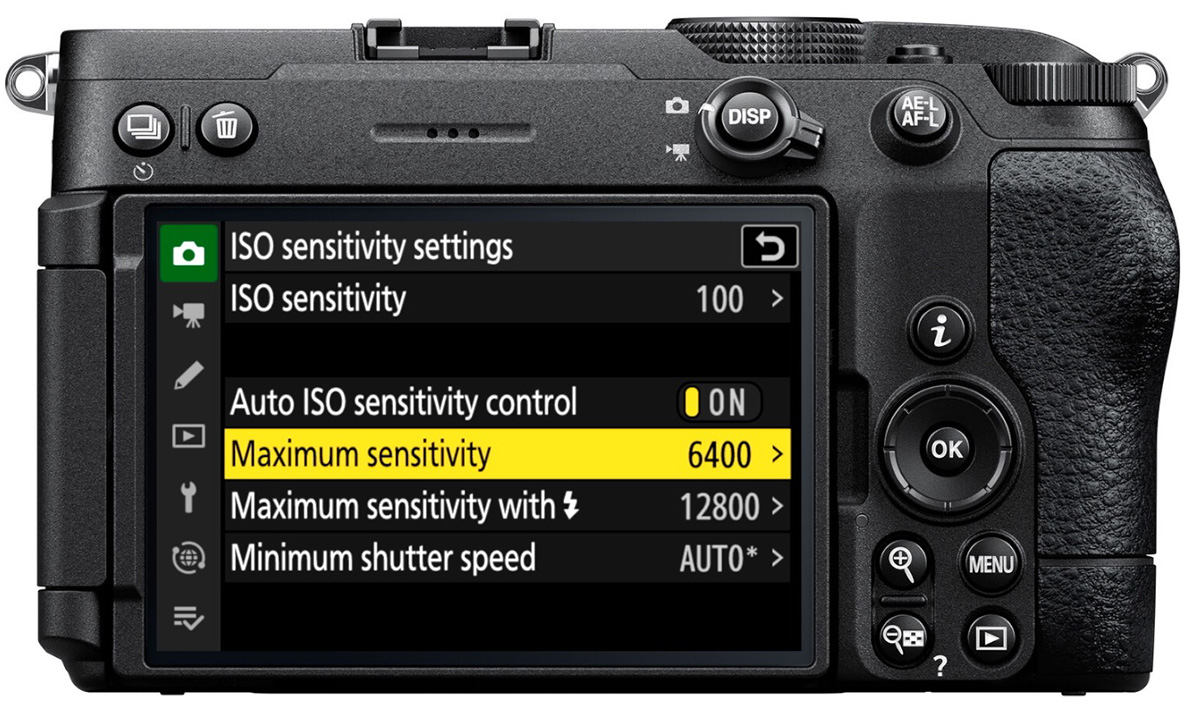
Focus Mode:
- AF-A is a good starting choice. The camera decides whether the subject is moving and switches between AF-S and AF-C for you.
- If you’d rather choose yourself, use AF-S (single) for still or stationary subjects. S is for still. Use AF-C (continuous) when anything is moving.
- MF is manual focus.
AF Area Mode: To start, choose Auto-area AF, the last option in the list. The camera analyzes the whole frame and usually focuses on the closest object. Read about the others here.
AF/MF Subject Detection Options:
- If you know you’re shooting one type of subject, pick it from the list.
- If you’re shooting several types, leave it on Auto.
- If you’re not shooting any of them, such as strictly landscapes, turn it Off. Sometimes the camera detects a subject that isn’t there and throws off your focus.
When the camera detects a person, it puts a box around them, and a smaller box on the eye if it can find one. If it detects multiple subjects, you’ll see arrows next to the box. Press the multi selector left or right to jump to the next one. Switching like this only works in Auto-area AF, which is why I had you set it above.
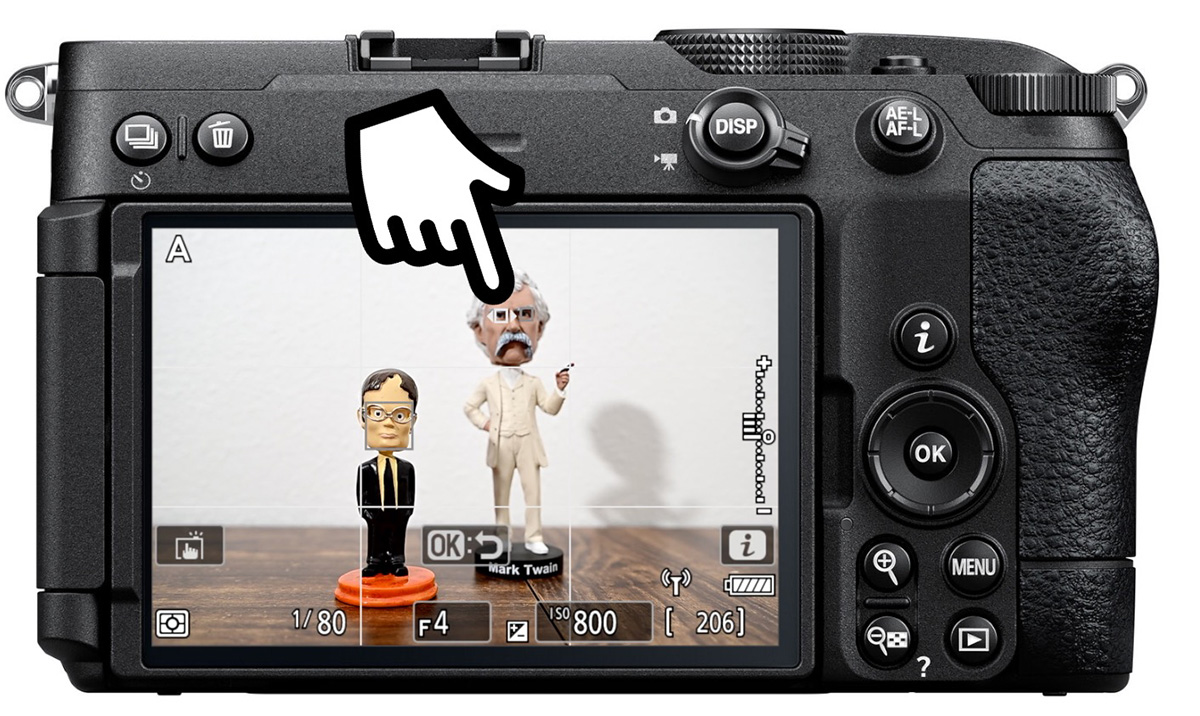
Step 6: Take Your First Photo
If you don’t want to think about focus or exposure yet, set the mode dial to Auto and shoot.
Otherwise, try P (programmed auto). With Auto ISO turned on, the camera controls shutter speed, aperture, and ISO. You should see P in the upper left of the screen.
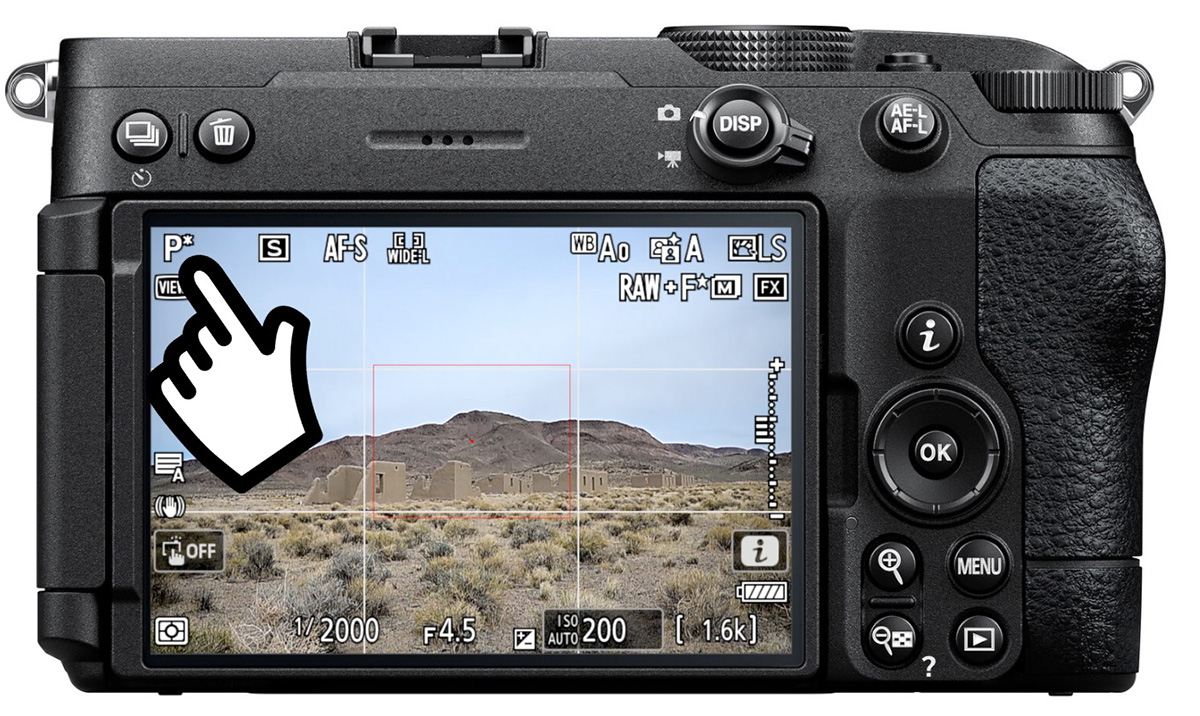
- To change the brightness, turn the sub command dial (the little dial underneath the shutter button). The meter on the right side of the screen shows the change. Positive numbers brighten the picture, and negative numbers darken it.
- Point the camera at something and press the shutter button halfway.
- Confirm the green squares appear where you want to focus.
- Press the shutter all the way down to take the picture.
- Press the Play button to review it.
There’s a lot more to this camera, including more exposure modes, more focus options, and more ways to customize it. This setup should be enough to get you comfortable in programmed auto with basic focus settings.
Go Further
If you want more detail on what every menu setting does, plus focus and exposure settings and tips for customizing the camera, my full Nikon Z5IIC Tutorial course covers it all. Use code BLOG20 for 20% off.