RAW vS JPEG on Canon R Cameras: How to Decide and Set Up Your Camera
Disclosure: This post may contain affiliate links. I earn a small commission of product sales to keep this website going.
One of the first decisions you'll make with a new Canon camera is which file format to record - RAW, JPEG, or both. This choice affects how you shoot and how your camera should be configured, so let's make sure you understand the implications of these file formats, then make sure your camera is set up appropriately.

RAW vs JPEG: The Negative and the Print
The easiest way to understand the difference is through a film photography analogy.
RAW is the negative. It's the unprocessed record of light captured by your sensor, without any permanent color or contrast adjustments. Even things like white balance aren't permanent; you can always change them later. Just like a film photographer would take a negative into the darkroom and make a print with specific adjustments to contrast, color, and selective exposure (dodging and burning), a RAW file can be processed again and again, in different ways, indefinitely. The original data is always there.
JPEG is the print. All of those adjustments, like contrast, color, and toning, are permanently baked into the file. It's finished, ready to share, and can't be meaningfully modified further.
The Trade-Offs
RAW's advantage is future flexibility. If you develop new processing skills or better software becomes available years from now, you still have the original data to reprocess with techniques you couldn't have applied at the time of capture.
RAW's disadvantage is that it requires processing. A RAW file straight off the memory card with no adjustments will look flat and muddy. That means you need to buy a RAW processing program, learn how to use it, and then actually sit down to process every single photo individually. For a lot of people, that's more time and money than they want to invest. The files are also significantly larger, requiring a larger investment in storage.
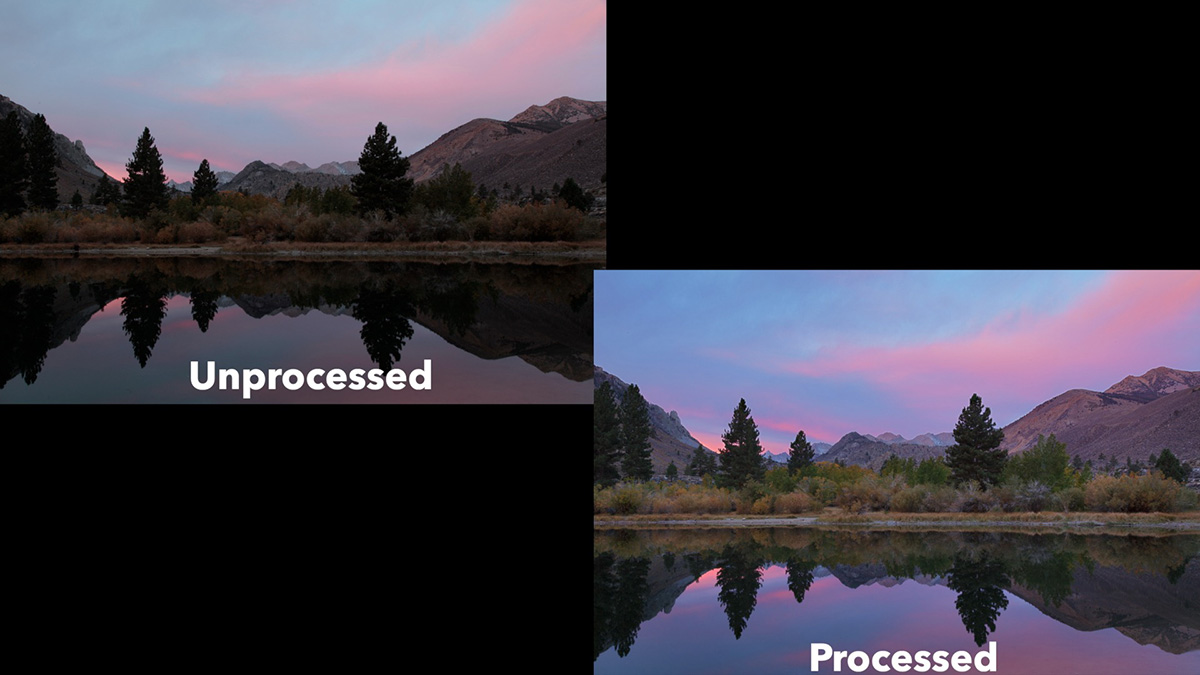
JPEG's advantage is that all of your camera's processing and image styling - the Picture Style settings - are applied automatically. Pull the file off the card and it's ready to share immediately. The files are also much smaller, so you can fit more on a memory card or hard drive.
JPEG's disadvantage is that the files can't be altered later. If you want to make any significant adjustments to exposure, contrast, or color, a JPEG file will immediately break down and not reflect the changes you want.
There's no universally correct answer here. It just comes down to whether you want to process every photo yourself or want images ready to go the moment you press the shutter. You can also record both simultaneously if you want the best of each.
Setting Up Image Quality
Head into the Shooting Menu > Image Quality to configure all of this.
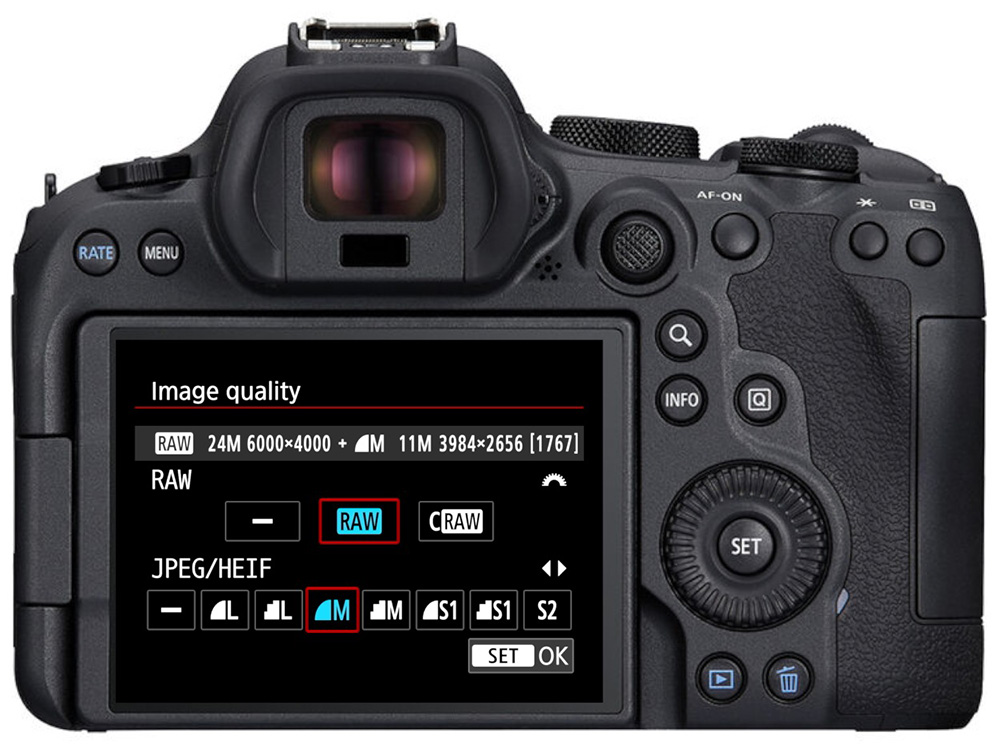
RAW Options
- None: no RAW file recorded, JPEG/HEIF only
- RAW: the standard, high-fidelity RAW format. Recommended for serious landscape or portrait work, or any situation involving extensive processing where you want all the data the sensor captured.
- Compact RAW (C-RAW): a compressed RAW format, roughly 40–50% smaller due to Canon's compression algorithm, at the cost of some discarded information. The smaller file size gives you a larger shooting buffer and saves storage. This can be good for fast action like sports or wildlife, where extreme processing typically isn't necessary anyway.
JPEG/HEIF Options
- None: no processed file recorded
- Size: Large (full sensor resolution; a 24MP camera produces a 24MP JPEG), scaling down through Medium, Small 1, and Small 2 (roughly 15% of full resolution, or about 3.8MP on a 24MP camera)
- Quality: Fine (smooth semicircle icon, higher quality) or Normal (jagged stair icon, lower quality). Small 2 is always recorded at Fine quality regardless of setting.
On higher-end cameras, these options may be split between separate JPEG/HEIF quality and image size settings rather than combined.
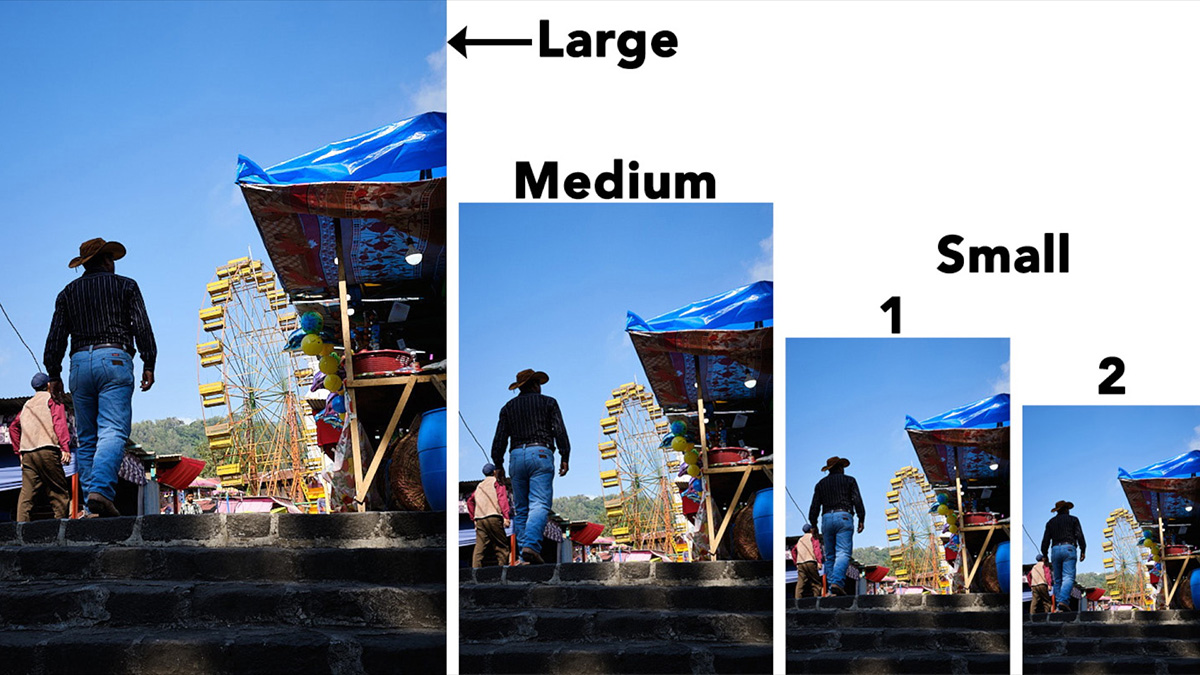
Recommendations: For JPEG size, Medium or Small 1 is more than enough for social media sharing. If you want room for printing or cropping later, go with Large. For quality, always choose Fine.
HEIF vs JPEG
Whether your processed files record as JPEG or HEIF is controlled separately, under HDR Shooting (HDR PQ) in the shooting menu. This is only available on cameras that support HEIF. Leave this disabled and your processed files will record as standard JPEG. Enabling it switches output to HEIF.
Recommendation: keep this disabled for now. HEIF isn't universally supported yet, and it introduces some in-camera limitations of its own, including ISO restrictions and inaccurate histogram display.
Aspect Ratio and Cropping
Found in the Shooting Menu (labeled "Still Image Aspect Ratio" on APS-C bodies), this setting determines which area of the sensor is used to record your image.
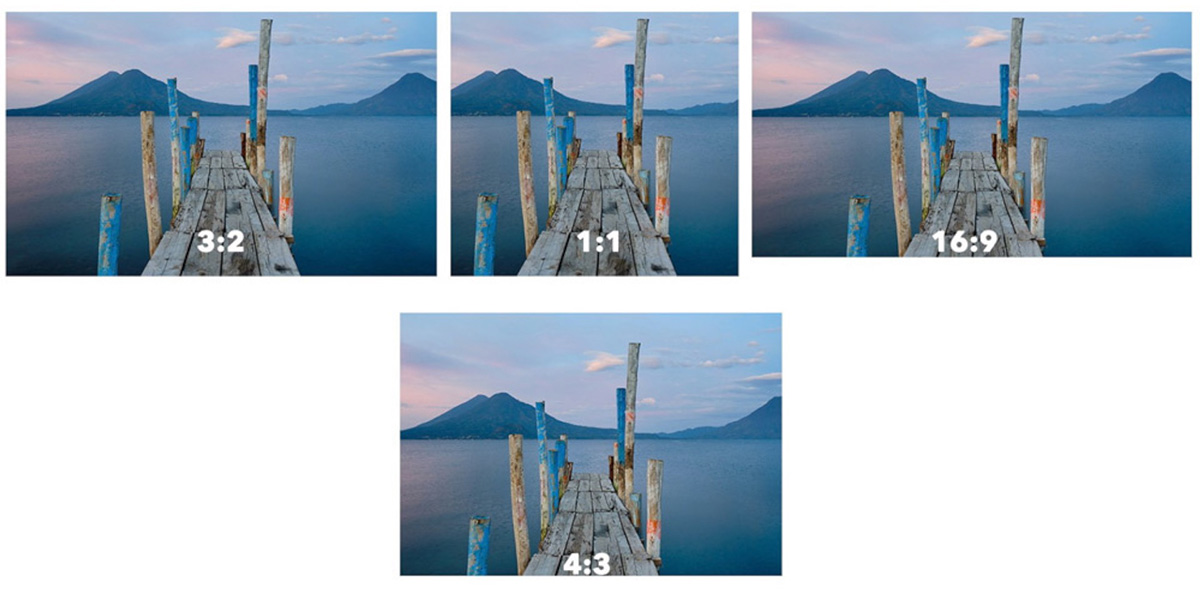
- Full / 3:2: records the entire sensor with no cropping. All pixels captured.
- 1.6x (full-frame cameras only): crops to APS-C size. This is automatically applied when using an EF-S or RF-S crop lens, and in that case your RAW file will also record with the crop applied.
- 4:3, 16:9, 1:1: creative aspect ratio options. These only affect JPEG/HEIF files. RAW files always record at the full 3:2 sensor area regardless of this setting.
Pressing the Info button while in one of the creative aspect ratios brings up two display style options:
- Masked: the cropped-out area is hidden under black bands, useful for eliminating distraction while composing
- Outlined: teal guidelines mark the crop boundary while keeping the full frame visible, useful for maintaining peripheral awareness of what's just outside your shot
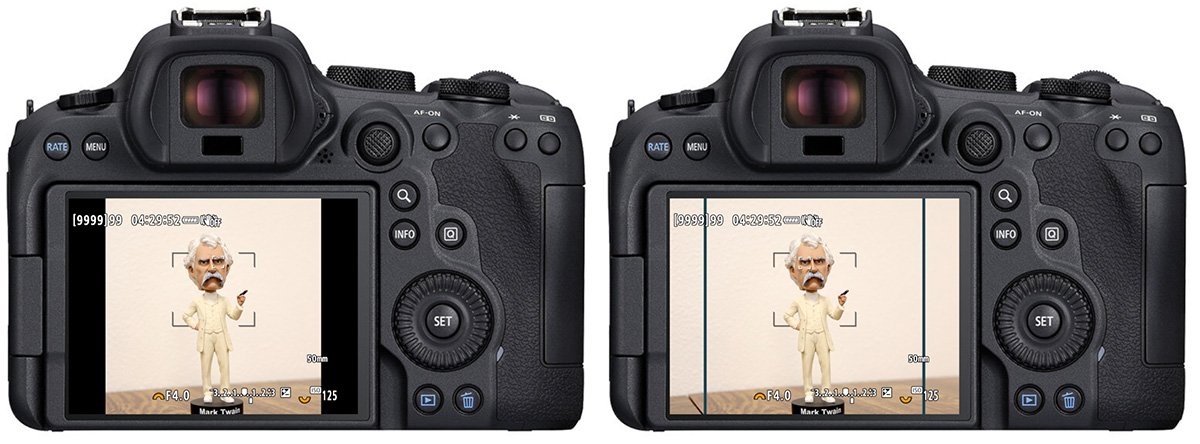
If you're drawn to one of the creative aspect ratios, use it. And remember that if you're recording RAW, you'll still capture the full sensor data regardless. Otherwise, shooting Full/3:2 and cropping in post gives you the most flexibility.
Color Space
Also in the Shooting Menu, Color Space determines how colors are mapped, and it only applies to JPEG files. RAW files aren't recorded with a color space at all; that gets applied when you process and export them.
Your options are sRGB and Adobe RGB. There's a persistent myth that Adobe RGB captures "more colors" and is therefore superior. This isn't entirely accurate. Nearly everything - computer monitors, the internet, most print labs - uses sRGB or a close approximation. Set sRGB unless you specifically print your in-camera JPEGs yourself, have experience doing so, and your monitor is properly calibrated to the Adobe RGB space. Otherwise, colors may not print or display as expected.
Note that this setting doesn't apply to HEIF files, which use a different color space.
Picture Style
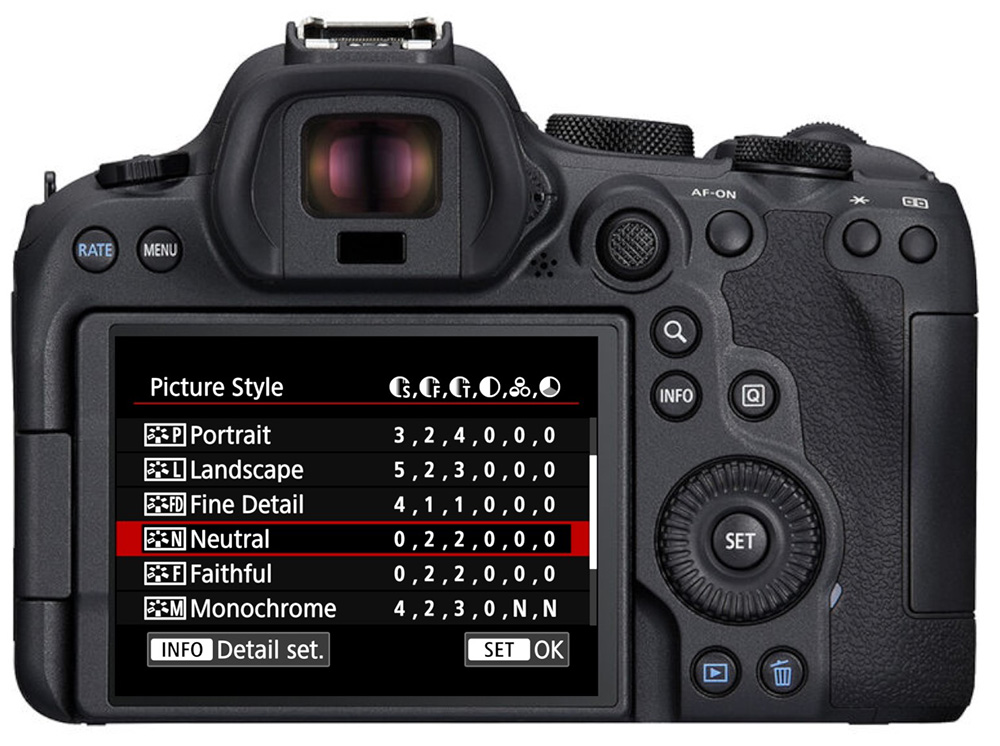
Found in the Shooting Menu, Picture Style controls the in-camera JPEG processing. You can let the camera choose automatically, select a preset suited to your subject, or build your own custom preset.
It's important to understand that whatever Picture Style you choose (even if you didn't choose one) is also applied to your RAW preview thumbnail. This means it affects what you see on the camera screen while shooting, even if you're only recording RAW. If you're shooting RAW only and want your live preview to more closely reflect the actual unprocessed data, set Picture Style to Neutral.
Formatting Your Memory Card
Found in the Setup Menu > Format, this isn't so much a setting as an important habit. Always format a memory card before using it with your camera for the first time. This prepares it to work properly with that specific camera. If you reuse the same card repeatedly, format it again after backing up your images each time, which helps keep the card healthy and reduces the risk of corruption.
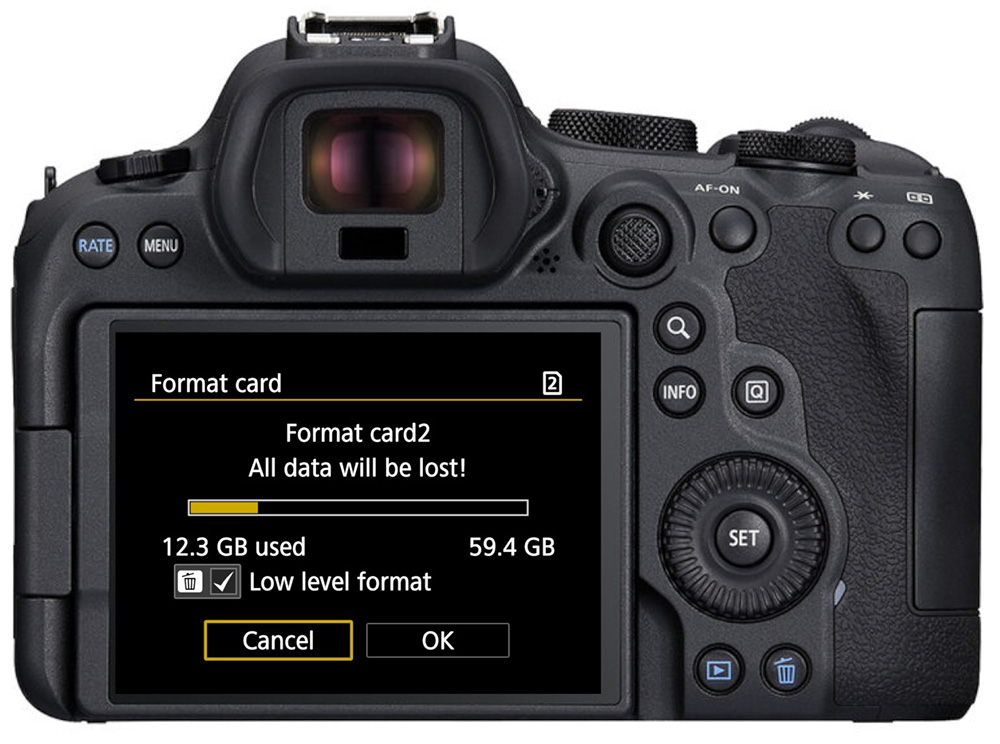
Formatting completely erases the card, so make sure everything is backed up first.
If your camera has multiple slots, select the one you want to format, then follow the on-screen prompts to enable a low-level format, which is a more thorough format that's worth doing every time to help prevent card issues down the road. Highlight OK and press Set to complete it.
Quick Reference
| Setting | Location | Recommendation |
|---|---|---|
| RAW format | Shooting Menu > Image Quality | RAW for max quality; C-RAW for buffer/storage with fast action |
| JPEG size | Shooting Menu > Image Quality | Medium/Small 1 for social; Large for print/crop flexibility |
| JPEG quality | Shooting Menu > Image Quality | Fine |
| HEIF | HDR Shooting (HDR PQ) menu | Keep disabled for now |
| Aspect ratio | Shooting Menu | Full/3:2 unless drawn to a creative format |
| Color space | Shooting Menu | sRGB, unless printing yourself with a calibrated Adobe RGB monitor |
| Picture Style | Shooting Menu | Neutral if shooting RAW only, for an accurate preview |
| Format card | Setup Menu | Before first use, and after each backup |
Want a full walkthrough of the rest of your Canon R camera setup — exposure modes, focus systems, and camera customization? The Canon R Photography Fundamentals course covers it all with videos, text outlines, assignments, and quizzes. Use code BLOG20 for 20% off.