Disclosure: This post may contain affiliate links. I earn a small commission of product sales to keep this website going.
If you want everything from just a few feet away all the way to the horizon to look sharp, you need to set the hyperfocal distance. The good news: there’s no math involved, and you don’t need an app. You just need your camera and a basic understanding of what you’re looking for.

What is Hyperfocal Distance?
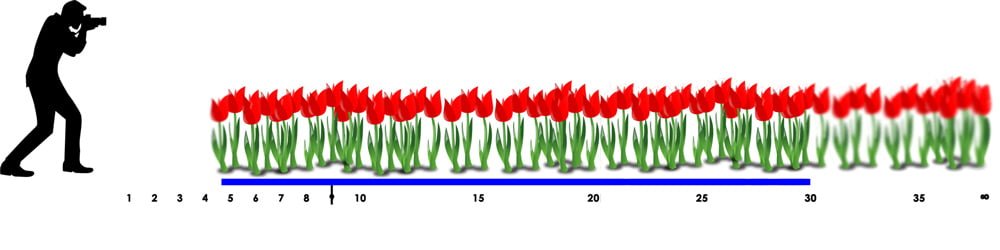
Hyperfocal distance is the focus point that gives you the maximum possible depth of field for a given focal length and aperture. When your lens is set to that distance, everything from roughly half that distance to infinity will appear acceptably sharp.
Set it correctly, and a foreground flower six feet away and a mountain on the horizon can both be in focus. Set your focus too far, like exactly to the horizon, and you’re wasting potential depth of field on “sharpness beyond infinity” that doesn’t exist, while your foreground goes soft.
“Hyperfocal distance” ensures you don’t waste that precious depth of field.
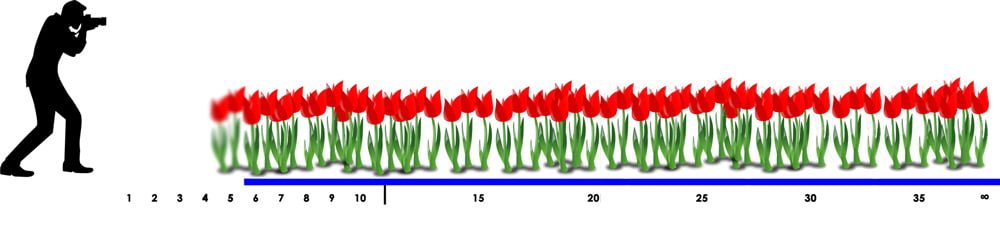
Without hyperfocal distance, the grass in the foreground would have been blurry:

Why Not Just Use a Table or App?
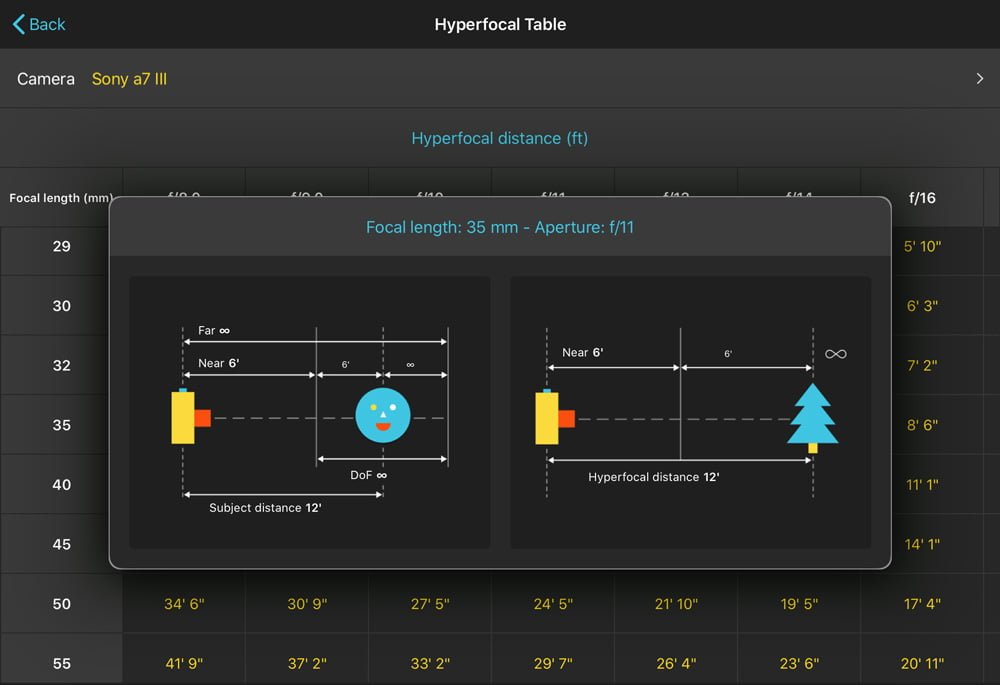
Apps like PhotoPills have excellent hyperfocal tables. You plug in your camera, focal length, and aperture, and they give you the exact distance to focus at. It’s great in theory, but pulling out your phone, opening the app, finding the right table, and then actually setting your lens to that precise distance is often impractical in the field. And many cameras don’t even display focus distance, making it hard to hit that number anyway.
There’s a better way.
The Camera-Only Method
The underlying principle is simple: increase your focus distance until the horizon – or the furthest object in your scene – just becomes acceptably sharp, then stop.
This works because as you focus further away, your near limit of sharpness moves further away too. The moment the far end of your depth of field reaches infinity, you’ve hit hyperfocal distance. Focus any further, and you’re not gaining anything in the background; you’re only losing foreground sharpness.
Step 1: Set your aperture and compose your shot first
Hyperfocal distance changes with both focal length and aperture. Lock those in before you start. If you zoom or change aperture mid-process, you’ll need to start over.
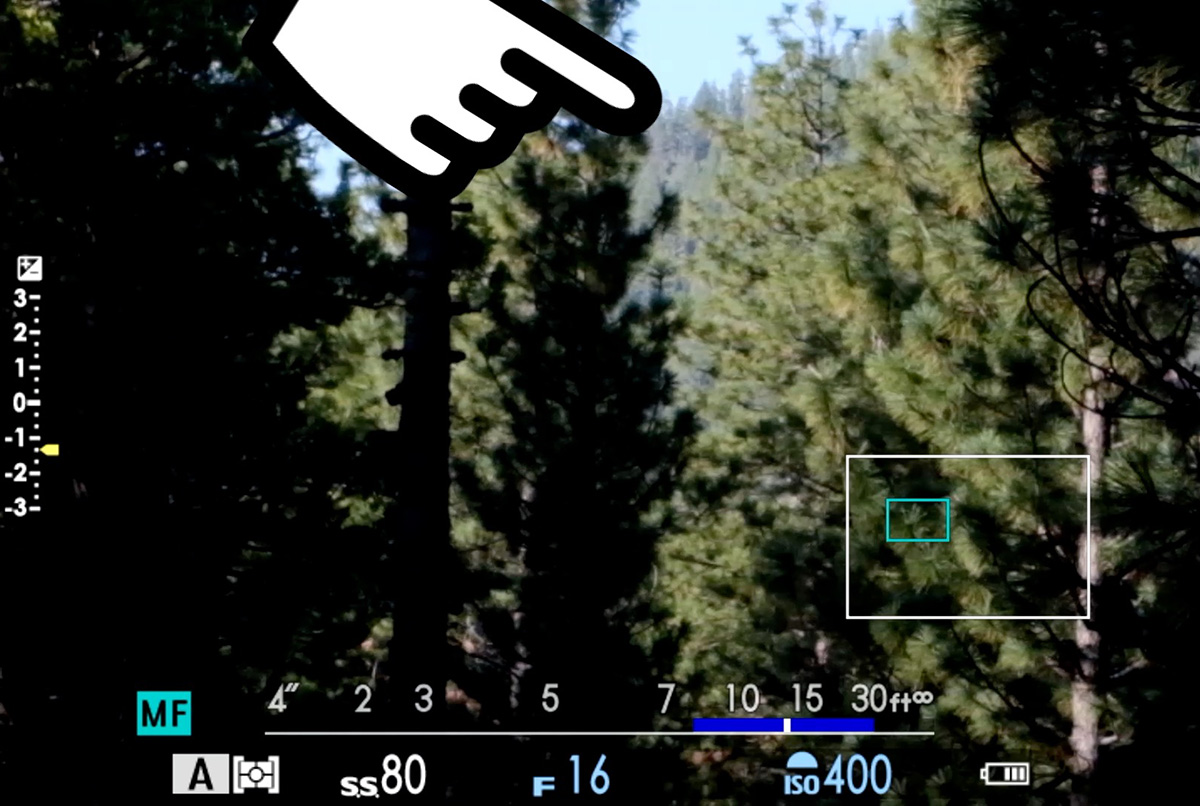
Step 2: Enable Depth of Field Preview – this step is critical
Most mirrorless cameras display live view at a wide-open aperture to keep the image bright and processing fast. This means what you see on screen may look like f/2.8 even if you have f/16 set, which gives you a completely inaccurate sense of your actual depth of field.

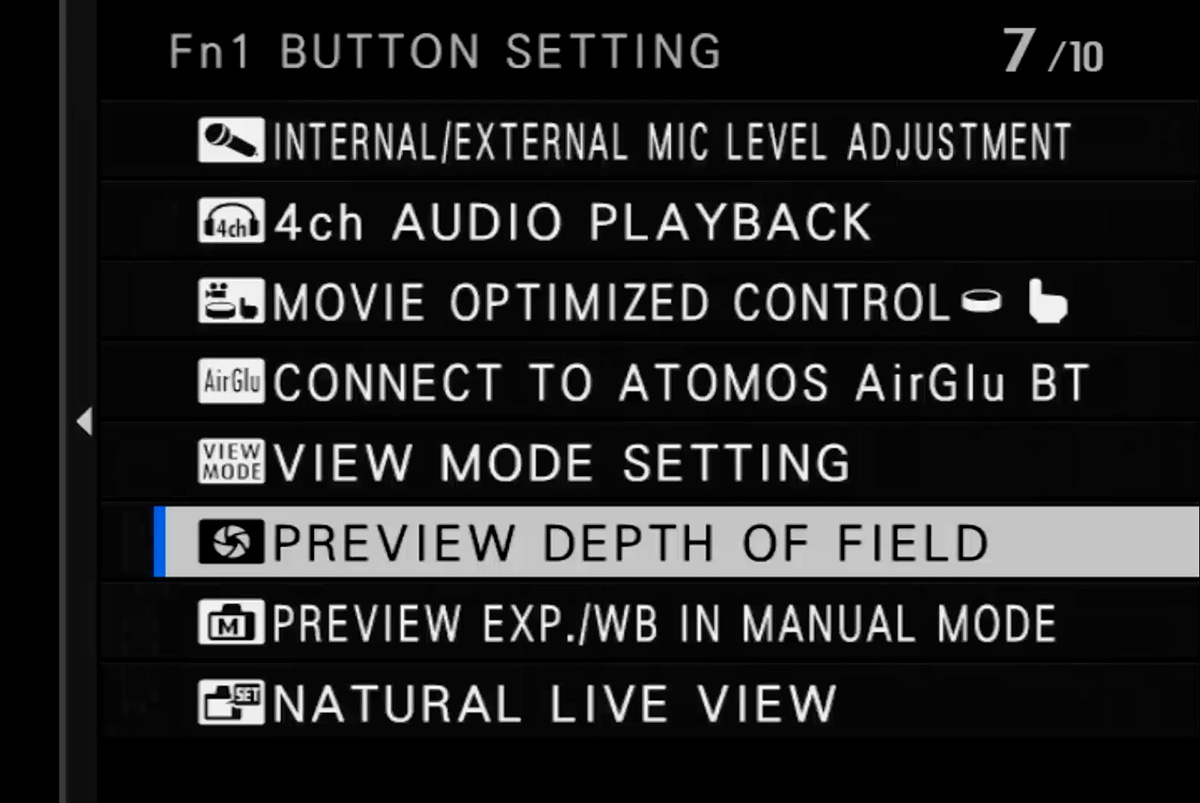
Before using this technique, activate your depth of field preview function. This closes the aperture to your selected value so the live view accurately reflects what will be sharp in your final image. You can assign this to a customizable button on nearly every modern mirrorless camera. Look for it in your camera’s function button settings.
Step 3: Switch to manual focus and slowly increase focus distance
Start focused close, like on your foreground subject if you have one, and slowly increase your focus distance while watching the horizon or furthest object in the scene.
Step 4: Stop the moment the horizon becomes sharp
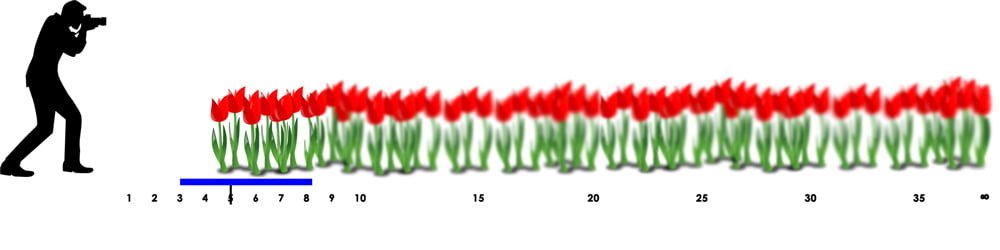
This is the key. The instant the horizon looks acceptably sharp, stop. Don’t keep rotating the focus ring. Every bit of additional focus distance past this point does nothing for the background. It only pulls your near limit of sharpness further away, blurring your foreground more and more.
Techniques for Checking Sharpness
Judging when the horizon “just becomes sharp” on a small screen can be tricky. Here are the best options depending on your camera:
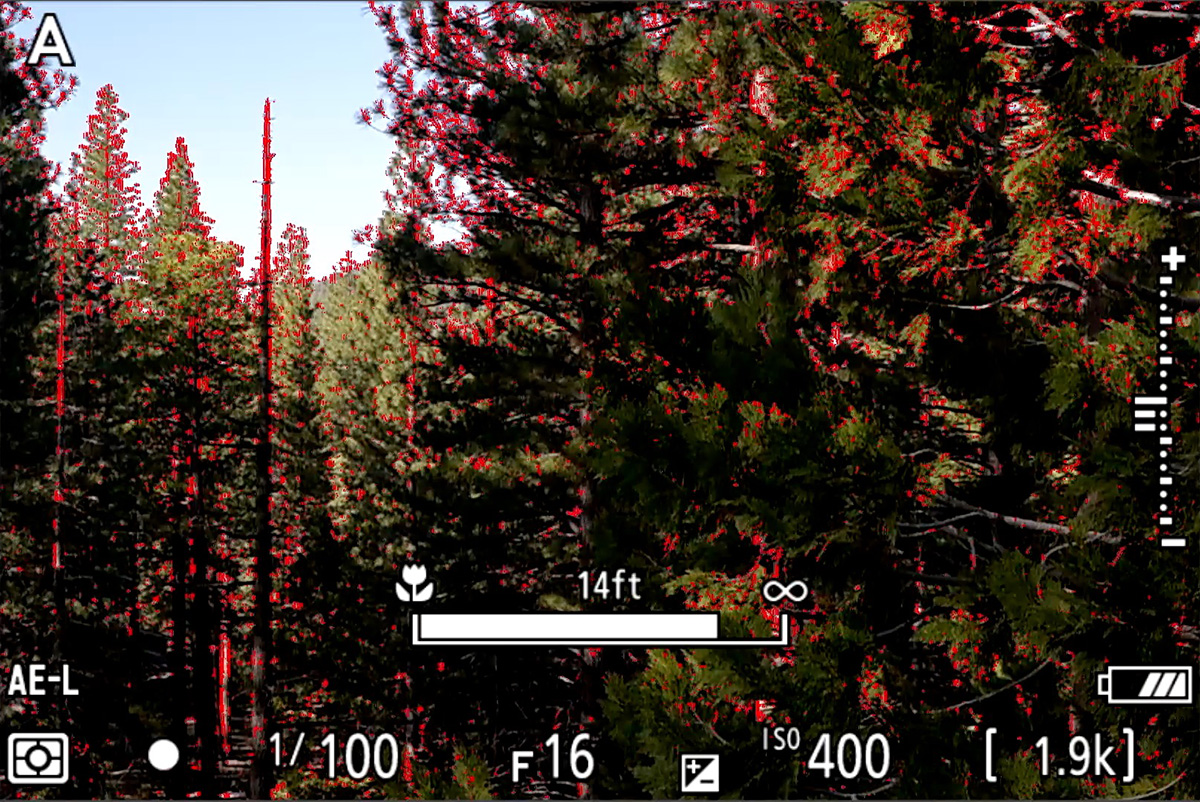
Focus magnification (preferred): With depth of field preview enabled, zoom in on the furthest point in your scene using your camera’s focus magnification tool (not your zoom lens). Fujifilm cameras maintain depth of field preview during focus check, making this the most reliable method. Zoom in on your horizon, increase focus distance until it’s sharp, and stop.
Reverse method: Focus all the way out to infinity first, then slowly pull focus back toward you until the horizon just starts to go soft – then nudge it back out slightly. This can be easier than approaching from the near end.
Focus peaking: If your camera disables zoom during depth of field preview (Nikon Z cameras do this, for example), use focus peaking instead. Increase focus distance until the peaking colors on the horizon appear as bold and dense as possible, then stop. You can also use the reverse method here – focus to infinity, pull back until the peaking colors start to thin out, then increase focus distance just slightly to restore them.
Important Things to Keep in Mind
This works best at small apertures, like f/8, f/11, and f/16. At f/2.8 or f/4, the hyperfocal distance is further away, and you may not be able to get both a close foreground and the horizon sharp unless you’re shooting a wide-angle lens.
Redo it if anything changes. Zoom in or out, or change your aperture, and your hyperfocal distance changes. Run through the process again.
This is for full-screen sharpness, not 100% pixel peeping. Results viewed on a phone, computer, or print will look sharp. If you’re zooming into every image at 100% to check corner sharpness, this technique may fall slightly short of a precisely calculated hyperfocal distance. But for “normal viewing,” it’ll get you there.
Quick Summary
- Set aperture and compose (don’t touch zoom after this)
- Switch to manual focus
- Enable depth of field preview
- Starting with a close focus distance, slowly increase focus distance while watching the horizon
- Stop the instant the horizon becomes sharp
- Shoot
There is a lot that goes into depth of field – it’s more than just aperture. If you want to learn how it’s all influenced by focal length, focus distance, aperture, display medium, and even individual physiology, check out the Advanced Depth of Field course.
Martin Hyett
Friday 18th of September 2020
I have wondered whether camera manufacturers could put hyperfocal distance into the camera itself. They know the focal length and aperture set and they could have the hyperfocal distance tables stored for their own lenses. Then the photographer could ask the camera to set focus at the hyperfocal distance. Of course new lenses would mean a firmware update or an approximation calculated. Would it be possible, in theory?
Greg
Friday 7th of April 2023
@John Peltier In my case with mirrorless, what I see is what I get from f/5.6 and more open. If I set up a preview button to stop the lens down to, say, f/22, I cannot both stop it down and do a camera body scene magnification at the same time. If I just bring distant mountains into focus at f/22 but then decide to shoot at f/4, I lose the distant focus. So, would this technique only work at the previewed and chosen fstop?
John Peltier
Friday 18th of September 2020
In theory this should be totally easy. I'm no programmer but I did take a few computer science classes in college decades ago and even then this would have been easy. I've wondered the same thing, and also wondered why this hasn't been implemented anywhere yet. I'm sure there's some reason I haven't thought of yet...
Tom Gibson
Wednesday 13th of May 2020
I also see you have gone to Sony vs Fuji or are you just using Sony examples, table and lens, for this article. But screen shot of camera is Fuji.
John Peltier
Wednesday 13th of May 2020
This post is not specific to any make or model. The method will work for both DSLRs and mirrorless cameras. The screenshots are just screenshots.
Tom Gibson
Wednesday 13th of May 2020
In theory this might work for others, but I have problems using the highlight color(s) as I never know when all is in focus. I have read when the red or chosen color is the brightest all is in focus. I have problems doing this. I focus on the foreground point that I want in focus with a given F stop, F 8-11, with a cropped camera, Fuji vs FF, and check with the magnification to be sure all is in focus. If not I adjust, refocus on the foreground, and check the background to be sure it is in focus. If in doubt and I will want to print the image I use focus stacking and check my first and last frame to be sure it is in focus.
I wish I could use the highlight as it would be much easier and that is one reason I was excited about getting a mirrorless camera.....but I should have gone with a Sony FF for landscape vs the Fuji. I find the Fuji is great for on point focus when photographing people, event photography, or macro etc, but a challenge for landscspe and of course night photography.
John Peltier
Wednesday 13th of May 2020
This post is not about highlight peaking. I just used that as an example of what's possible. You don't need to use it; you don't even need to use focus magnification. Just do whatever works to make sure the horizon is sharp as long as you're not zooming a zoom lens to do it.