
Guide Numbers Explained for Manual Flash - Calculator & Pocket Chart
Disclosure: This post may contain affiliate links. I earn a small commission of product sales to keep this website going.
Flash guide numbers, just like the Inverse Square Law, are one of the mysterious specifications about portable flashes that keep many new photographers from using them in Manual mode.
But once you understand what a guide number is and how to calculate it, using a manual flash becomes much easier.
Portable flash units - speedlights, shoe-mount strobes, whatever you call them - are such an important tool for every photographer.
Manual flashes are simple when you understand them, but getting to that point with guide numbers and inverse square laws and whatnot can put people off.
You'll even need to have an understanding of guide numbers if you only use TTL flash.
Ready to learn about flash photography from the beginning?
Check out my new Learn Flash Photography course. Watch the free previews and take 20% off the full course with the code "blog20".
What is a guide number?
In short, guide numbers on a flash indicate how much light that flash can produce.
You'll see them in the specs indicated in either meters or feet. The higher the guide number the further the flash will reach.
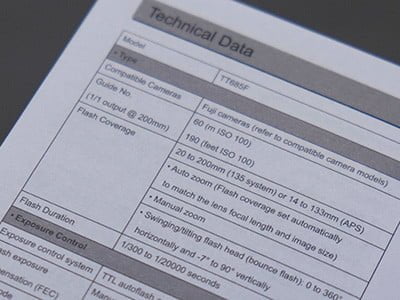
The specifications will also show the flash settings at which the guide number is calculated, including the ISO and flash zoom setting.
I use the cheap Godox units. They have a guide number of 60 meters, calculated at ISO100 and a full flash zoom setting of 200mm.
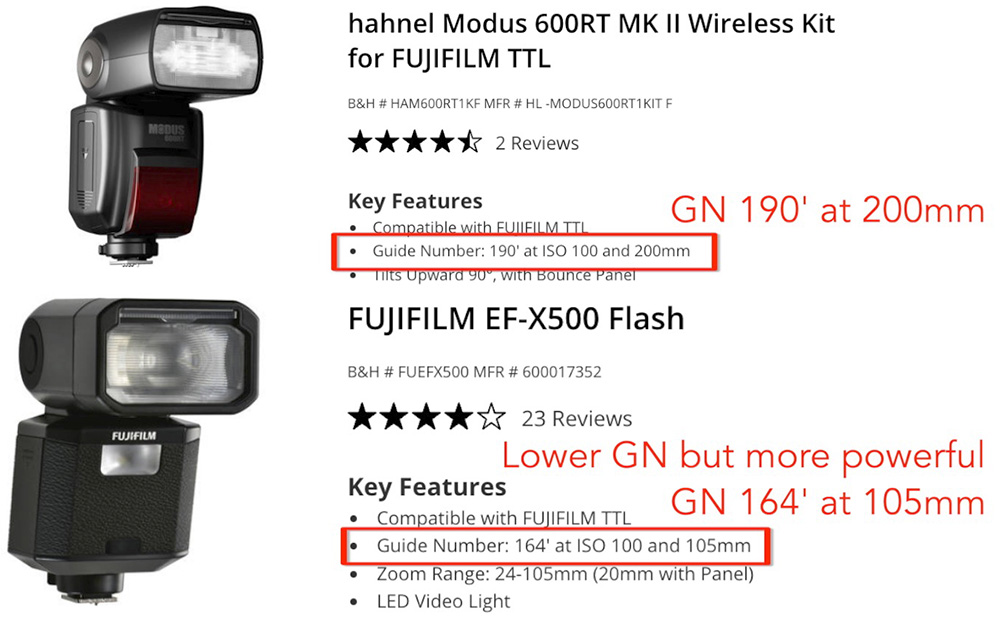
The more expensive Sony units, for example, have the same guide number but are calculated at a flash zoom setting of 105mm.
So the Godox units aren't as powerful. Pay attention to these specifications when looking at flash units.
We'll use a Guide Number of 60 meters in all of these examples.
The flash guide number formula
Before we can understand anything further we need to know how the flash guide number (GN) is calculated.
Distance * Aperture = GN
Flash exposure on your subject is dictated by aperture, ISO, and distance (see Inverse Square Law). Shutter speed doesn't have much to do with it until you get into sync speeds but that's another topic for another day.
So if our guide number is 60, that means that at ISO100 and an aperture of f/1.0 we'd get a correct flash exposure at 60 meters.
60m * f/1.0 = 60
It seems simple, right? It would be if we were always 60 meters from our subject, shooting at ISO100 and an aperture of f/1.0.
But that's not reality.
How do you use a flash guide number?
Finding the maximum distance for your flash when changing aperture
Now, what if we wanted to shoot at f/11 to get some depth of field, to have our foreground and background more in focus.
How far would our flash reach for a correct exposure?
Distance * f/11 = GN60
...solving for distance we have...
Distance = 60/11
...which is 5.5 meters, or 18 feet for us stubborn Americans.
We'd get a (hopefully) perfect exposure at 5.5 meters now, not 60, with our aperture at f/11.
That makes sense because the smaller aperture of f/11 lets in much less light than a wide-open aperture of f/1.0.
Still with me?
Changing ISO
Bumping up your ISO will make your sensor more sensitive to light, meaning you'll get more out of your flash.
In our example above, if we needed to have our flash further than 5.5 meters from our subject, we could increase our ISO.
What's our new distance at ISO200?
Well, ISO isn't in our guide number formula. Only the aperture is.
ISO200 is a one-stop increase from ISO100, which would be the same as increasing our aperture one stop from f/11 to f/8.
Distance * f/8 = GN60
Distance = 60/8
...which is now 7.5 meters at ISO200, compared to 5.5 meters at ISO100.
Reducing flash power
Sometimes we need to reduce the flash power to have faster cycling times, get more out of our batteries, or avoiding overheating.
Flash units allow you to reduce the flash output, from 1/1 to ½ (half-power) to ¼ (quarter-power) to ⅛ and so on, down to 1/128 typically. Each reduction in flash power is a one-stop decrease.
Unfortunately halving our flash output doesn't mean we can halve our distance...we still have to do math.
What's our flash distance at ISO100, f/11, and ½ power?
Reducing the flash output by one stop (from 1/1 to ½) would be the same as reducing the aperture one stop to f/16 (from f/11 to f/16). So let's plug that into our formula.
Distance = 60/16
...comes out to 3.75 meters.
Remember from our first example that at full power we had 5.5 meters. Now we have 3.75m at half power.
Final exam
Switch up what we need to solve for - we want to have our flash 4 meters from our subject and a shallow depth of field using f/1.4.
What power setting will we need?
We can't solve for flash power using the guide number formula. We know that at full power we have a guide number of 60, and we want to be 4 meters away, so let's solve for aperture at full power first.
4m * Aperture = GN60
Aperture = 60/4
...which is 15.
There is no f/15, so let's round to f/16. We'd get a good exposure at f/16, but we want to shoot at f/1.4.
How many stops away is f/1.4 from f/16?
- 16 to 11
- 11 to 8
- 8 to 5.6
- 5.6 to 4
- 4 to 2.8
- 2.8 to 2
- 2 to 1.4
Seven stops increase in aperture. So we need to reduce our flash seven stops to balance it.
- 1/1 to ½
- ½ to ¼
- ¼ to ⅛
- ⅛ to 1/16
- 1/16 to 1/32
- 1/32 to 1/64
- 1/64 to 1/128
Tips for using flash guide numbers
- Many modern flash units have range scales on them in both TTL and Manual modes to make all of this much easier for you.
- These are only valid for bare flash heads! If you do anything with the light - bounce it, throw it through an umbrella - these numbers will be off.
- It's important to remember that these numbers are also only valid at the noted flash head zoom setting. Adjusting the zoom setting of the flash will adjust the behavior of the light.
- Flash manufacturers really milk the testing conditions, so keep in mind that these are guide numbers.
- They're still important to know if you only shoot in TTL - it'll tell you how far the flash will reach when it's at full power.
- You should have a way to calculate a flash guide number in the field (see below), use an app...
Or you could have a baseline for the kind of work that you do and start from there. Say you usually shoot environmental portraits at a distance of 3 meters, ISO400, and f/4.0. That's a power of 1/128. But you're also probably using a modifier of some sort, so bump it up one stop to 1/64.
Having this kind of "go-to" setting takes a lot of the guesswork out of it. After taking a sample exposure you usually only need to adjust by one or two stops in either direction. It'll really speed things up.
Simple flash guide number calculator
This is just a simple guide number calculator that solves for distance, but you can play around with all of the different variables and see how they're related.
You can also plug in a few anchor points and use those for your baseline starting points when you go out and shoot.
Guide number calculator chart
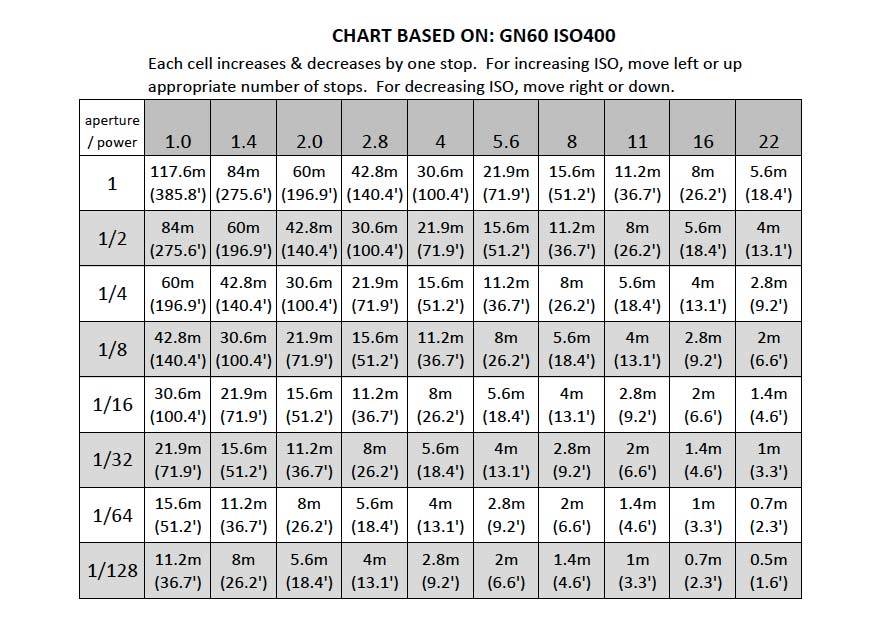
Using the guide number calculator, I've made this guide number chart for a Guide Number 60 at ISO400.
If you use an ISO of 800, you just move left on the chart one stop (one square). If you use an ISO of 100 you move right two stops. Make sense?
You can make something similar for your specific flash units using this calculator.
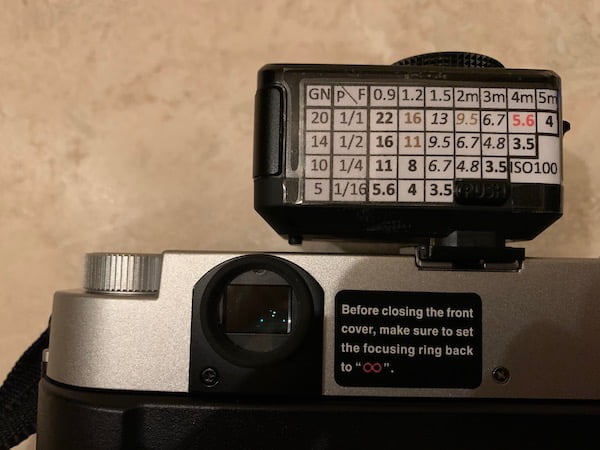
One of our readers, Karl, submitted a chart he made for an EF-X20 flash on his Fujifilm GF670 medium-format rangefinder (below). It affixes to the back of the flash unit and shows slight over/underexposures, as well as half-stops, similar to the camera.
Thanks Karl!
how about sony a6400 is using 1/3 step increments
This is more dependent on the flash unit rather than the camera.
And I just find it easier to use the full stops as a starting point; going into a shoot thinking about thirds is too much and unnecessary. You can use those micro-adjustments if you need to real-time. But I like to keep things as simple as possible.
Edit: are you talking about the FEC using thirds? Yes most cameras have that option. But start off with the whole stops and then fine-tune it using the thirds if you need to.
Often when I need to find info related to photography, I am directed to your site and I always find it very helpful. Thanks.
Glad to hear it, Herman. Thank you so much for the feedback!
What an easy explanation of how this works - thank you so much.
Glad it helped Susie, thanks for the feedback! Anything that could have made it clearer?
Really useful article, thank you.
How does the flash zoom affect all this please?
If a Godox has a Guide Number of 60 at 200mm and a Sony has GN60 at 105mm flash zoom, how do you compare the Guide Number to compare?
I’ve Googled and come up with various threads asking this and not come across the answer!
Thanks.
Hi David, that just means that if you use those two flash units for the same photo, with the same power settings and at their maximum zoom settings (Godox at 200mm and Sony at 105mm), you'll get the same exposure. But the Godox beam will be more concentrated since it's at 200mm and the Sony is at 105mm. If you then zoomed the Godox out to 105mm to get the same coverage as the Sony, the Sony light would appear brighter because that Godox light is now being spread out. I hope that makes sense.
Hi John, yes that make sense however it still does not give us an answer. How to compare two flashes eg. in this example we know that Sony flash is stronger but how much stronger? This is very confused as different brands use different configuration to present their product and even the same brand Godox is presenting their two products TT350 with GN36 at zoom 105mm but TT860II with GN60 at zoom 200mm. How to compare them? We only know TT860II is stronger but cannot calculate how much would it be at the same zoom level. That's very frustrated.
Unfortunately you won't find an answer to this. There's no formula. I wouldn't even wish this research on a grad student for their thesis. There's just so many variables involved between the different manufacturers, models, power levels, and zoom levels that it's impossible to compare or calculate.
Best advice is to just know your gear. Pick one and become intimately familiar with it.
If you really need to know, the simplest way is to borrow, rent, or buy a light-meter. use a tape measure, and make yourself a chart. If you're feeling really ambitious, you could plot both flashes on a chart and compare.
Hey, thanks for all the information about how speed lights work. Just trying to make sense of how the Sony 105mm is brighter than the Godox 200mm given the same guide number. Since 200mm is bigger than 105mm, shouldn't it be the other way around? Also, if the Sony appears brighter at 105mm than the Godox because the beam is more spread out, couldn't you flag it off to get the same desired look?
It just has to do with how the manufacturers calculate their guide numbers. Godox wants to appear strong since they're a budget light, so they say hey we have a GN of 60, but that's calculated with the flash head zoomed to a lens focal length of 200mm (light more concentrated). Sony calculates theirs at a 105mm focal length in this example (light more spread out). Meaning the Sony flash is stronger. If you zoomed the Sony to 200mm, the light would be more concentrated, and brighter than the Godox at 200mm. Flagging wouldn't have quite the same effect because there's also a lens in front of the flash strobe when you zoom it.
Thanks for the detailed explanation but something is yet not cleared for me. What is the required compensation when using the flash with the beam set to less zoom than the one that was used to measure its GN? For example, if we use the Godox flash with 24mm, so the beam is more spread now so less powerful, can we calculate the required compensation for that?
That's all going to depend on your flash unit. There's no easy formula you can use to calculate this. It's just going to take experimentation.
I've read several explanations of guide numbers, including The Strobist's, but this is the first one that made sense. I think the key part was explaining in depth how to deal with different ISOs and flash powers; after you explained it, it seems obvious if you're familiar with the calculation of stops, but I didn't put it together on my own.
Btw the calculator is being blocked by an x-frame-options policy. Also I had to switch to another browser to comment because mod_security is hard-blocking all comments made over tor.
Thanks for the feedback! Understanding "stops" is so critical in understanding how light behaves.
And thanks for the info on the other things, I'll have tech support - I mean, me - look into it.
Congratulations! First and foremost, thank you for your Service.......Thankyou on finally getting a very linear explanation to me that my very mechanical mind can grasp with ease...All the other places I looked had to much in the abstract that was way to much to understand....and yeah, I like feet and inches,lol 😉
Thanks for the feedback...if I can find a way to explain things to my caveman brain I hope it makes sense for everyone else 🙂
I'm a total novice, looking to buy my first flash and this made perfect sense to me (with the help of your answers to people's questions about the zoom difference). Thank you very much.
You're welcome - good to hear. Have fun with it 🙂
Hi John, I really enjoyed your article and it's all starting to make sense, thank you. Can I ask, are there any principles that I can follow, in conjunction with your calculations above, when using a soft box and flash for instance? Many thanks, Yvonne
Hi Yvonne, unfortunately, there aren't any "formulas" for adjusting these when using softboxes. The only "rule" is that a softbox will absorb some of the flash output, so you won't get as much power out of it when using a softbox. Any time the flash has to go through something (like fabric) or bounce off of something, it's going to lose some power.
Any chance you might also factor magnification into the flash guide number calculator?
Either way, thanks for the info! This the clearest GN explanation I've yet met.
Sorry, there's really no way to factor in the magnification on a global scale. There are too many other variables when you bring that into the equation.
@John Peltier, the easy solution is to do it empirically - set the camera up with a lens equal to the longest setting the flash will zoom to - on manual set an arbitrary fstop. zoom the flash wider and wider and see how many stops you need to open up to get an equivalent exposure -
I have a 1956 Braun 80 big prof. portable flash. The metal table on the back of the head shows a GN of 50 with DIN 17Deg/40ASA. What will be today's GN with Tri-X (320 ISO)? I thought I calculated 126/Mtr but that sounds wrong. Another thing, the head has a rotating offset tube mount that can place the tube at two different axial focal points of the reflector. I am guessing I can use that to change the useful output of the flash. I have ordered a manual but am not confident of what It will tell me. When I was using a similar flash in 1959 with TXP200 I never worried about careful settings and always got good dense images.
If anyone out there uses vintage gear I would like to compare notes.
@John Kessler, can't you just shoot digital and check what the flash output is, or use a flash meter
Hey John, amazing guide. Many thanks for sharing.
Got a question in regards to GN for underwater photography, do you have any advise how I should treat a strobe with 33GN. Could I simply assume GN 16.5 for UW?
It would be less but I’ve never considered converting these for underwater! Water absorbs light in so many different ways than air, so I don’t know if it’s as easy as cutting it in half - but you could start there 🙂
I am more or less a beginner in photography. Even though I had read about GN, the calculation was not properly understood until reading this article. A subject which was complex has been reduced to primary school Maths! Thank you.
Glad to hear it, you’re welcome!
This has helped me so much with understanding my flash beyond trial and error. One quick question, what shutter speed should I be shooting at for this or does it not matter as long as it's within the sync speed limits? I'm looking to use a small flash with a GN of about 33 on my Olympus RC35 and HP5. I have about f2.8 around 35ft, f4 around 26ft, f5.6 around 19 and so on for iso 100. Is this all correct? also would that mean that I can shoot at further distances than the calculations since my film speed is 2 stops higher?
Hey Drew, glad it helped. If your GN is 33 feet, you're going to have about 12 feet at f/2.8, 8 feet at f/4, 6 feet at f/5.6, etc. But yes, that's all at ISO 100, so if you're using higher speed film, those distances will increase. If you're using 400 speed film, those numbers become 24 feet at f/2.8, 17 feet at f/4, 12 feet at f/5.6, etc. ISO 800 would be 28' at 2.8, 24' at 4.0, 17' at 5.6...
So when dealing with ISO, could you just calculate at iso 100 then change aperture or light power? Seems to work when you adjusted to shoot at f1.4 instead of f11
Yes, there are a lot of different ways to get to the same solution, which is important to understand because there are several other reasons you may choose to change one variable over the other not covered in this article, such as for control of depth of field, control of ambient light, maxing out your flash, etc.
If you’re decreasing the ISO, why do you move rightward on the chart? That stops the aperture down, letting in less light. So with the ISO being lowered and already letting in less light, shouldn’t a decrease in ISO mean we move up or left? Not down and right?
Decreasing the ISO has the equivalent effect (as far as the flash is concerned) of closing the aperture. You move right on the chart for either stopping down in aperture or decreasing ISO the same number of stops.
Fantastic article, Thank you!