Disclosure: This post may contain affiliate links. I earn a small commission of product sales to keep this website going.
Looking for some mirrorless camera photography tips to get the most out of your switch from DSLRs? Or maybe you’re new to photography altogether – or you’re a veteran, and looking for ways to get the most out of your mirrorless camera.
Here are my five favorite tips for using a mirrorless camera.
Learn to Use the Histogram
I wasn’t exactly an exposure master when using DSLRs. Even after learning metering on a film camera, transitioning to advanced metering with DSLRs, and reading acclaimed books like Bryan Peterson’s Understanding Exposure, the perfect exposure still eluded me.
I mean, I wasn’t horribly off, but I still found myself bracketing exposures just to make sure I had one that matched my vision. With that came an increase in editing time and digital storage needs.
The electronic displays in mirrorless cameras come with a wealth of information (customizing the display is another tip), but one of my favorite pieces of information is the histogram.
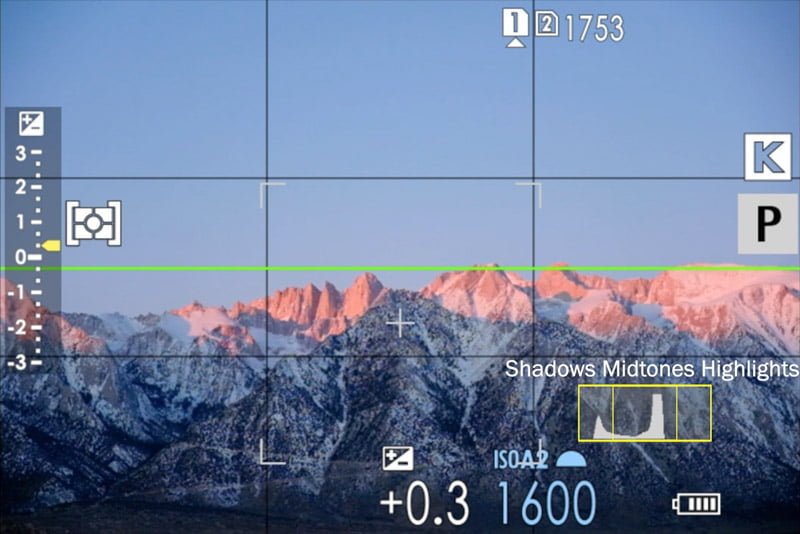
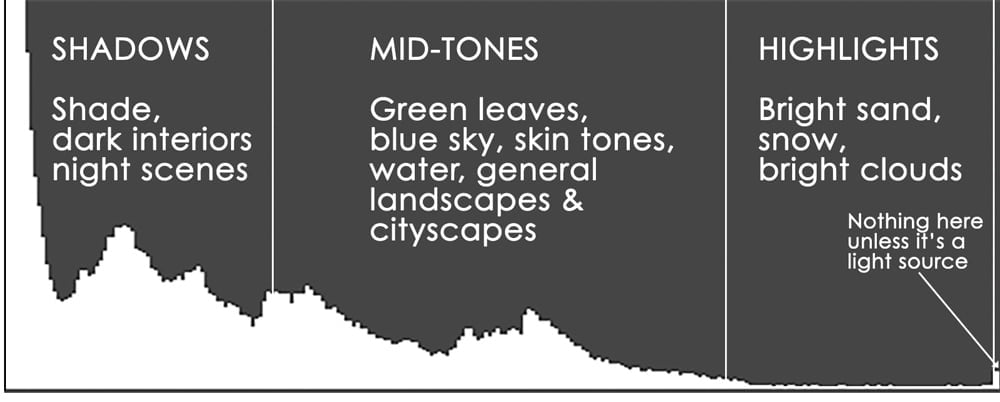
If you’re not familiar with what a histogram is, here’s a basic explanation. It’s a graph of how bright your photo is. Want a dark photo? Make sure the bulk of the graph is on the left. Want a bright photo? Make sure the bulk of the graph is on the right. An evenly exposed photo? It should all kinda average out to the middle.
Using a histogram is a bit more complex than how those simple sentences make it sound, and it takes some practice. But once you learn how to use the histogram to expose your images with your mirrorless camera, you’ll be much better off than I ever was with an SLR. This is probably my favorite mirrorless camera photography tip.
You can learn more about it in an entire post I dedicated to the subject.
Customize your Controls
Don’t you hate it when you get into your car after someone else has been driving it? Your knees hit the wheel, the seatback is reclined so much you can’t see over the dash, and God knows where the rearview mirror is looking.
Camera manufacturers are trying to set the seat for the average driver…I mean, photographer. Some of the assigned button functions kinda make sense, and others make you wonder what they were thinking.
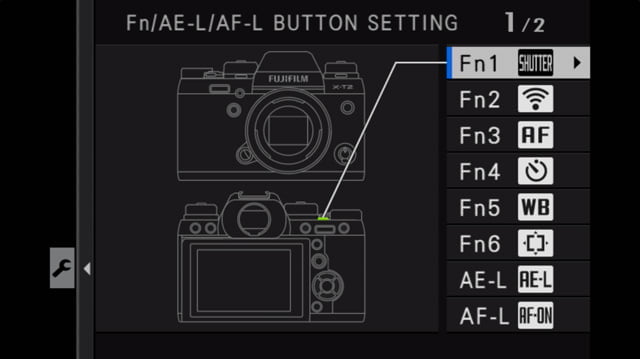
Thankfully, these same camera manufacturers recognize that there is no one-size-fits-all solution, and they allow you to customize most of these controls.
And thankfully, because I’m an author who doesn’t assume to know how you want your controls set, I’m not going to tell you what to program. Rather, I’m going to tell you how to figure it out for your own style of photography.
This process is going to take some time to refine, and it’s going to take even more time to train your muscles to go to the right buttons without thinking about it. But it’s really going to pay off when you no longer need to go into deep menus to change settings you need quick access to.
The first step is to think about what you primarily photograph. Which settings would you need to quickly change for that kind of photography?
For example, if you’re a portrait photographer, you probably want quick access to the Face/Eye Detection settings and flash compensation. If you’re a nature photographer, you could probably care less about Face/Eye Detection or flash compensation. Instead, you want quick access to change your Continuous Autofocus Tracking settings and adjusting your continuous burst rate. If you record JPGs because you don’t want to process RAW photos, being able to quickly refine your White Balance is probably really important. Probably not if you only record RAW.
And so on. Go through all of the possible settings you can assign to custom buttons. Prioritize them. Map them out. Assign the most important settings to custom buttons. Put the rest in your camera’s “My Menu”/”Quick Menu” or other custom menu that cameras have.
Practice using these buttons out on a shoot. Refine. Practice more.
Customize your Viewfinder
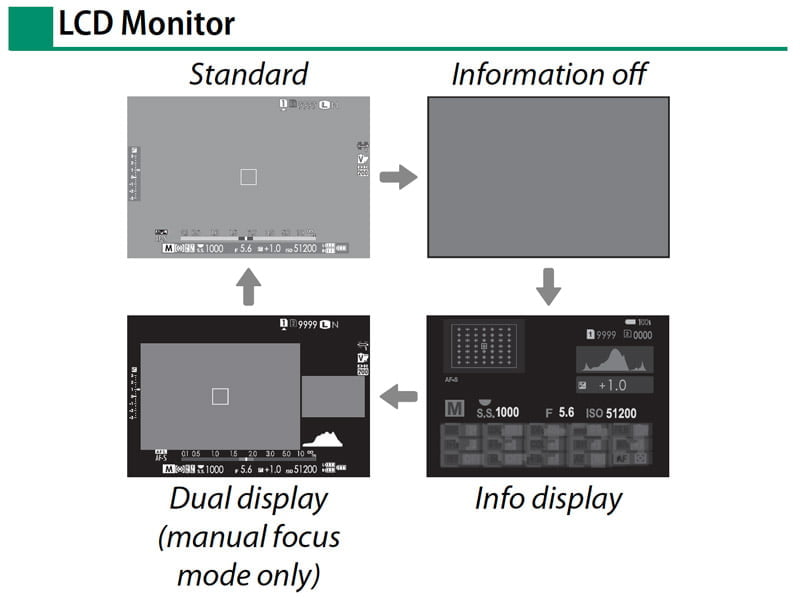
Back to that Histogram…how do you put it in your viewfinder/LCD? Want to go old-school and not have it in your viewfinder?
Customizing that viewfinder/LCD is another powerful feature of mirrorless cameras and a great tip for using your mirrorless camera.
Like the previous section, I’m not going to tell you what to put in your viewfinder and what not to put in your viewfinder.
But I want you to think about it.
Specifically, look at two different things you can customize:
- What’s actually displayed on the screen.
- How you can “cycle” different displays on the screen.
For the first point, you can very easily enable/disable certain features. Like Highlight Overexposure Warnings, Horizon Levels, Histograms, Composition Grids, and more. Even the basic stuff that you’d never think of customizing, like file type, exposure remaining, and so on. Figure out what you need, what you don’t need, what you like, and what you don’t like.
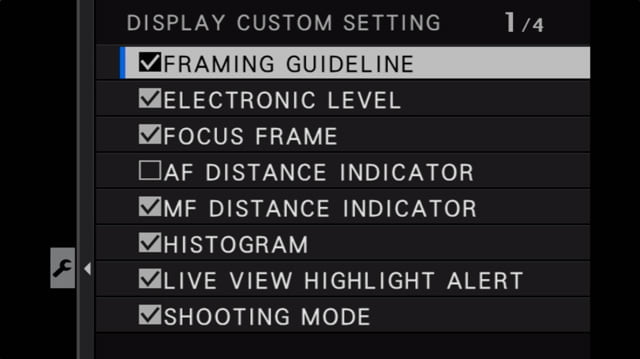
For the second point, most cameras have a number of different displays that you can cycle through. Some of these can be customized. Learn what your camera can do, and what the different display options are.
Powerwise
Despite all of their advancements, one of the disadvantages of mirrorless cameras is that they consume power like nothing else. It takes a lot of juice to power that screen! Just based on physics, you can’t get a comparable number of photos out of a mirrorless battery that’s the same size as a DSLR battery.
But there are some things you can do to squeeze as much life out of those batteries as you can. Batteries as in plural; every mirrorless camera owner should have more than one battery. First sub-tip.
Turn off features you don’t need. As a default, mirrorless cameras have a bunch of cool features. Features that you may not need, and features that will suck your battery dry. The two that come to my mind first are the Image Stabilization (if your shutter speed is fast enough) and the automatic image review feature. Stop looking at the back of the camera after each photo – you’re wasting your battery, and you’re going to miss the next photo!
Your camera’s wireless features also draw power. Bluetooth & WiFi are used for controlling the camera, transferring photos, and adding geolocation data. Although Bluetooth is a much lower power draw than WiFi, it’s still using power.
Be mindful of which screens are on, and when. If you leave your camera on all the time, without an auto power-off feature enabled, your screens will deplete your battery in no time. Some cameras have features where all of the screens will remain off until you pull the camera up to your eye. Or you press a button to “wake up” the LCD. Find out what your camera can do, and set the auto power-off feature!
I have a few more “battery extension” tips in this post written for backpackers, but applicable to everyone looking for mirrorless camera photography tips.
Take advantage of silent shooting – when necessary
DSLRs have a “silent shooting mode”, but it’s nowhere near as truly silent as what mirrorless cameras can do. This is another big advantage of mirrorless cameras, and not enough people use it.
When I’m talking about a mirrorless camera’s silent shooting ability, I’m referring to the Electronic Shutter – which DSLRs can use too, but they still have that mirror-slapping sound. Mirrorless cameras are silent.
Don’t be a voyeur. That’s creepy. But there are times when camera shutter sounds are inappropriate or distracting. Like in churches, during speeches, or around wildlife.
In these situations, enable your Electronic Shutter and make photos without anyone knowing or alerting wildlife. The guy next to you with the DSLR will get all the hate when his camera goes “clack clack clack“, but at least you know that you were silent.
Beware, there is a downside to the Electronic Shutter, which is why I only advocate using it when necessary. It can result in light-flickering or what’s called rolling shutter. You can read about these disadvantages here.

But used properly, the Electronic Shutter will let you take photos that, with a louder camera, you may only get one shot at due to the noise.
mirrorless camera photography tips - Kobo Guide
Sunday 9th of May 2021
[…] Learn to Use the Histogram […]