Disclosure: This post may contain affiliate links. I earn a small commission of product sales to keep this website going.
Why add geolocation information?
Having location information embedded into your photos can be extremely helpful for numerous reasons.
It can help keep you organized by grouping your photos by location. It can help with search engine optimization if your photos are in an online portfolio and you want to sell/license their use. Use it to remind you of where you were on trips or photo walks. And it can just be fun to look at a map and see photos associated with a certain location.
Recording geolocation information can also be detrimental, however.
Unfortunately, there are some bad actors out there who take advantage of vulnerable populations and locations for exploitation. Human trafficking and natural resource depredation can be a result of geolocated photos. So be mindful of this when adding geolocation information to your photos. A lot of the nonprofit work that I do is with vulnerable populations, for example, and those photos do not have any geolocation information.
Still, it can be of great benefit to photographers. In this article, we’ll look at how to add geolocation information to your photos in Photo Mechanic. To learn how to geotag in Lightroom Classic, reference this article.
Adding geolocation information in Photo Mechanic with a GPS track
Many cameras today have some function to pair to your smartphone via Bluetooth. Not only does this help ensure your capture times are accurate, but it can also automatically add location information from your smartphone to your photos every time you press the shutter button!
Setting this up can be a burden, though, but more importantly, it can deplete both your smartphone and camera batteries fairly quickly. Turning this off is one of my recommended steps for making your camera batteries last longer when it matters.
Thankfully there are other ways of geotagging photos, using Photo Mechanic.
Recording tracks
Recording a GPS track is my favorite method of geotagging photos in Photo Mechanic. And there are so many great smartphone apps out there that you don’t even need a dedicated GPS receiver anymore. These smartphone apps work in Airplane Mode, helping you preserve your phone battery on extended trips, and in places you don’t have cellular reception.
My favorite is Gaia GPS. There are several other apps; make sure that whichever one you use can export a GPX or KML file.
This GPS track will record “breadcrumbs” of exactly where you were and at what times and Photo Mechanic uses that information to sync the location and time of the photographs. This is why it’s so important to have your camera’s clock as accurate as possible, to the second. It will match your photos to the GPS time.
These cloud-based GPS smartphone apps then allow you to download the GPX file to your computer. I keep these GPX files in the same folders as my photos.
Importing tracks into Photo Mechanic
When you’re ready to import your tracks, open a Contact Sheet for the photos you want to geotag.
Select all of the photos that you’ve tracked. Click on the first photo for the tracks, then shift-click on the final photo for the tracks. All photos in between will be selected. Or use Ctrl/Cmd+A to select all photos in the Contact Sheet; Photo Mechanic will ignore the photos that don’t have a corresponding track for their capture time.
Then go to File > Import GPS Coordinates. This will be grayed-out in the Preview window. You must do it from a Contact Sheet.
The Import GPS Coordinates window will open; click on Add… Browse to the folder containing your track(s) and open the track(s). You can add multiple tracks, like if you stop and re-started recording for some reason. You just have to add them one at a time.
Then click on “Plot GPS Logs.” Photo Mechanic will show you a map with your track. Ensure it’s correct.

Then we have some options we need to go through.
GMT Offset
GPS times are recorded in GMT Universal Coordinated Time, the time at the Prime Meridian. Most GPS smartphone apps automatically adjust for local time based on date and location. Photo Mechanic does not. You’ll need to set this offset in the dialog.
The best way to do this is by using the Auto button; Photo Mechanic will use the capture times of the selected photos to make an educated guess as to which time zone you were in.
You can, of course, do this manually using the inputs or reset it all with the Reset button.
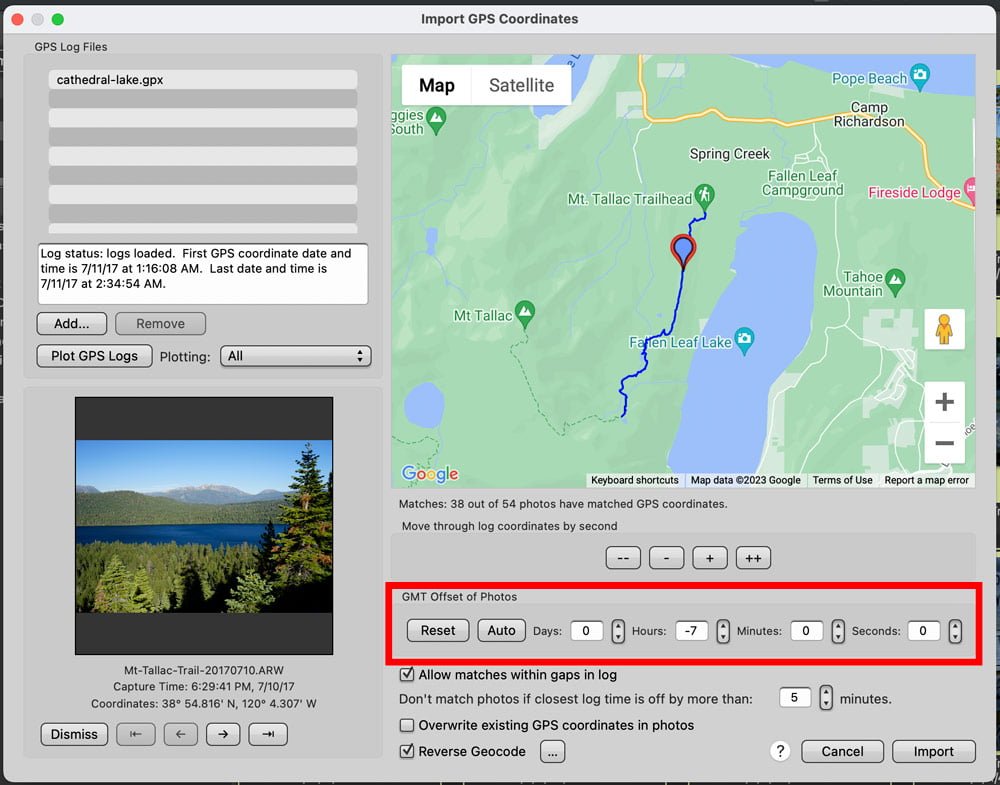
Time & location verification
Photo Mechanic will tell you how many photos of the selected photos can be matched to that track. You’ll see something like “224 out of 228 photos…” below the map. Does the number make sense? Is it lower than expected?
Verify the plots by stepping through the photos one at a time using the arrows in the bottom left of this dialog. Do they match up? Does the track show you on a bridge for a photo when the photo itself is not on a bridge?
You can use the GMT Offset inputs to further refine the plots close to where they should be if a photo was made at a known location.
“Allow matches within gaps…” will allow Photo Mechanic to interpolate where a photo should be if there were any gaps in the GPS log, if it didn’t record due to GPS reception or some other reason. This can be fine if you were traveling at a consistent speed, but if you stopped moving for a while or varied your speed, this can cause some discrepancies. You can uncheck this option and plot them manually, discussed below.
“Don’t match photos if closest log time is off…” will tell Photo Mechanic to ignore matching photos with times outside of this range. If your GPS track contains a plot at 2:37 and the next plot is at 2:47, and your time set here is 2 minutes, then any photos captured from 2:35 to 2:39 will be plotted to the 2:37 time, and any photos captured between 2:45 and 2:49 will be plotted to the 2:47 time. Any photos captured between 2:39 and 2:45 will be ignored.
We’ll look at Reverse Geocoding below, but I’d recommend checking this.
Once everything looks good, click Import to start the batch sync!
Geotagging in Photo Mechanic without a GPS track
You can still add geolocation information in Photo Mechanic without a GPS track. It’s just a bit more labor-intensive.
I’d recommend keeping good notes on your travels to do this accurately. I usually make notes of my days anyways; they’re not super-detailed, but enough to refresh my memory on where I was when I get home.
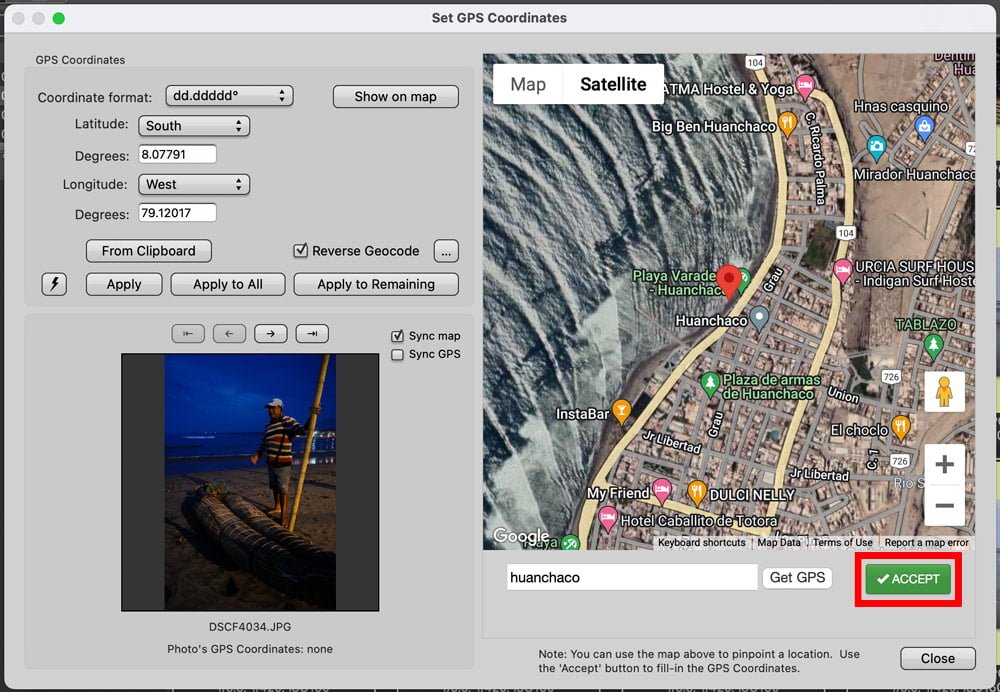
To geotag individual photos, select the photos you want to add geolocation information to. Then go to Image > Set GPS Coordinates…
When the Set GPS Coordinates dialog opens, you can input coordinates manually if you know them. But most likely, you don’t have that information.
Use the map to go to that location. You can use the search bar below the map to type in the closest location and click “Get GPS” to get you in the right area. Then you can pan around the map until the pin is in the correct location. Click “Accept” to transfer the coordinates of the pin into the coordinate field. Don’t forget that step; your photos will be plotted to Null Island otherwise! Then apply those coordinates to the photo(s).
- Apply applies those coordinates only to the currently selected photo.
- Apply to All applies those coordinates to all selected photos.
- Apply to Remaining applies those coordinates to the current photo and all remaining photos in the selection that haven’t been geotagged yet.
Reverse Geocoding
Regardless of which method you use to geotag your photos in Photo Mechanic – with a GPS track or without – you have the option to Reverse Geocode those photos.
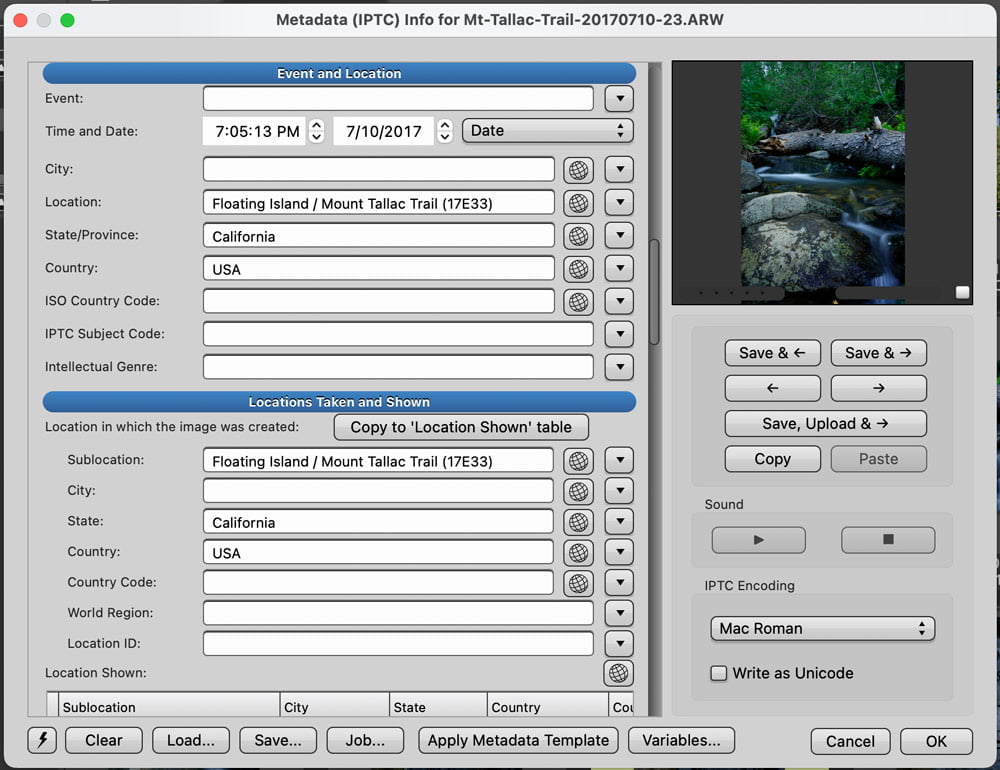
When this is enabled, whenever you apply GPS coordinates to a photo, Photo Mechanic will send those coordinates to its reverse geocoding server. It’ll look up the closest geographic tags, such as an address, city, state, zip code, country, or even things like hiking trail designations. It will then add that information to the IPTC metadata for that photo in the “Event and Location” and “Locations Taken and Shown” sections of the metadata.
This can be another great benefit for some photographers, assisting with the organization of large photo libraries and enhancing search engine optimization & discoverability.
Geotagging in Photo Mechanic is one of the many facets of Photo Mechanic that we’ll cover more in-depth in my Photo Mechanic Guide, currently only available to subscribers as I build up the guide.
You can also learn more about Photo Mechanic in the following articles:
William McKee
Thursday 19th of January 2023
Thanks for this. Just worked all this out last week (Jan 2023) - so recognise the workflow. Points: 1 - GPS Export - You need to explicitly describe the export process from the GPS software eg how to create a GPX file as it will be completely new to a lot of people. I used myTracks app. 2 - GMT offset - I have to fiddle this after using Auto to get 100% match - ie 56/89 matched to 89/89 - not sure why - It might be a bug. 3 - Some photos just wont geotag when everything before and after do so correctly - again possibly a bug. 4 - Reverse Geocoding - again a bit hit and miss - some full detail and others nothing (middle of tourist Istanbul) or incorrect. This was for photos taken in Istanbul and Georgia. Still working through. Also names can be in local language eg Turkish or Georgian for me. 6 -Maps alternative - “maps.me” - I use this in parallel to GPS capture where I was - I add a place marker. It was more detailed than mytracks for rural Georgia. The GPS mytracks detail was not there but with maps.me I was able to confirm the exact name of a winery and it’s location completely. Does not need Wi-Fi or phone signal, so no data roaming charges. Again works in flight mode. It needs country maps which are £0.89 per country. 7 - Take place name photos - use your camera or iPhone to capture signs at places or on roads to allow you to describe where you have been later better. This helps when adding keywords of restaurants, museums, sites etc....
John Peltier
Friday 20th of January 2023
Thank you for the comments! Yes, there are countless ways to record a GPS track, and every tool has a different way of getting those files to your computer, so it's up to the user to learn their application - there's no way I could possibly cover all applications here. The system isn't perfect, and Reverse Geocoding functionality is actually crowdsourced, and I believe there is a way to submit information into the database. Otherwise, great tips!
William McKee
Thursday 19th of January 2023
@William McKee, Forgot to mention - always think of your camera time setting when you change time zone. Easy to forget. Older DSLR and lots of mirrorless don’t have Bluetooth sync capability. Don’t worry if you forget - the offset will correct for it.