Disclosure: This post may contain affiliate links. I earn a small commission of product sales to keep this website going.
High Sierra Trail Planning & Photos
Contents:
High Sierra Trail Summary
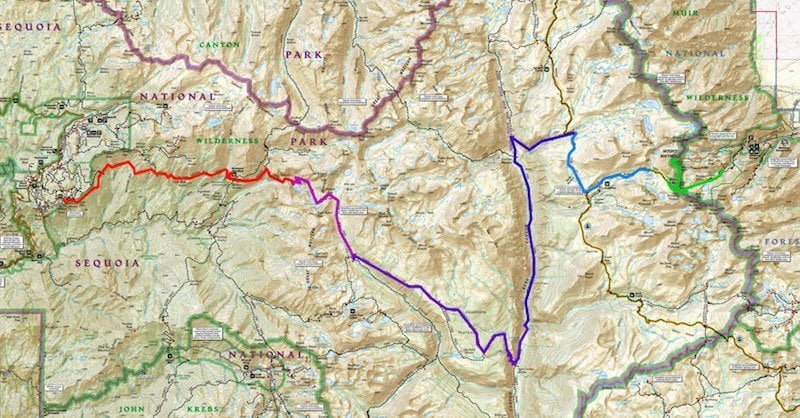
The High Sierra Trail is a moderate to strenuous 61.5-mile trail through Sequoia National Park. The trail starts at Crescent Meadow, near Visalia, California, crosses over the Great Western Divide, goes up Kern Canyon, then joins up with the John Muir Trail and Pacific Crest Trail at Wallace Creek. The trail then continues east to Guitar Lake and officially ends at the summit of 14,494′ Mount Whitney. Continuing to Whitney Portal makes the hike 72.2 miles total.
Recommended Reading: High Sierra Trail Suggested Itinerary
The High Sierra Trail is best completed between early July, when most of the snow should be melted, and late September, when cold temperatures and storms begin to move in.
The first 11 miles of the trail are fairly wooded as it leaves Crescent Meadow and contours the high side of the valley above the Middle Fork of the Kaweah River. There are numerous stream crossings and colorful wildflowers in June and July. Occasional breaks in the tree cover provide spectacular views of Castle Rocks, Sugarbowl Dome, and Little Blue Dome. Bearpaw Meadow is a popular glamping spot for hikers.

The “glamping” spot at Bearpaw Meadow
The next 8 miles follow an exposed trail blasted into the side of the granite above Hamilton Creek. The trail crosses the top of Lower Hamilton Falls and then climbs some steep switchbacks in front of a massive rock formation known as Valhalla. It finally arrives at Hamilton Lake, a must-stop lake filled with trout and backdropped by waterfalls. The trail then climbs over 2,000′ directly above Hamilton Lake, passes unique Precipice Lake, then over 10,700′ Kaweah Gap and the Great Western Divide.

High Sierra Trail blasted through rock above Hamilton Lake
After the Great Western Divide, the next 16 miles of the High Sierra Trail descends into Big Arroyo Junction (another popular campsite), followed by a shallow climb up to the Chagoopa Plateau. Once arriving at the top of the plateau, the trail then sharply descends into Kern Canyon. Most of this part of the trail contains high alpine forest, numerous wildflowers, and wonderful views of the surrounding mountains.

Nine Lakes Basin from Kaweah Gap and the Great Western Divide
The next 10 miles of the trail is unlike anything else you’ve done so far, as it follows the mighty Kern River through dense forest and climbing around one thousand feet. Kern Canyon is deep with a beautiful mix of colors between the river, foliage, and canyon walls.

Kern Canyon and the Kern River
The final 15 miles of the High Sierra Trail starts with a climb of almost 2,500′ up Wallace Creek, where you’ll get impressive views down to the canyon you were just in. The High Sierra Trail joins the Pacific Crest Trail and John Muir Trail here. The trail meanders through high pine forest to Crabtree Meadows, and then reaches the tree line at scenic Timberline Lake. From here you’ll finally get some views of Mount Whitney as you continue to climb to “base camp”, 11,500′ Guitar Lake. From Guitar Lake, it’s a steep five-mile, 3,000′ climb to the summit of Mount Whitney, the tallest mountain in the contiguous United States.

Sunrise from the top of Mt. Whitney
High Sierra Trail Permits
The High Sierra Trail is subject to a daily quota between late May and late September. There are 40 permits issued for the High Sierra Trail each day between these dates, which you can find at this link.
High Sierra Trail permit applications are accepted starting at midnight on March 1st. Download the form here and submit it by mail or electronically as a scanned PDF. Full instructions are available at this link.
Cost: High Sierra Trail permits cost $10, plus $5 for each person.
Trailheads: Plan to start your hike at Crescent Meadow. Put Alta as a secondary entry if Crescent Meadow isn’t available.
Permit Pickups & Walk-ins: Permits must be claimed in person at the Lodgepole visitor’s center by 0900 the day of your reservation. You cannot print them out at home, you must visit in person. After 0900, your reservation may be released for walk-ins. A quarter of the quota is reserved for walk-ins and you should get there as soon as the visitor center opens at 0700.
You can check permit availability at this link.
High Sierra Trail Transportation & Logistics
Transportation for a thru-hike can always be challenging. Thankfully my sister over at Forever Adventuring took care of most of this for us. Now she’s got a wedding to plan after her boyfriend proposed to her on top of Mt. Whitney.
Getting to Visalia
We rented a car for a one-way trip from home in Lake Tahoe and down to Visalia, California. The rental car places in Visalia close early and don’t allow for after-hours dropoffs, so we made it to the Budget dropoff with an hour to spare. From there we walked into downtown for a few final beers, nachos, and other guilty food. An Uber took us to our hotel when we were ready to pass out.
Where to Stay
We stayed at the Wyndham on the west side of Visalia. The advantage of staying here is that the High Sierra Trail shuttle stops at the Wyndham first.
You can also camp at the Lodgepole or Buckeye campground in Sequoia National Park and take the free park shuttle to Crescent Meadow after you’ve picked up your permits and ready to start the hike.
High Sierra Trailhead Shuttle
If you’re staying in Visalia, the Sequoia Shuttle has numerous stops that will take you into the park in the morning. Shuttles start at 0600 and run hourly until 1000. If you plan to pick up your permit that morning, you’ll need to take the earliest shuttle. Cost is $15 per person and you can make reservations online here.
Transportation from Whitney Portal
There isn’t any public transportation from Whitney Portal to Lone Pine. You’ll have to hitch or use prearranged transportation like the East Side Sierra Shuttle. If you’re comfortable hitchhiking, this is much more economical – and sometimes even more reliable – than prearranged transportation. Paul at ESSS was over twenty minutes late picking us up, and it wasn’t even him. While we were waiting, the folks at the Whitney Portal store laughed and said, oh, you’re waiting for Paul, you’ll be waiting longer. “Mountain time”, bro.
From Lone Pine, take the Eastern Sierra Transit Authority shuttle up or down US395. This bus goes as far south as Lancaster, and as far north as Reno. If you need an airport, Reno is your best bet. That fare is $59 per person and reservations are essential.
High Sierra Trail Maps and Navigation
The High Sierra Trail is marked very well. There are only a few spots where it goes over granite, but even then there are cairns and you can see where it’s worn. However, paper maps are still one of the few mandatory things you need to bring for the hike.
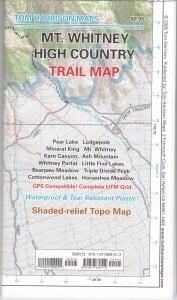
The Tom Harrison Mt. Whitney High Country Trail Map is probably the best High Sierra Trail map you’ll find. It’s small, waterproof, tearproof, and contains enough detail.
I also used the electronic National Geographic Trail Maps with the Gaia GPS smartphone app. This is another good map, though I found the Tom Harrison paper map to have more useful information. I used this app and map to record my track throughout the day, track mileage, elevation gain, pace, etc. You can also just print out this map from the Gaia GPS website if you’re a subscriber. The Nomad 7 kept my phone charged throughout the trip.
Food for the High Sierra Trail
Your choice – freeze-dried food, peanut butter and crackers, beef jerky, instant mashed potatoes, dehydrated food, whatever you’re comfortable with for the six to eight days you’re on the trail. My two biggest pieces of advice: get the highest calorie count per ounce of food, and make sure you’ll still find it tasty after a week.
Bears, bear bins, and bear boxes
Yes, there are bears along the High Sierra Trail. We had one mama bear with two cubs stroll through our camp the first morning.
The problem with bearproof food containers, even the biggest BearVault 500 (which is what most backpackers use), is that it only stores at most seven days of food. If you’re lucky.
Thankfully, most campgrounds along the High Sierra Trail have bear boxes. If you can’t fit the first few days of food in your bear bin, you’ll be able to store it in metal containers provided at Nine Mile Creek, Mehrten Campground, Bearpaw Meadow, Hamilton Lake, Big Arroyo Junction, Kern Hot Spring, Junction Meadow, and Wallace Creek.
The rangers still require you to carry a bear bin, so be sure to purchase one before your trip if you don’t have one. You can also rent them at Lodgepole visitor’s center. They’re not just for the bears – the marmots are crafty little savages also.
Backpacking Gear for the High Sierra Trail
I really didn’t change anything since my 2015 John Muir Trail trip. I’ve been backpacking with pretty much the same setup since then, meaning fairly spartan and lightweight. Check out the previous link for details.
If you’re cooking with a Jetboil along the High Sierra Trail, one small fuel canister will be more than plenty.
You’re never too far from water, especially through mid-summer. You shouldn’t need more than two liters of water storage.
Just be sure to bring foul weather gear, as the weather in the high Sierras can be unpredictable and change rapidly.

Surprise hailstorm (accompanied by thunder and lightning) at Guitar Lake
Photography on the High Sierra Trail
Favorite interaction on the High Sierra Trail:
Older backpacker to younger backpacker with a massive backpack and heavy tripod: “That’s a big, heavy pack you’ve got there!”
Younger backpacker, clearly beat and out of breath: “Yeah, well it’s all professional photography gear.”
He may have been a professional, but so am I, and I only carried one APS-C mirrorless camera, one lens, one polarizing filter, two batteries, a solar charger, and a small Gorillapod tripod. My total kit weighed just over four pounds, which is probably half of what just his tripod alone weighed. I shot some photos I’m fairly proud of, and I can guarantee you I was enjoying my hike much more.
Essential photography gear to bring:
- Spare batteries and/or solar charger
- Small tripod
- Polarizing filter for the sky and foliage
- Lens capable of wide-angle shots for the landscapes, or ability to make panoramas with a mid-zoom.