Tips for Photographing in Rainforest and Jungle
Disclosure: This post may contain affiliate links. I earn a small commission of product sales to keep this website going.
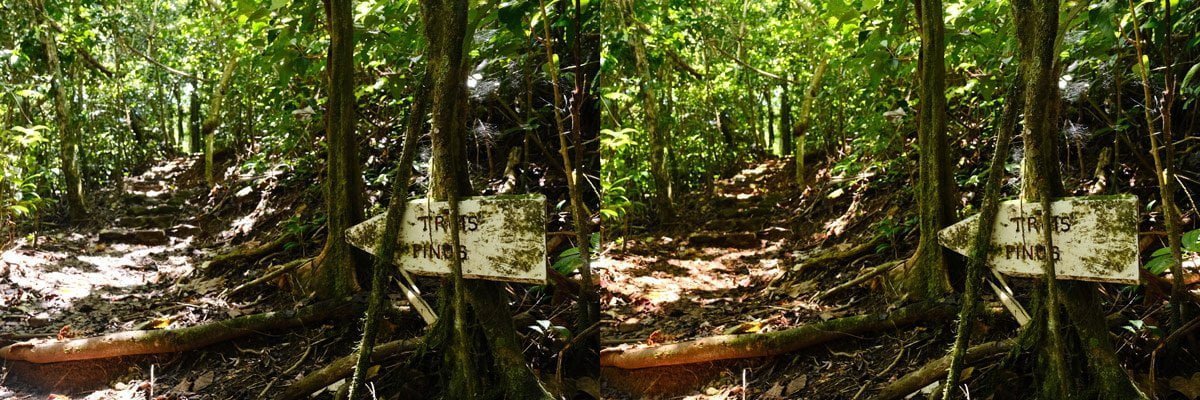
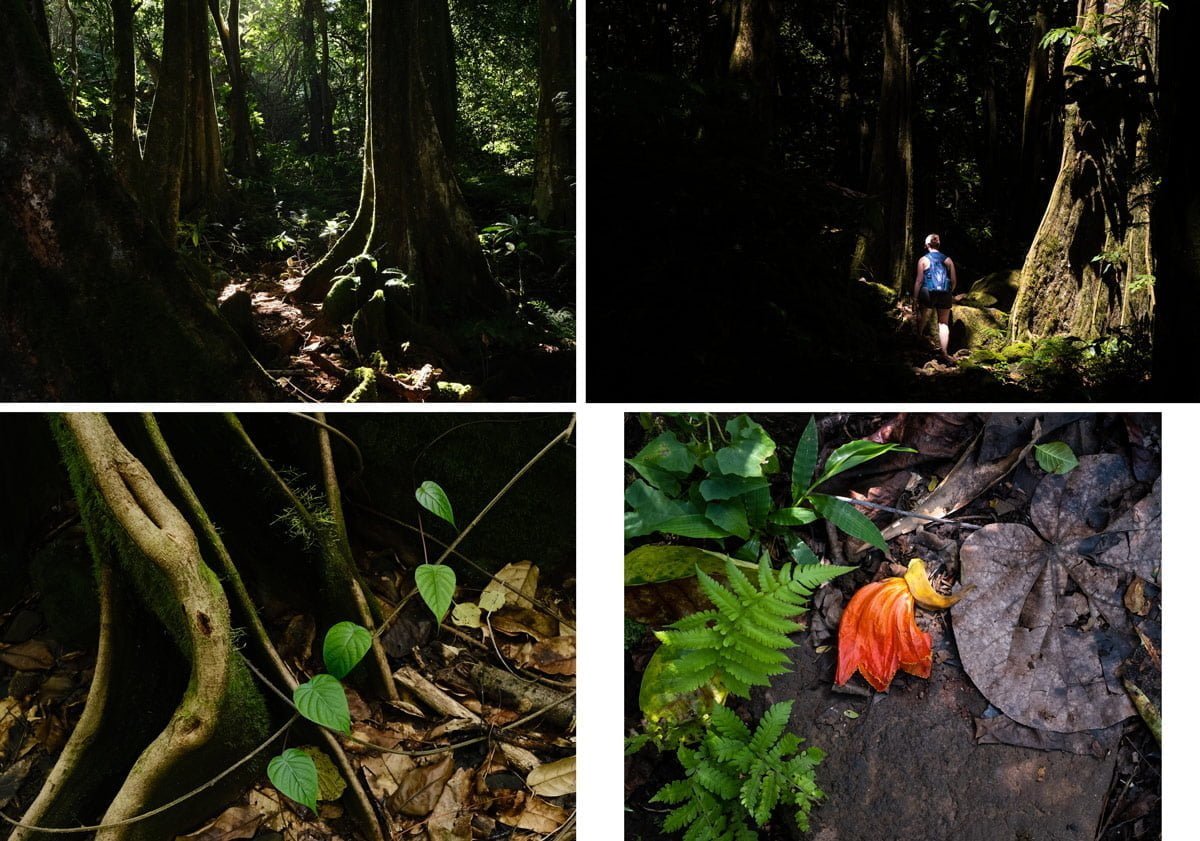
I was recently on a hiking trail through some beautiful forest on Moorea, French Polynesia. Its beauty was a challenge to capture with the camera. And if you've ever been on a photo outing like this, I'm sure you've run into the same. Here are some tips for photographing in rainforest and jungle.
Gear for photographing in rainforest and jungle
Camera & lens(es)
A weather-resistant (WR) camera is nice to have when photographing in a rainforest or jungle environment. This not only protects your gear from rain that might fall, but also from the general humidity levels encountered in these places.
Just remember that a WR camera isn't necessarily weather-resistant unless a WR lens is also attached to the body. You need the whole package (both a WR lens and WR camera).
And if it's in your budget, it's also a good idea to have a camera and/or lens with image stabilization. These environments typically don't let in a lot of light. If you want to work with apertures that give you deeper depths of field while keeping your ISO relatively low, you'll need to work with longer shutter speeds. Carrying/using a tripod on hikes through the jungle just sucks, so handheld stabilization is best.
Image stabilization is even more important when you're using a polarizing filter since these filters further reduce the light that reaches your camera sensor.
Polarizing filter
A circular polarizing filter is one of my favorite pieces of photography gear for photographing in rainforest and jungle environments.
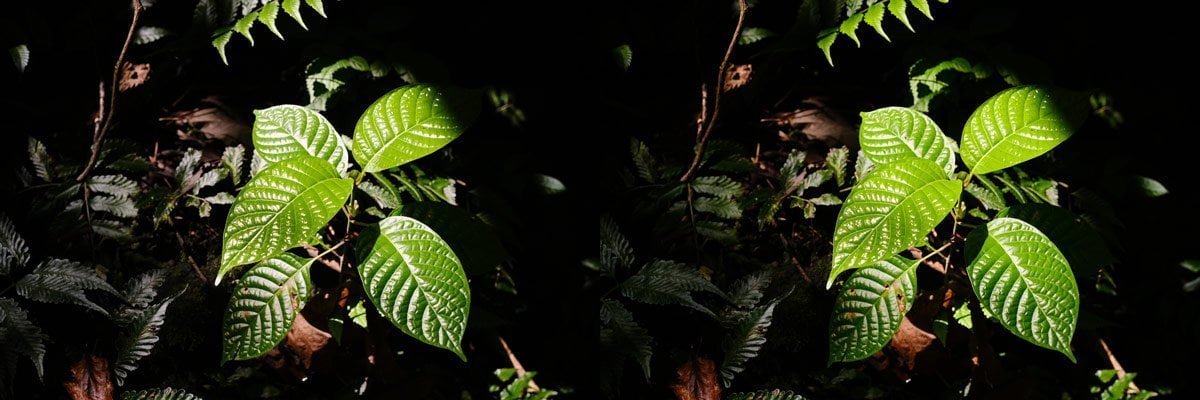
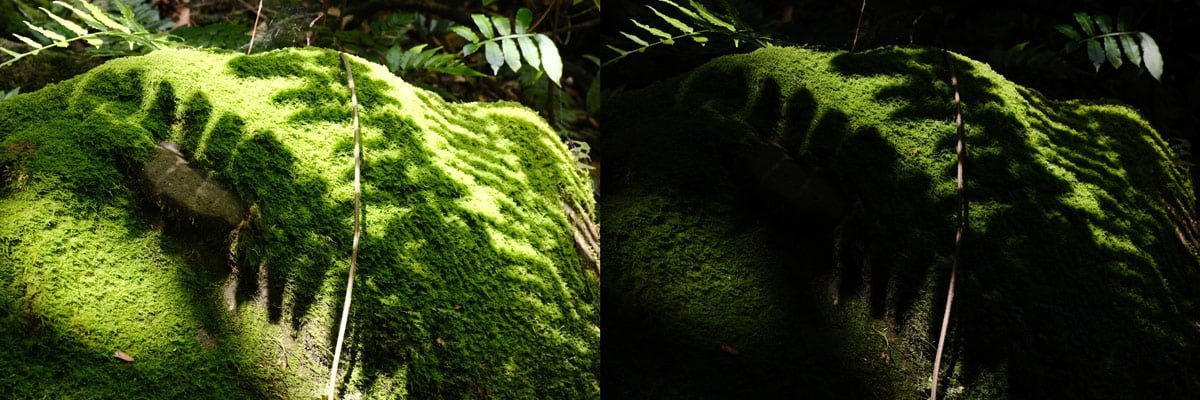
We'll look at how and when to use them in just a minute, but the benefit of having one of these on your lens or at least in your bag is color. A polarizing filter reduces glare on shiny objects (like wet green leaves), allowing that rich green color to show through. You'll end up with more even exposures in these high-contrast environments and get deeper colors.
Make sure they're circular polarizers (CP) to avoid some of the problems found with linear filters. And if you have a wide-angle lens (wider than about 24mm), get a slim filter specifically made for wide-angle lenses. This will reduce the vignetting, or light fall-off, that might happen around the edges of the frame.
White card
Jungle and rainforest environments can really throw off your camera's auto white balance. I prefer using a custom white balance in these situations so that I get more accurate colors. A simple color-neutral piece of heavy cardstock, or even better, plastic, is a great assist. For the most accuracy, use a white balance card specifically made for photography.
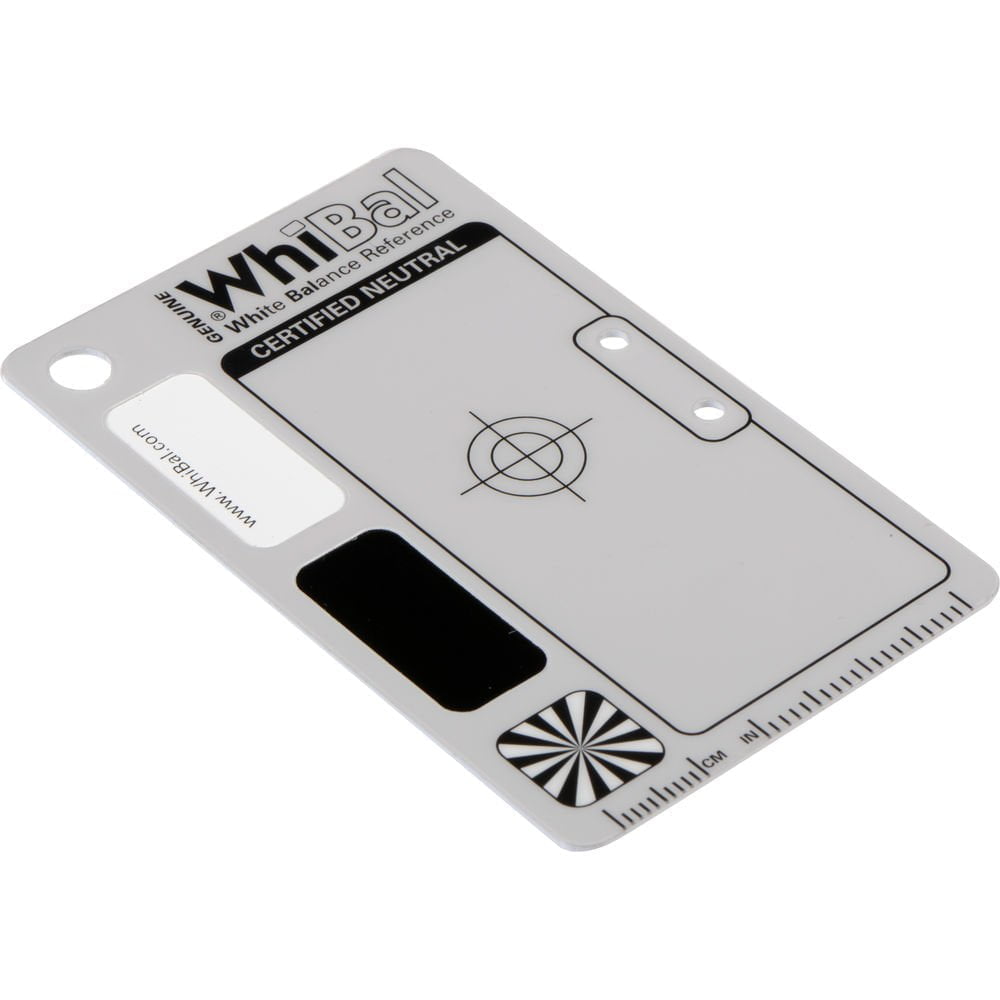
I shoot in RAW, I don't need this, I can fix it later. Not accurately you can't. You'll still want to take a reference photo of your color balance card while in this lighting so that you can use your software's eyedropper tool for color balance.
We'll look at how to do this next.
Technical considerations for photographing in rainforest and jungle
Accurate color
Let's talk color first.
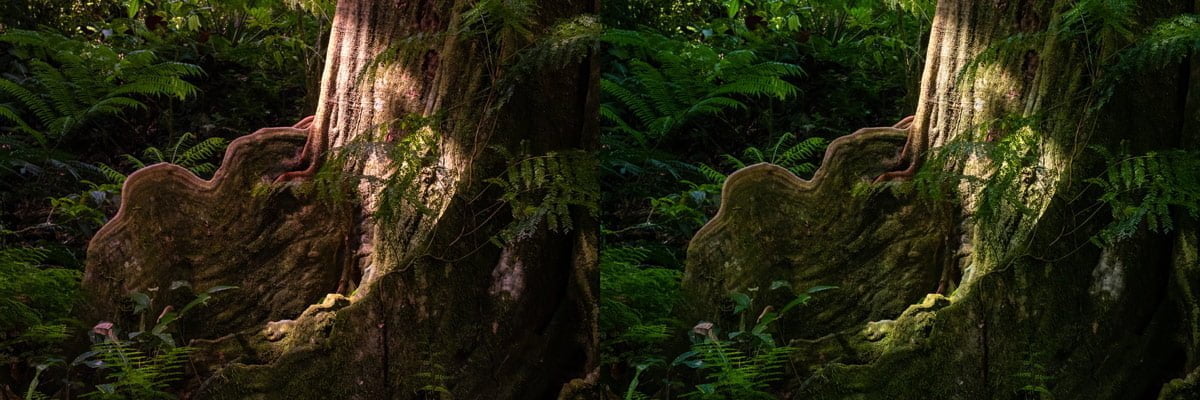
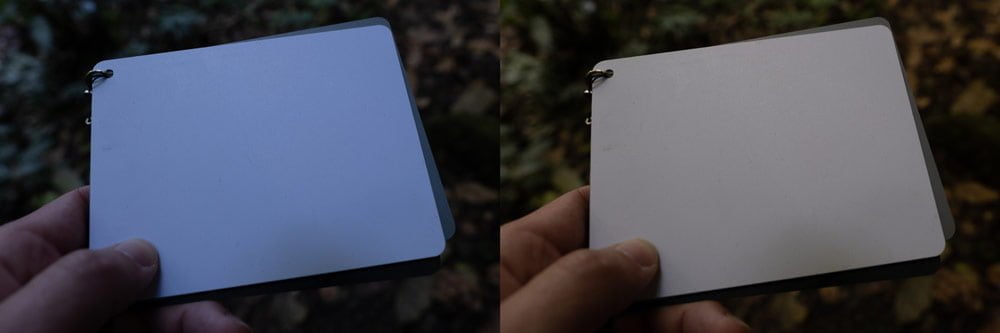
Rainforest environments have a lot of green. Sunlight filters through this green and reflects off of all the green moss and leaves. When you're photographing in rainforest and jungle in auto white balance, the camera thinks all of this green is a mistake. Thus it adds a ton of magenta to neutralize the green, giving you a photo with a purple tint. Polarizing filters can further throw off the auto white balance.
You may not even have realized this before. Go back to your older photos where you used auto white balance in a jungle. I bet you see the purple now!
But this green is supposed to be there. Bring it back using the white balance card.
If you're recording JPEG/RAW, set your camera's white balance to Custom. Follow your camera's directions for creating a custom white balance. You may need to do this a few times during your hike if the lighting is changing.
If you're recording RAW only and want to fix the color in post, simply take a photo of the white balance card every so often. You'll want a few different references for the color balance as you walk through the different lighting found in the jungle. Then in post-processing, use your software's color balance eyedropper tool to click on the white balance card in the photo. Apply this white balance correction to the subsequent photos.
If you're using a Fujifilm camera with the Auto White Balance Lock feature, you can stay in Auto White Balance, fill the frame with the white balance card, then lock that auto white balance after it has corrected.
Using a polarizer
As mentioned in the gear section, a polarizing filter will give you richer colors and help reduce the harsh contrast often found in rainforest. This is all through reducing the glare coming off of the foliage.
There are some important considerations, however.
For one, a polarizer will throw off your white balance. Another argument for using a white balance card.
Second, a polarizer will reduce the amount of light coming through your lens. Depending on the polarizing filter you get, they can reduce the light by one to two stops. Meaning that, on the high end, you might need to slow your shutter speed by a factor of four. Or increase your ISO by a factor of four. Or a combination of both.
So when photographing in rainforest and jungle using a polarizing filter, you'll need to pick which variables are most important to you. If it's a deep depth of field, you'll need to raise your ISO and/or slow your shutter speed. If it's a fast shutter speed to freeze moving leaves, you'll need to raise your ISO and/or open your aperture, which will reduce your depth of field.
To actually get the polarization effect, just rotate the filter until you get the deepest green colors in areas where there's glare. If there's water, rotate it until the reflection on the water disappears the most.
Creative considerations when photographing in rainforest and jungle
I've seen a lot of jungle photographs that look like the photographer just stood in the middle of the trail and clicked a photograph using a wide-ish focal length.
Change it up!
There are so many opportunities in these environments to think about the following elements of photography:
- Shadow
- Lines & shapes
- Color contrast
- Patterns
- Symmetry
- Close-up details
- Changing perspective (from the ground or looking up)
So look for all of these things when photographing in rainforest and jungle. Don't just stand in the middle of the trail, pull your camera up to your eye, and capture the photo. Your viewers will get bored after about the third photo if they all look like that.
If you need ways to remind yourself to look for different photos, I use two things that help.
One, I tell myself don't be so literal. Think in the abstract, especially when there's a lot of contrast. What are the lines & shapes I'm seeing?
Second, I remind myself to get my storytelling photos. What are the storytelling photos?
- Establishing photo
- Detail photos (close-ups)
- Portraits (of trees, rivers, etc - it doesn't have to be of people)
- Gestures/moments
Exercising creativity is of course a lifelong process for us, so don't expect to be able to go out and get all keepers on your next outing.
Check out the Basics of Light, Composition, and Color course (20% off with "blog20") for some help in these creative endeavors that will help your rainforest & jungle photography.
Practice. Be different. Don't be so literal. Tell the story.
What other tips would you add?


Hi John, another great article, thankyou. My tip, look for backlit leaves / flowers…I can’t stop myself photographing them! I use a combo of the 70-300 + 1.4x TC + 11 mm Extension so can zoom in really close. Autofocus still works if it’s all Fuji. I have an XT3, it’s GREAT!!!
All the best
Peter
Thanks Peter, great tip on the backlit subjects! You can really get some interesting rim lighting on the solid shapes in the jungles, and great diffused light coloring translucent objects like leaves and flowers.