Disclosure: This post may contain affiliate links. I earn a small commission of product sales to keep this website going.
It’s been a frustrating couple of months for me. I get my energy from doing photo projects for nonprofits around the world, much like Superman gets his energy from the sun.
Being homebound and unable to travel, canceling trips I was looking forward to, right on the heels of my mother’s sudden passing from cancer, has been like being stabbed with kryptonite.
I’ve also been hesitant to get out to photograph my own community, as I would normally recommend. But a year living in close proximity to Afghanistan’s infamous “burn pits” has left me with a chronic, unexplainable cough, and a respiratory virus is the last thing I need.
But we’ve gotta find constructive things to do with our time, to sharpen our blades for when we can get back out there.
So if you’re looking for something to do while on house arrest, here are a few things to try out. Even if you’re like me and don’t like to spend too much time processing photos at all, these small things can make a huge difference in your workflow and your final photos.
Organization
Okay, first things first, and everyone’s least favorite thing to talk about.
You’ve gotta be organized. If you’re going to be efficient, you need “a system.” It doesn’t matter what that system is, but you need to have one in place.
Finishing the steps below left me with a tidy, organized catalog that I can work with without feeling like a hoarder.
File names & Folders
I was so bad about this in the 2000s and finally started a system last decade. For nearly 15 years I’ve had folders sitting on my drives labeled “2006-10-04” and files within those folders named _IGP2001.PEF, _IGP2004.PEF, and so on.
How easy is it to look at that folder and know what’s in it?
Name your folders and your files. I don’t care how. If you’re a travel photographer, name your folders by location with subfolders by year. Name your files by location, date taken, and numerical sequence. If you’re an event photographer, do the same but by event instead of location. And so on. Just do something so that you can look at files within a folder and say, “yes, that’s what I’m looking for.”
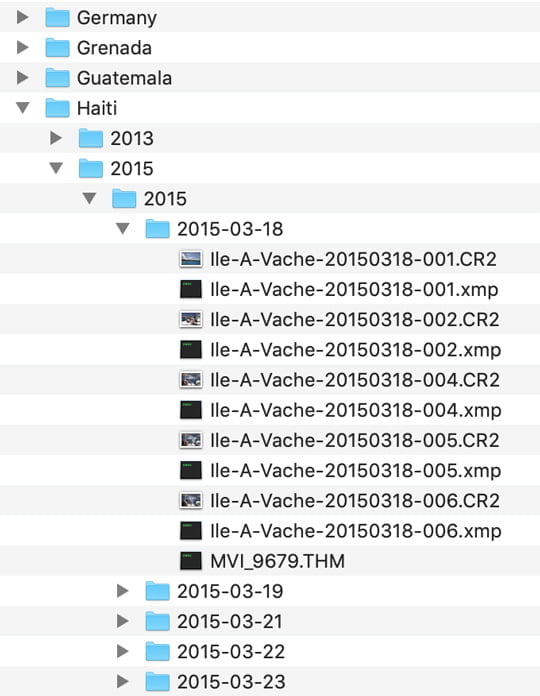
Go back through your catalog and make sure all of your folders and files have some kind of naming structure.
Doing this in bulk is easy but it must be done through your primary cataloging program. DO NOT rename folders or files from your computer’s finder/explorer function if you’re using something like Lightroom or Capture One. That will “break the links” that those programs use to find your files.
You can create & rename folders and move files around from within your cataloging program. This ensures the link structure remains intact.
To rename photos in bulk, select all the photos within each folder and go to your program’s “Rename photos/files” function. I like the “Custom Text-Date-Seq” naming convention but pick one that makes sense to you.
Trim the fat
I’ve trimmed a bunch of fat from my Lightroom catalog over the past few months. I’ve made it something like 20% smaller, which not only helps with Lightroom’s already abysmal performance but also helps my own organization and efficiency.
I had countless duplicates, unneeded “virtual copies,” and missing photos that were intentionally deleted from my drives long ago but not from my catalog.
I even had a phase years ago where I made TIFFs out of my favorite processed RAW files. Why? I don’t know, I probably read it in a forum or something before I knew better. But they were between 100-200MB each. Getting rid of those freed up nearly 500GB on my drives. I know storage is cheap but damn. That’s a lot of storage. Like room for over 10,000 future RAW files.
And I haven’t even started yet on RAW files that I’ve kept but should delete, like those with technical flaws or those that were part of unnecessary bracket sequences when I went through a bracketing phase 15 years ago.
Color is important
I never really placed an emphasis on color when I first started processing RAW files, at least not to the extent that I do now.
But color is extremely important. It really does make all the difference in a photo. It’s often the first thing that viewers will notice – and it’s going to give them a reaction that’s either “wow!” or “what?”.
Going back through your old photos will bring new life to them, and set you up for success for future photos.
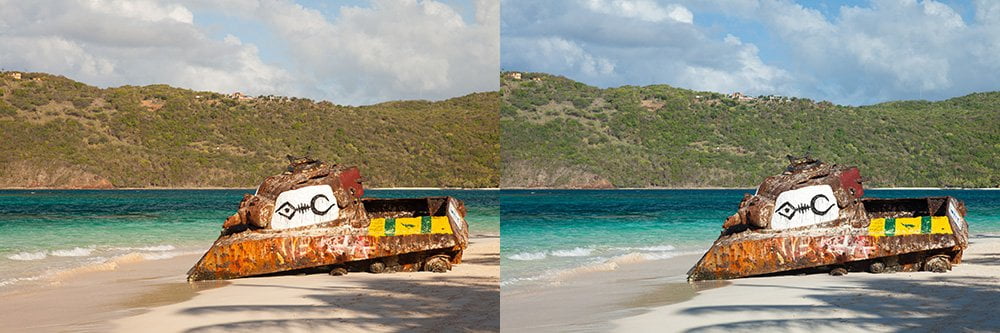
White balance
If you leave the white balance in AUTO, you can probably do it better. AUTO doesn’t always get it right. In fact, AUTO hardly ever gets it right. And when it gets it wrong, it can really get it wrong.
Having a solid understanding of Kelvin color temperatures can really help you clean this up. It can also help you create a stronger color contrast in your photos.
Go back through some of the photos where you left white balance in AUTO and see if you can do it better. Take into account your light source, set an appropriate color temperature balance, and refine it from there. Practice this. You may be surprised at the results.
Color contrast
When we think about contrast, we often only think of tonal contrast. The alternation of light and dark, opposite tones. But what about the alternation of opposite colors? It can make your photo stand out just as much as tonal contrast.
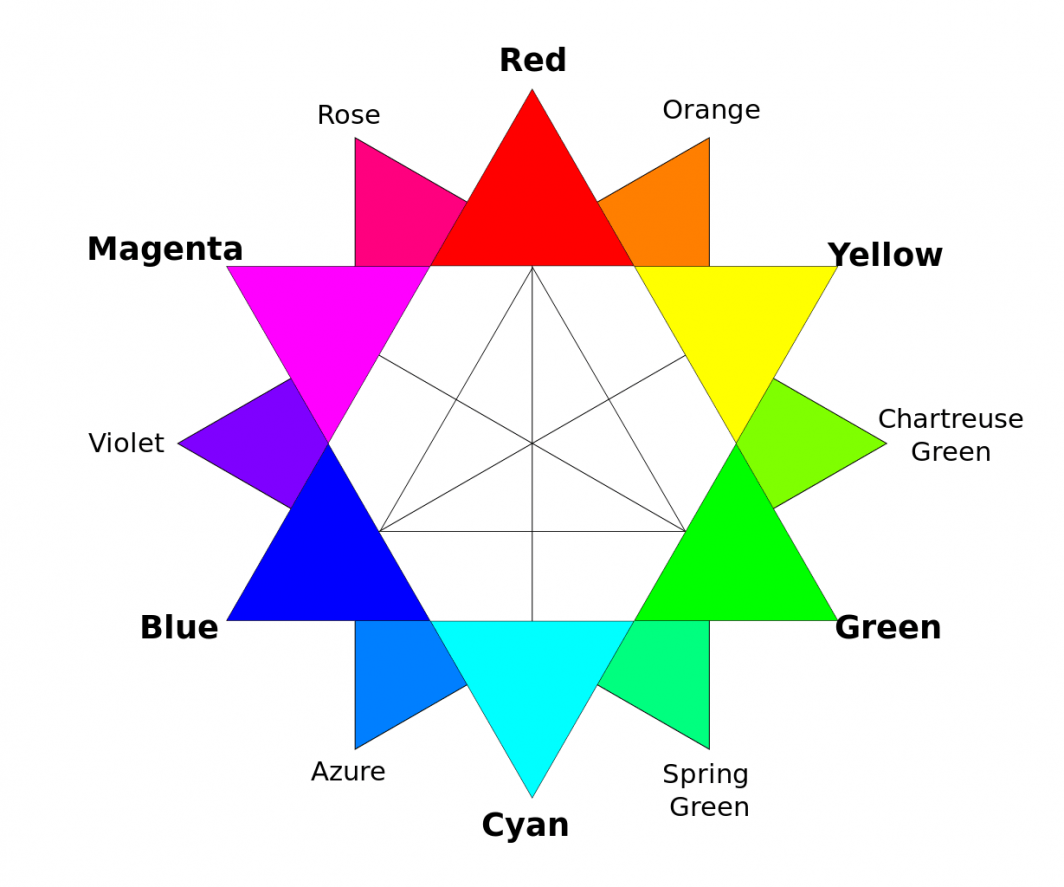
If your white balance is off and you have an unintentional yellow color cast throughout the photo, the blues will also have a yellow color cast.
With a proper white balance, the yellows and blues will be further separated, thus creating contrast.
And don’t just crank on that Vibrance or Saturation slider to bring out your colors. Adjust individual colors first. Go to that HSL panel in Lightroom and make subtle adjustments to the hue, saturation, and luminance of the important colors in your photo to make them stand out, and stand apart.
Direct your viewers
One really simple thing you can do to dramatically improve your photos is to practice directing your viewers’ eyes.
This is can be done quickly in post-processing and makes a huge difference. There are a few different ways to direct your viewers.
If this is something you don’t do, go back through some old photos and try it out. Does it make a difference?
Use Adjustment Masks
Directing your viewers is mostly going to be done with local adjustments versus global adjustments. Meaning you won’t make these adjustments to the whole photo. Just certain areas of the photo that you want your viewers to either notice or ignore.
There are three main tools to use for these adjustments. And it can all be done in Lightroom or Capture One in a matter of seconds, without needing to open Photoshop or draw complex masks.
- Linear Gradient: For making changes to one “side” of a photo, gradually blending in the changes to the other side.
- Radial Gradient: For making circular or oblong changes to a certain area of the photo that will gradually blend into the rest.
- Adjustment Brush: For any other case where a straight line or circle won’t work, use a brush to draw over the area you want to change.
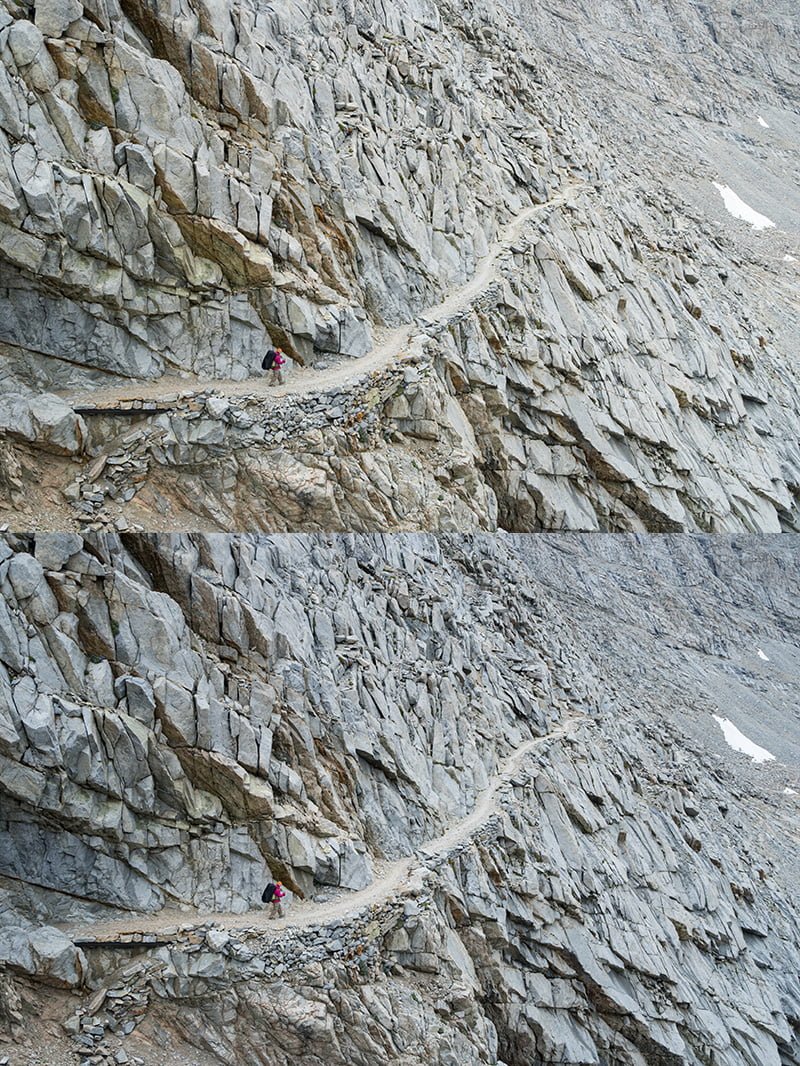
DIRECT With light
Our eyes are naturally pulled to bright areas and pushed from dark areas.
So this is easy – “brighten” your subject, where you want your viewers to look, and “darken” the other areas of the photo.
And be subtle about it. It doesn’t need to be drastic. Just a slight change in brightness is enough to subconsciously direct your viewer; it shouldn’t be obvious.
The most simple example of this is a vignette: A vignette leaves the center of the photo bright while darkening the edges. This frames the photo, and a frame is used to keep your viewer inside the photo.
But instead of going to the “Vignette” tool, use a Radial Gradient to apply a vignette around your subject. Draw that circle or oval over your subject, decrease the exposure by -0.2 or so, then invert the mask so everything outside of it is darkened slightly.
You can also use the Adjustment Brush or Linear Gradient to darken bright areas of the photo slightly, areas that are less important than the subject, to bring attention back to your subject rather than those bright areas.
With Color
Our eyes are naturally pulled to warm colors and pushed from cool colors.
This means that if your photo has a mix of cool colors and warm colors, your viewers will naturally – most of the time – go to the warm colors first.
Our eyes are also naturally pulled to more saturated colors and pushed from desaturated colors.
So again, with either the Linear Gradient, Radial Gradient, or Adjustment Brush, use these principles to bring attention to your subject and help the viewer ignore everything else. Slightly desaturate the less-important areas, and slightly “warm up” the more important areas, if it makes sense to do so.
These principles won’t work in every situation, but when they do, they can make a world of difference.
Little steps to big improvements
There are of course so many other constructive ways to use your time, but I hope these three things can help out your post-processing if you haven’t been doing them already.
Practice and build habits; hopefully, you’ll begin to see improvements immediately when it’s time to get out and travel again!