Disclosure: This post may contain affiliate links. I earn a small commission of product sales to keep this website going.
You’ll see some products out there proclaiming that you can stop carrying around white balance cards if you get a fancy new lens cap that does the same thing. But there is a difference between white balance lens caps and white balance cards. They’re not equal, and we’ll look at those differences and use cases here.
I’ve long advocated for getting a proper, accurate, or close white balance at capture, even if you’re recording the RAW file format. These tools are one way of doing that. And they’re for two different situations.
Two white balance tools
Can you just carry a white balance card? Or just have a white balance lens cap? Do you need both?
Let’s start with the differences between white balance lens caps and white balance cards, and how they measure color balance.
Incident vs Reflective metering
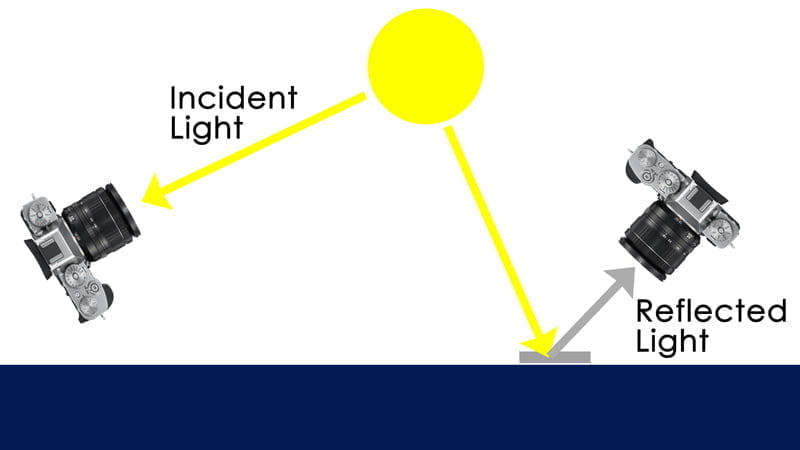
There are two ways to measure the colors making up the light that is illuminating your scene. If you know which colors make up that light, the camera can adjust for that to neutralize any color casts. That’s what we do when we create a custom white balance.
You can measure either the light that will reflect off of your subject or the light source illuminating your subject.
Measuring the light reflecting off of your subject is a…wait for it…reflective measurement.
An incident measurement is when you measure the light source illuminating your subject.
The main difference between white balance lens caps and white balance cards is that they each use a different measurement method.
White balance lens caps
A white balance lens cap or filter is for an incident meter. It is designed to measure the light source.
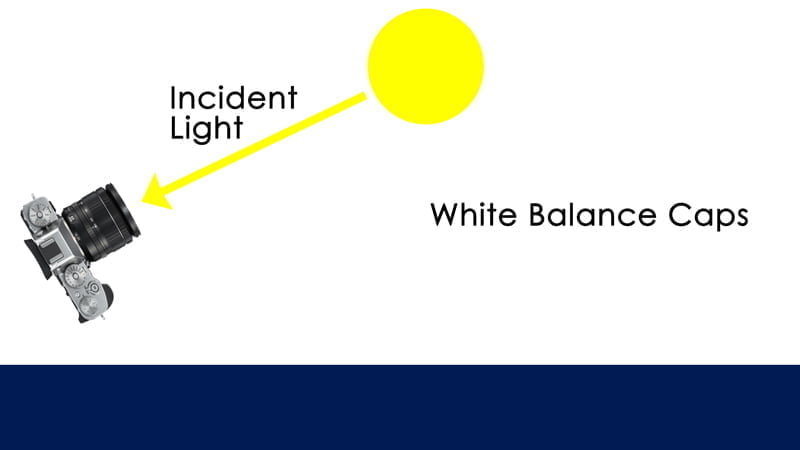
If you’re photographing a landscape illuminated by the daytime sun, you’re going to measure the sun.
Or if you’re indoors under incandescent lighting, you’re measuring the light bulb (or lampshade, wherever the light is illuminating from).
Maybe a strong light is reflecting off of a wall, and that reflected light is illuminating your subject. Now that wall is the light source. That’s what you’d measure.
- The ExpoDisc is one of the most popular white balance filters; they advertise a bunch of other photography functions it’s also useful for, like dust spot mapping. Get the biggest one you need for the lenses you have. It is not an actual cap, just a filter.
- The BRNO baLens is an actual lens cap you keep on your lens; it has a small filter that can be used for incident measurements. You can get different sizes depending on your lenses, or just get the biggest one and use it as a filter like the ExpoDisc. You’ll have to be careful of not popping the filter out accidentally.
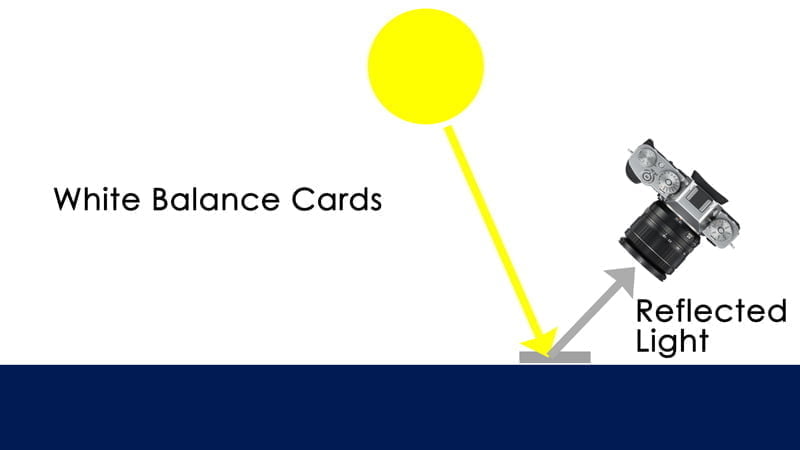
White balance cards
White balance cards are for reflective meters, meaning you’re measuring the same light that is reflecting off of your subject.
- The most accurate card you can get is the WhiBal; this link takes you to a 3.5″x6″ card for less than $40. There are smaller and larger sizes available; these cards have been specially tested to ensure they are precisely color-neutral.
- You can get cheaper cards but they may give you readings with color casts.
- Don’t have a card with you? A white piece of paper or index card can also work so long as it’s color-neutral.
Reflective metering can be a bit more difficult to understand.
Using a white balance lens cap or a white balance card
There’s a little flowchart I have in my head that I put on digital paper here.
Essentially, you’re going to ask yourself if you can see your light source and/or get into the same light as your subject. The answer to that question will mean the difference between using a white balance lens cap or a white balance card.
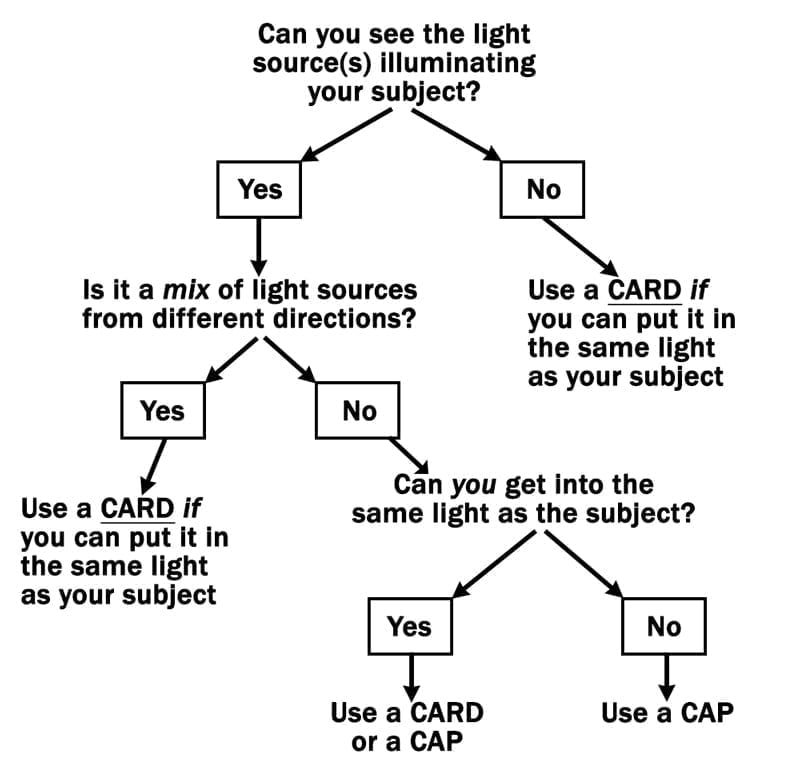
You can see your light source
If you can see your light source – the actual source of light illuminating your subject – you can usually use a white balance lens cap.
The exception to this is if you have multiple light sources of mixed lighting from different directions. Like if you have a tungsten bulb in one corner and fluorescent light in another corner, that’d require two simultaneous incident measurements in different directions. You can’t do that, so using a white balance lens cap won’t work.
Otherwise, if your subject is being lit by only a tungsten lightbulb, and you can point your camera at that light source, you can use a white balance lens cap.
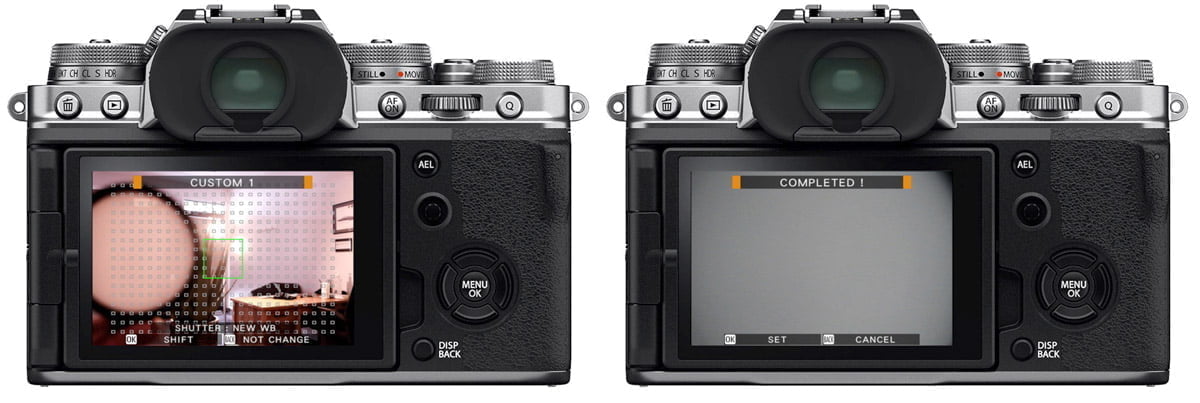
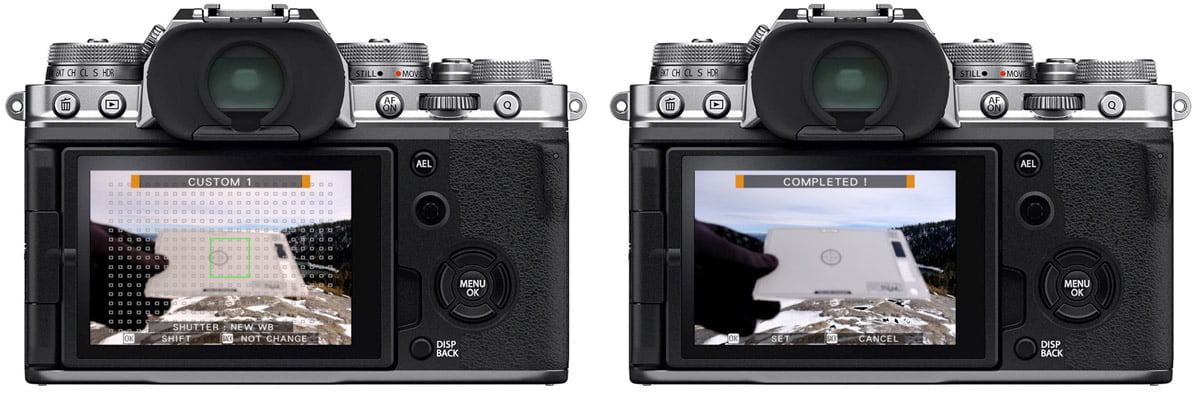
Just put the cap over your lens, make sure your exposure is adjusted appropriately (not too dark or not too light), and create a Custom White Balance in accordance with your camera manual. Some Fujifilm photographers can also use the Auto White Balance Lock feature.
This method is nice because you can get a white balance reading without having access to your subject. All you need is to see the light source illuminating it.
You can get next to your subject
If you can get next to your subject – whether or not you can see your light source – you can use a white balance card.
You should also use a white balance card if you have mixed light sources, but this requires you to be next to your subject, or at least in the same light as your subject. If you can’t get next to your subject, or in the same light, and there are multiple types of lighting illuminating your subject, try another manual method or Auto White Balance.
Here you’re going to make sure that your camera measures the same light reflecting off of your subject. So point your camera in more or less the direction you’re going to capture the photo (usually towards your subject). Put your white balance card next to your subject (or in the same light) and makes sure it’s facing you. Then create a Custom White Balance in your camera, filling up the frame with the card as much as possible.
Closing thoughts
I hope this article makes the distinction clear.
You’re certainly going to have to practice this to ensure that you can do it quickly and accurately.
The main thing to take away from this article is the difference in how the measurement is made – reflective vs incident. And the pros & cons of each one.
Sometimes you just won’t have the opportunity to do this. You don’t have the time, you’re working fast, you don’t have the gear with you, and so on. That’s fine! There are plenty of other ways to get a close white balance in the camera. Sometimes Auto works great! Sometimes it doesn’t and you’ll need other methods.
Regardless, I’m still a big fan paying attention to your White Balance at capture. Especially if you’re recording JPGs, and even if you’re recording RAW, or both the RAW & JPG.
Color is a big part of color photography – it’s right there in the name! Get it close at capture!
Mirko
Monday 12th of May 2025
I red the article that is very interesting but while reading a question came to my mind and keep reading did not solve the doubt. Probably I did not fully understand why it's better to use a card. My question is: if I have to use a card for example because I have different light sources (cold, warm, coloured...) will the result be the same if I use a cap measuring very close to the subject? In other words if I use the subject as a card and I measure using a cap will be the result different or not? Surely the subject is not colour neutral as the card, on the other side even the cap has a colour neutral white surface... thank you in advance! Mirko.
John Peltier
Monday 12th of May 2025
Measuring reflected light with a white balance cap won't be as accurate. If the light source is "cool," for example, but the subject is made up of warmer colors, it's going to reflect those warmer colors and trick the camera into thinking the light source is "warmer" than it really is. That's why a cap should be pointed at the light source itself, for a direct measurement. Is that what you were asking?
Ross
Friday 27th of January 2023
Great video, thank you. Which should I use to video a theatre production, please?
John Peltier
Saturday 28th of January 2023
Theater lighting can be tricky, but you'd be best getting on stage with the show lights and using a white balance card in those lights.