Disclosure: This post may contain affiliate links. I earn a small commission of product sales to keep this website going.
The travel photography genre covers a lot of different skills – landscapes, nature, street, environmental portraits, and more. So, what are the best Nikon Z settings for your next trip, to cover all of this?
That’s what we’ll explore here. I’ll show you how I have my Nikon Z cameras set up with my reasons for choosing those settings.
I think this last part is important to understand, and what many articles omit – the why.
A few things to keep in mind before you continue:
- These are my recommendations, starting points for you.
- This will be generic to the entire Nikon Z line; not all cameras have all of these settings.
- This also won’t cover every setting available, but the ones I think are important for travel photography, whether you have the Z5II, Zf, Z6III, and so on.
You can also learn about these settings and more by checking out the Nikon Z Photographer Membership – click here to get 20% off your first three months!

Photo Shooting Menu
Role played by card in Slot 2/Secondary slot function
If your camera has two card slots, I’d really recommend setting this to Backup.
This means that your memory cards will be duplicates of one another. Should anything happen to one of them – card failure, loss, etc – your precious travel photos exist on another card.
You should be carrying multiple memory cards when you travel, spares, so storage space a la the Overflow option shouldn’t be an issue.
Image area
You have many options for recording a square format, letterbox format, etc. Just set it to FX (full frame cameras) or DX (APS-C cameras) and crop later if you need to.
Setting 1:1 or 16:9 will also crop your RAW file, and that data is discarded forever. Just record it all now.
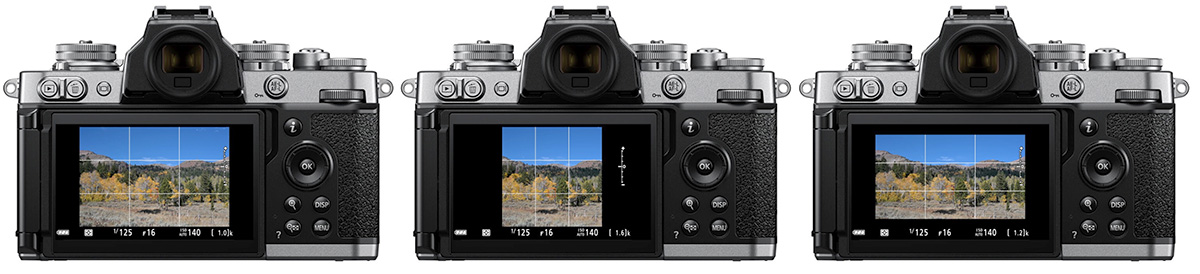
Image quality
There are certainly many merits to recording the RAW file, especially if you wish to post-process your photos. You should be recording RAW in this case.
But getting a good in-camera JPEG that’s ready to share is also valuable, so you have something until you can get it processed on a computer. This is why I set RAW+JPEG fine⭑.
If you have no desire to process RAW photos, and there’s nothing wrong with that, just set it to JPEG fine⭑.
Image size settings
This applies to your JPEG file, not RAW. Setting Medium is plenty big, you can still print a 12″x18″ photo with no issues. This will use less storage.
If all you’ll be doing is sharing these photos with family & friends, even Small is more than enough for this purpose.
Full-frame camera users, I’d also recommend enabling DX image sizes with a Large size to account for the crop when using a DX lens.
RAW recording
If you’re recording the RAW file format, there’s a reason for it (you want all the RAW data), so I recommend Lossless compression. The High efficiency options will discard some data.
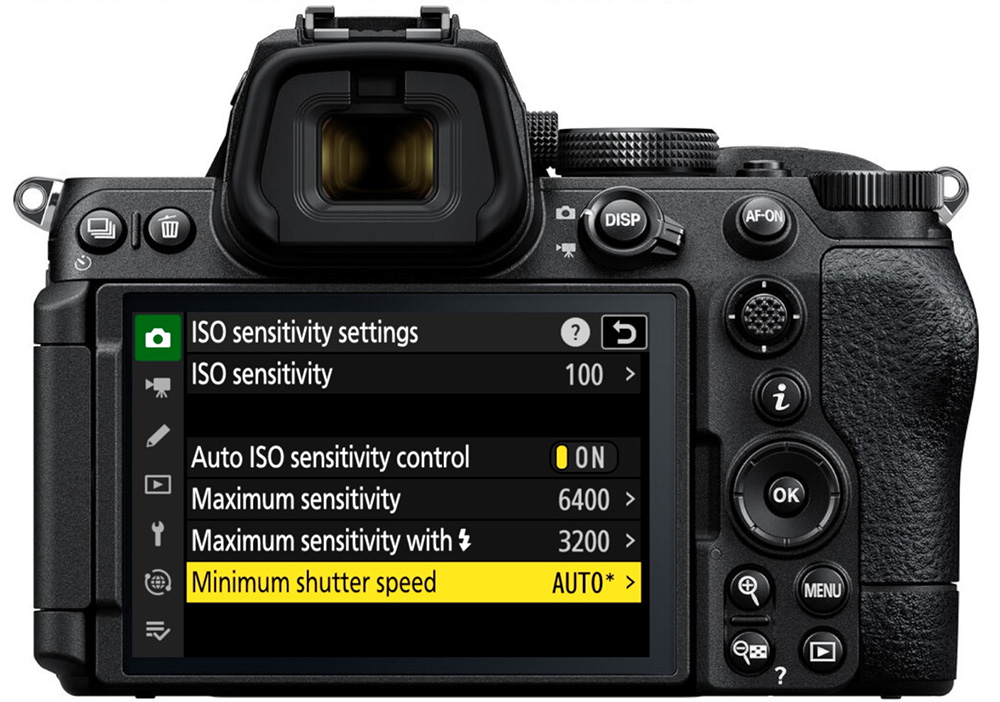
ISO sensitivity settings
I’d really encourage you to take advantage of Auto ISO. It’s a godsend for travel photography: one less thing to think about, while also ensuring a fast enough shutter speed for sharp photos.
- Enable Auto ISO and set ISO sensitivity setting to 100.
- I like to set 6400 for the Maximum sensitivity. You might want to set it higher if you’ll be in dark scenes a lot (don’t be afraid of high ISOs).
- The Minimum shutter speed is a tricky one: shooting across all travel photography subjects, 1/200 is a good compromise. It’ll be fast enough to freeze most scenes, but not excessively fast that you have unnecessarily high ISOs. If you’re only doing still life, try Auto+1.
White balance
Auto 1 works great in most situations, so you don’t have to keep changing it.
Color space
Leave this in sRGB. You may have heard that Adobe RGB is a “bigger” color space for greater colors, but this really only applies if you’re directly printing your in-camera JPEGs. sRGB ensures compatibility/consistent colors across all digital display devices.
Metering
Matrix can’t be beat in dynamic situations. It’ll give you consistent exposures across a variety of scenes and without much thought on your part.
Release mode
I prefer L (low-speed burst) for this reason.
During travel, I could be photographing landscapes or people on the street. “L” is slow enough where I can do single photos during those landscapes without accidentally snapping off a burst, but as soon as I turn to the street, it’s fast enough to give me choices in the final photo I choose.
Focus mode
This may take some thought on your part. If your camera has AF-A, like the consumer cameras do, just set it there and leave it. It’ll respond to the scene as appropriate.
AF-S is best for still life, but AF-C is a must when photographing things moving towards you or away from you. If you’re anticipating all of this and only want one setting to hang your hat on, leave it in AF-C. Otherwise, it’s really easy to change between AF-S and AF-C using the i Menu or a custom control.
These, and the AF-area modes, are all covered in-depth in the Nikon Z Photography Fundamentals course.
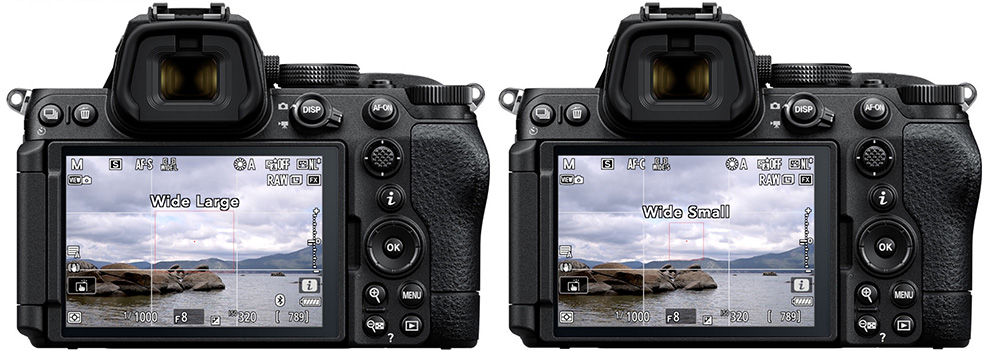
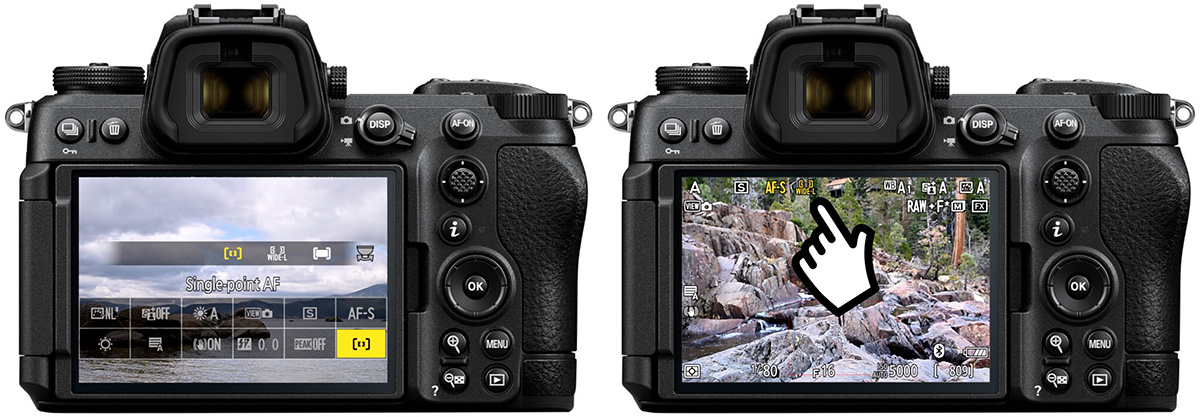
AF-area mode
This, too, may require some thought and changing around in response to what you’re shooting.
However, if you had to choose just one, I’d recommend Wide-S. This is small enough to be fairly selective, but large enough so you don’t need to struggle placing a small point. It’s also the smallest area in which Subject detection is available.
AF/MF subject detection options
Auto works great if you’re photographing a variety of subjects. Otherwise, set it to People when selectively photographing people, and Off when not photographing these subject types.
Sometimes it can detect faces/subject types that aren’t there, and this will throw off your focus.
Vibration reduction
Normal is the best vibration reduction setting to use for general travel photography. Sport should only be used when panning.
If you’re doing long exposures on a tripod, I’d recommend setting this Off. The system can actually introduce movement during long exposures, leading to a blurry photo.
Video Recording Menu
This isn’t a full tutorial on Nikon Z video settings, but it’ll get you ready to go when you need to record a movie when it will suit the situation better than still photos.
Frame size/frame rate
1920×1080 is plenty for the size. 4K is nice, but it’s not offered in all modes, it requires a lot more storage, and it’s honestly a waste unless it’s being viewed close-up on a huge screen.
As for the frame rate, 24p is considered “cinematic,” but requires slower shutter speeds for that effect, often additionally requiring ND filters. Just set 60p and you’ll be fine for your travel videos.
Video quality
Normal will record enough data for you to be able to enjoy your videos, and won’t take up too much storage space. Fine will double the bitrate, which you may want to do for commercial filming.
Video file type
There are a lot of options here, and “the best” isn’t always “the best,” unless you’re again doing commercial filming. Set H.264 8-bit MP4, which is easier to manage in post-processing.
Focus mode
I find AF-F to be a great Focus mode for travel videos with Nikon Z cameras. It’s very similar to AF-C, but it will keep your AF-area in focus even when you’re not actively recording.
If you’re only recording static scenes with a static camera, however, AF-S will prevent accidental unwanted focus adjustments.
Electronic VR
Vibration Reduction sounds great, right? Especially when recording video?
Nikon Z cameras don’t have the best electronic vibration reduction. It produces “the wobbles,” or a jello-like appearance, when the camera is attempting to stabilize the image electronically. It makes me nauseous watching it.
I’d recommend keeping this Off and using the mechanical VR of the lens or camera.
Microphone sensitivity
Keep this in Auto unless you have the time (and the stable environment) to manually set your microphone gain.
Attenuator
Turn this On if you anticipate being in environments with sudden, loud sounds. This setting will reduce the gain during those loud sounds. It can, however, introduce some distortion when not needed, so keep it Off at other times.
Frequency response
Only set Voice if you only care about recording human dialogue. For all other times, I recommend Wide to get the full spectrum of environmental sounds.
Wind noise reduction
Another setting that should only be used when needed, and not always left On. Turn it On if you have wind hitting the microphone; otherwise, keep it Off.
Custom Settings Menu
a Focus points used
When things are moving fast, I prefer Alternating (or 1/2) to allow for faster focus point selection.
It doesn’t give you the accuracy of being able to use every single focus point on the screen, but you’re likely not doing macro or locked down on a tripod that you can’t move, so you can always use the focus-and-recompose technique.
I think it’s a good tradeoff to be able to move that point faster.
a Store points by orientation
This is a really useful feature if set to Focus point and AF-area mode.
With this set, you could, for example, set “Single-point” in the lower-third for horizontal (landscape) orientation. Then have “Wide-area(S)” in the upper-third in the vertical orientation with the handgrip on the top, and “Single-point” in the upper-third in the vertical orientation with the handgrip on the bottom. Or whatever focus points/positions you want to use.
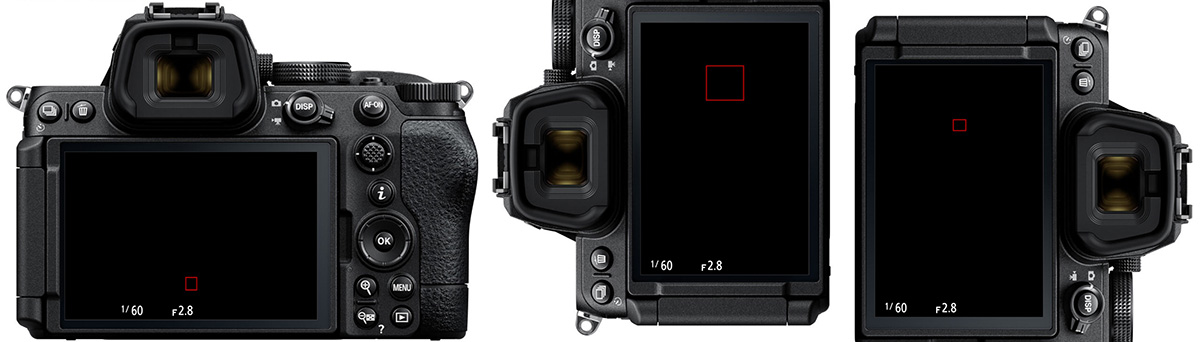
It just gives you some flexibility and saves time if you have go-to focus areas for different camera orientations, or save them as you’re rotating the camera.
a AF activation
I love using the back-button focus technique so that I’m not “required” to focus for every single photo via the shutter-button half-press on the way to the shutter full-press. Meaning, only the back autofocus button (AF ON or AE-L/AF-L) is used to focus. The shutter button is only used to take the picture.
This is why I set this to AF-ON only. Leave it at Shutter/AF-ON if you want to keep using the shutter button to focus.
Back-button focus is covered in its own lesson in the Nikon Z Photography Fundamentals course; you can read this article for the summary.
a Limit AF-area mode selection
For faster selection of the AF-area modes that you do want to use, disable the ones that you don’t use. Now, when you’re selecting the AF-area mode via a custom control/i Menu and the command dial, it only cycles through the modes you’ve enabled here. Quicker selection of your desired mode.
I’ve disabled Pinpoint, Dynamic-area AF S & L, and Wide-area AF C1 & C2.
a Built-in AF illuminator
This is the lamp on the front of the camera that comes on in dark scenes to help your autofocus system.
As far as travel photography is concerned, I think it’s better to turn this Off. It has limited useful range and can surprise/blind people you may be doing candid photos of.
b Easy exposure comp.
Turn this On so that you can rotate the command dials to change your exposure compensation without having to find and hold that little EC (+/-) button. This can make your life easier. Just be aware that your exposure compensation could accidentally change if you bump the command dials.
The command dial you use will be the one not used to change the exposure variable for the corresponding mode you’re in.
d Extended shutter speeds
I think it’s a good idea to turn this On so that you have long exposure speeds available to you in Manual exposure mode. Exposure speeds are limited to 90 seconds otherwise. You may want to do some long exposures at night.
d Apply settings to Live view/View mode
You’ll want to see what your exposure variables and other Picture Control settings are doing to your photo, so set this to either On or Show effects of settings (depending on the model).
Your viewfinder will look more like a traditional DSLR otherwise; you won’t be able to preview your exposure settings.
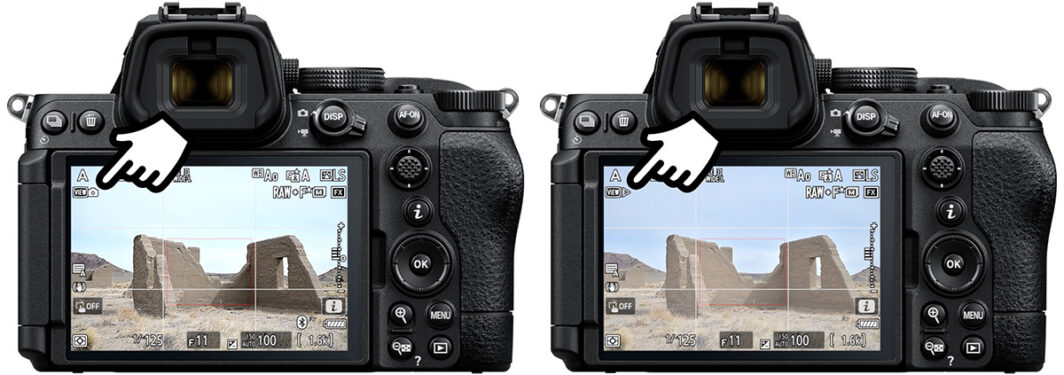
f Touch Fn
I love using the viewfinder to limit all other distractions happening around me.
This is a touchscreen setting that’s enabled when you’re using the viewfinder, and I find it useful to move the focus point with my thumb.
- Enable touch Fn
- Assign touch Fn to Move focus point
- Touch Fn area to the area of the touchscreen you want to use (I have right half for “Wide” and entire screen for “Tall”)
Now, when looking through the viewfinder, you can use your thumb to drag the focus point where you want it.
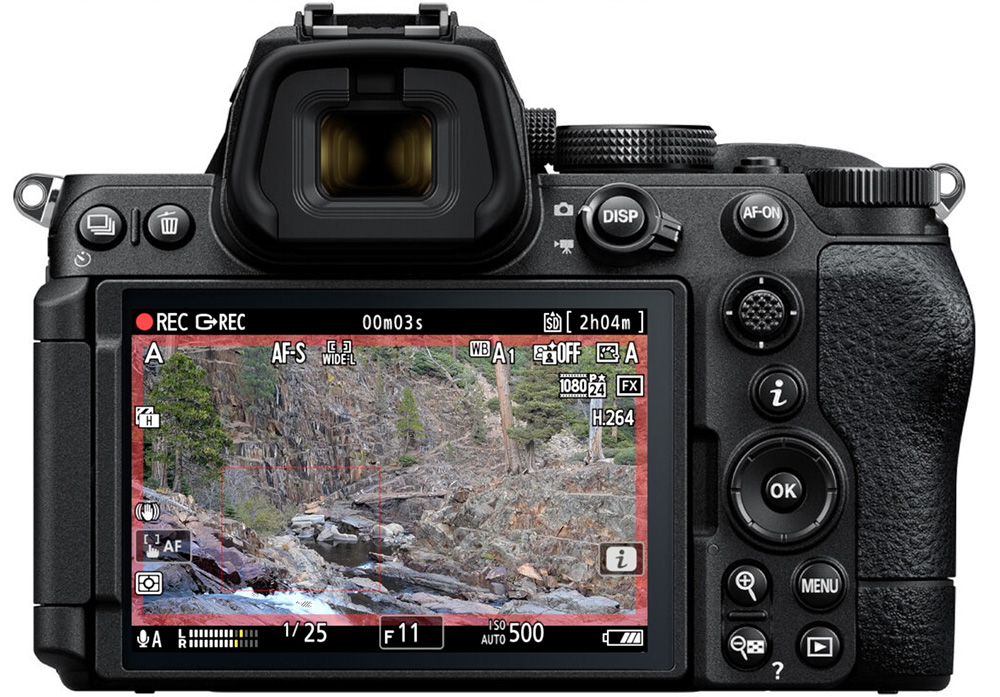
g Red REC frame indicator
Turn this On so you get a red border around your frame when recording movies. It’s a lot easier to see than the little red dot.
Playback Menu
Image review/Picture review
I think it’s best to turn this Off.
If it’s On, the last image that you took is going to play back automatically. Sounds nice? Well, it’s a huge distraction, and photographers have missed many an opportunity because of the automatic image review.
Keep it off, capture the moment, then review your images with the Play button when you need to.
Setup Menu
Format
Be sure to format your cards before any big trip. This will “prepare” the card by wiping it clean and ensuring the file structure is set up to record properly. Just be sure you’ve backed up any images that were on it.
If you have the Quick or Full format options, do a Full format.
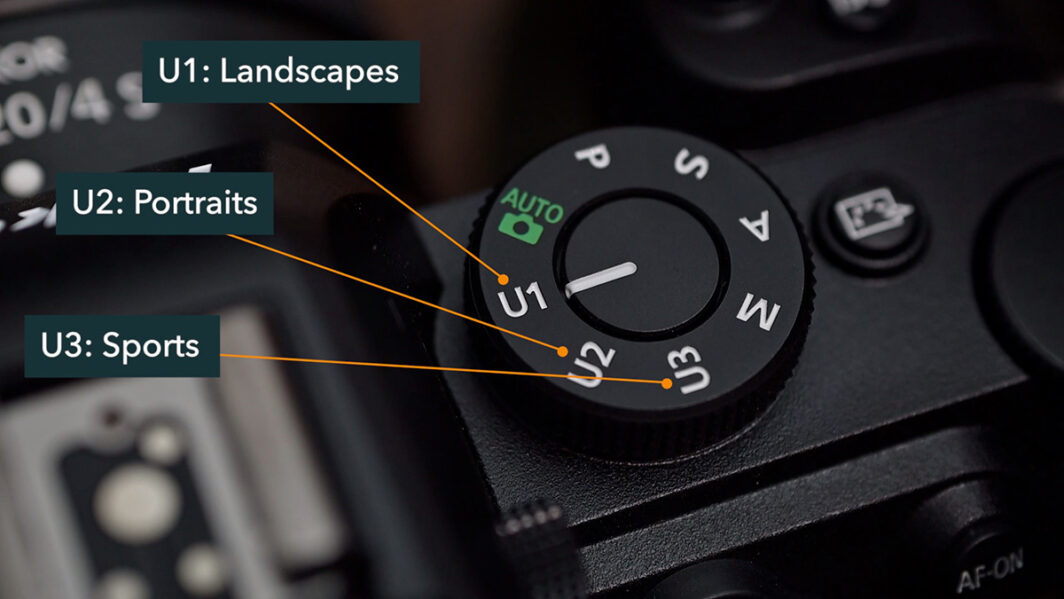
Save user settings
If you want to refine your settings even further into sub-genres, take advantage of the User Settings feature (U1, U2, U3). The Zf, Zfc, Z8, and Z9 do not have these.
Read this article for more on programming your Nikon Z User Settings.
Time zone and date
Be sure that, whenever you get to your destination, you adjust the Time Zone (and don’t forget to change it back when you get home!).
This happens automatically if you’re connected to the SnapBridge app.
Monitor & Viewfinder brightness
Battery life is an important consideration when you’re traveling, and you can read this article for all the ways to increase your battery life.
When it comes to the Nikon display settings, leave the Monitor at 0 and the Viewfinder at Auto.
You can turn the monitor up if there’s a lot of glare, but that will consume your battery faster. Leave it at the lowest useful setting; default to 0.
Auto rotate info display
Make sure this is On so that your symbology rotates with the camera and is easier to read.
Save focus position
Make sure this is also On. It will save your focus position (focus distance) when camera power is cycled. Otherwise, it will reset to infinity, which could slow you down a little.
Clean image sensor
Your sensor can get dirty if you’re changing lenses a lot, and there are plenty of ways to keep your sensor clean.
One of them is to set Automatic cleaning to Clean at shutdown. This will vibrate the sensor every time power is cycled to shake off any loose materials that might be on it.
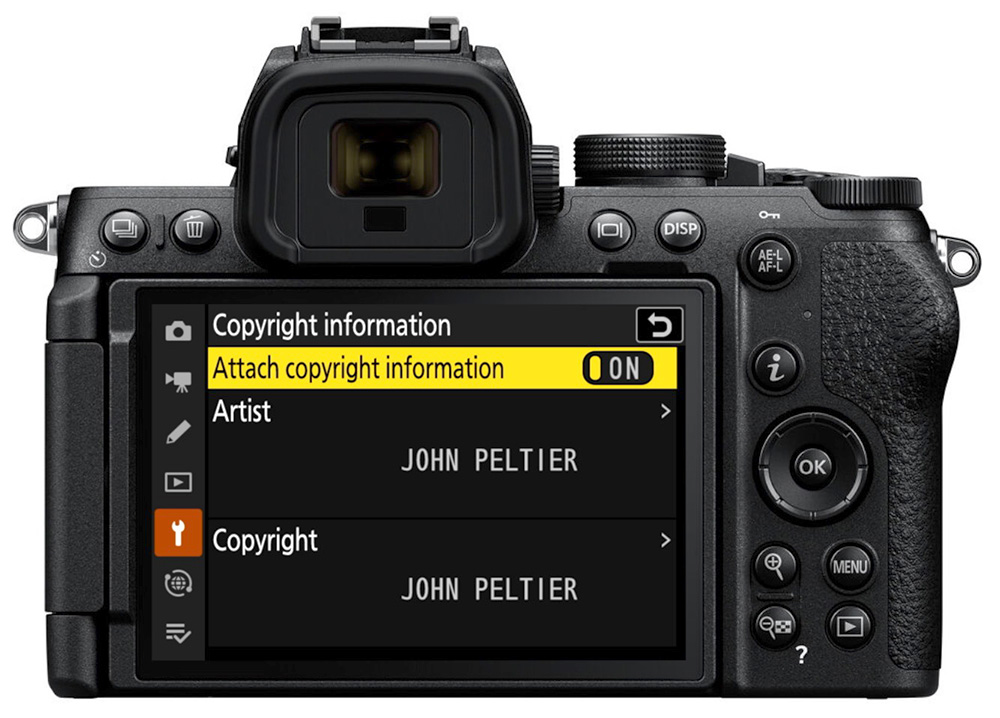
Copyright info
Set your Artist and Copyright so they’re recorded to every image as they’re captured, and enable Attach.
Beep options/camera sounds
You may be wandering into churches, museums, or doing discreet candid photos or other things like that. You probably don’t want your camera making all the possible sounds it can make.
Set the Beeps Off.
And if you have an Electronic Shutter option, you can set that synthetic sound and volume here. Set the volume to the lowest practical useful volume, or keep it off if you don’t care for an artificial shutter sound.
Silent mode
Enabling this will also disable all sounds, but it will also enable the Electronic Shutter. This can be useful when you need to be absolutely stealthy, but there are some limitations to the Electronic Shutter.
Keep this Off unless needed.
Network Menu
These settings are found at the end of the Setup Menu in older Nikon Z cameras; newer generations have them in a separate menu.
Connect to smart device
You can pair your camera to the Nikon SnapBridge app for automatic time updates, adding geolocation information, and transferring photos from your camera to smart device. Follow the on-screen instructions for pairing.
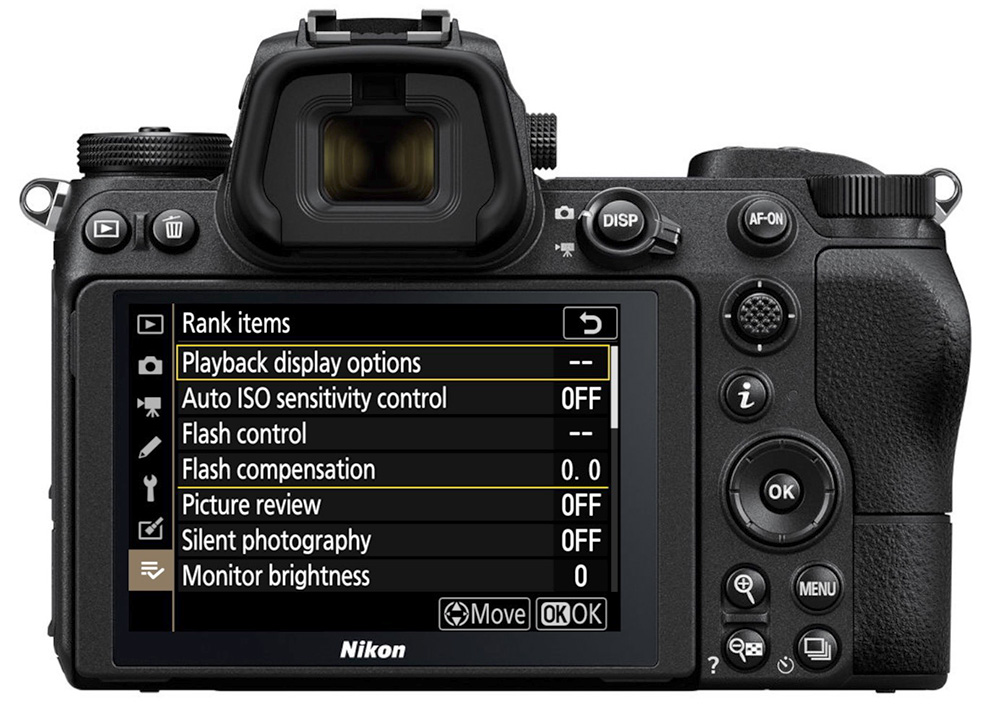
Custom menus
Finally, I’d encourage you to customize your i Menu and My Menu so that you can adjust your settings faster. Instead of endlessly scrolling through the menus to find an item you need to change often, put it in a custom menu.
I wrote an entirely separate article about customizing Nikon’s menus.
Conclusion
You want to be sure that your Nikon Z camera settings are all ready to go for your next trip. You don’t want to be fumbling around when the moment matters!
I hope this article gave you a good starting point and some things to consider when setting up your camera.
Please leave any questions/comments below.
And be sure to check out all of my Nikon courses for an even deeper understanding of your camera settings and photography. They’re all included in the Z Photographers membership, and you can use the code “blog20” for 20% off the first three months.
Ota Sey
Friday 27th of June 2025
Hi John, I found out that [Touch Fn] works less reliable with "Automatic display switch" set in my Zf, i.e., when the EV is auto-activated. Sometimes it works, sometime it doesn't. In the street photography, this function is (with this display mode setting) rather useless. The problem doesn't exist in the display mode "Viewfinder only". Unfortunately, I don't really like to have more than 2 display modes activated to selection, that slows me down. "Automatic display switch" is my preferred mode, it is fast and practical in the use. "Monitor only" was my second option until now, because the automatic switch from EV to monitor doesn't work in some (low) light situations. What is your experience?
John Peltier
Friday 27th of June 2025
Thanks for the question. I haven't experienced any of these problems in my Zf. I use Auto Display Switch 95% of the time and haven't noticed any problems with the Touch Fn. I was also just using it in the middle of the night a couple weeks ago (it was a full moon, but still very dark), and the eye sensor worked as advertised. I might recommend that you make sure the eye sensor is clean. Otherwise, I wish I had better information to share, those are just my experiences :) I hope it improves for you!