Disclosure: This post may contain affiliate links. I earn a small commission of product sales to keep this website going.
The wide field of view that drone cameras have are great for capturing sweeping landscapes. But you can get an even wider field of view by creating an aerial panorama.
Here are some things to avoid when creating aerial panoramas. This article will focus mostly on drones that have a Panorama Mode that will automatically stitch a panorma together. Keeping these common mistakes in mind will set you up for success!
The Big Picture on Aerial Panoramas (no pun intended)
Aerial panoramas are simple in concept.
Create a series of overlapping photos as the camera moves left, right, up, and down. Then put them together like a puzzle so you get one larger photo. Nearly all drones can do this automatically for us, so it can be an easy thing to do.
But despite the fact that it’s automated, there are some things we can do to either ruin it or make it memorable. And that’s what this article will focus on.
Imagine putting together a puzzle where each puzzle piece has a different brightness than neighboring pieces or the picture on each piece was enlarged more or less than the pictures on neighboring pieces. That’d be a pain to put together and the result would look awful.
That’s what can happen if we’re not paying attention to how our drone is set up prior to creating an aerial panorama.
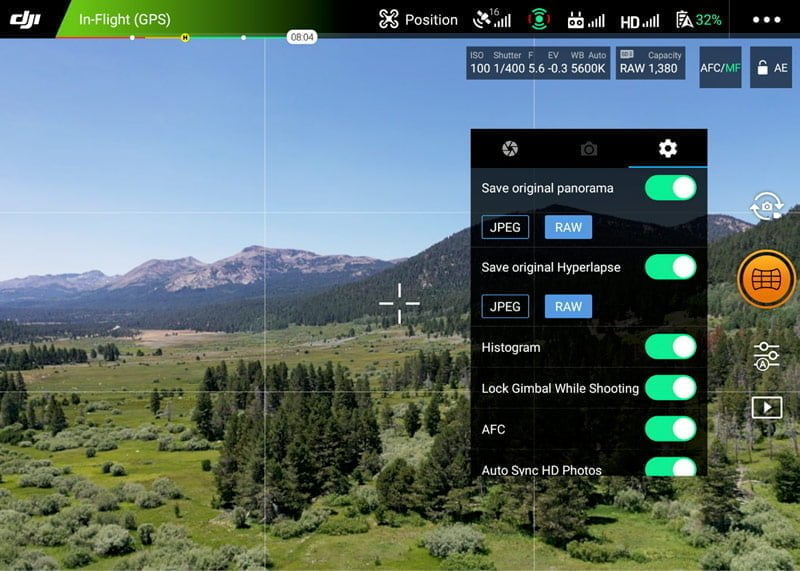
Saving the originals
If you’re comfortable with post-processing, and if your drone allows it, you can also save the original, individual photos that make up the entire panorama.
In many cases, you can save both the JPEG and RAW/DNG files, which gives you a lot more latitude with the final panorama. If you don’t like the way your drone processed each frame and stitched the final image, you can do this on your computer later on, so long as you have the original, individual frames.
Filters
Polarizing filters
Polarizing filters are great for reducing the glare on water and deepening blue skies. But polarizing filters can ruin an aerial panorama.
The strength of the “polarization effect” in the sky depends on where the camera is looking in relation to the sun. The sky will be a much darker blue at 90 degrees to the sun. Looking straight towards or away from the sun will reduce the polarization effect.
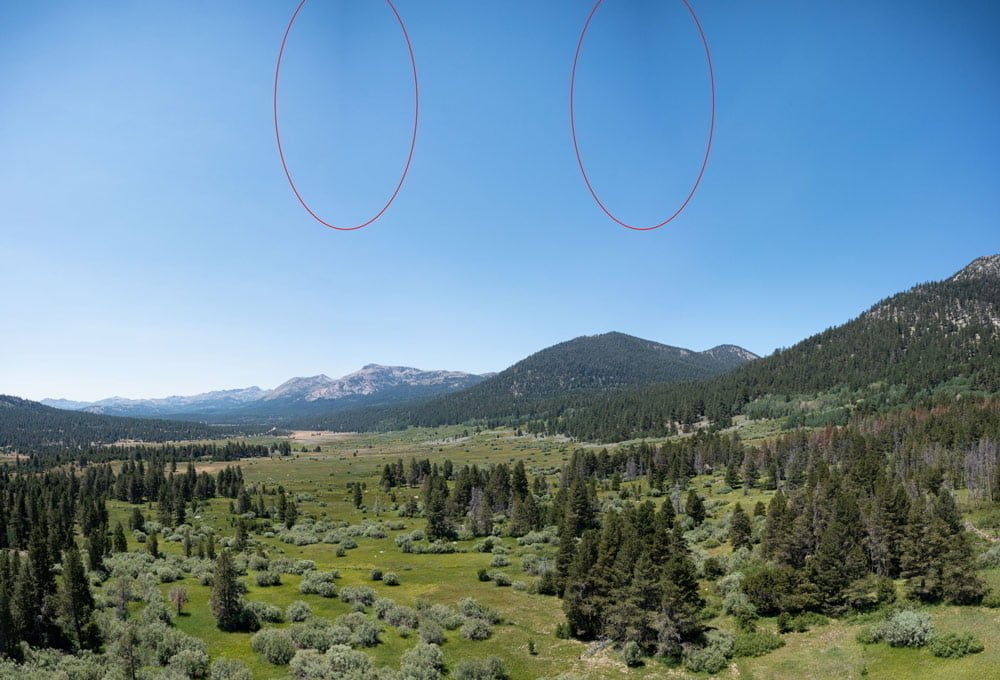
This can be apparent in a single wide-angle photo too. One side of the sky will be darker than the other. Now imagine covering a much wider area of the sky with multiple wide-angle photos. Your sky will go from dark to light to dark or light to dark to light and just not look normal. This is virtually impossible to fix in post-processing.
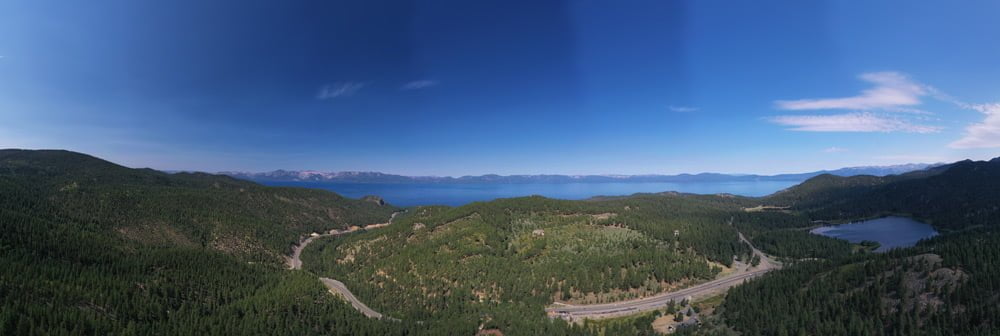
The panorama below was made with a polarizing filter on the lens. Note the extreme change from dark blue on the left side, to a very light blue on the edges. The transition area between each frame also produces vertical banding across the image, a result of the drone changing its angle to the sun for each of those photos.
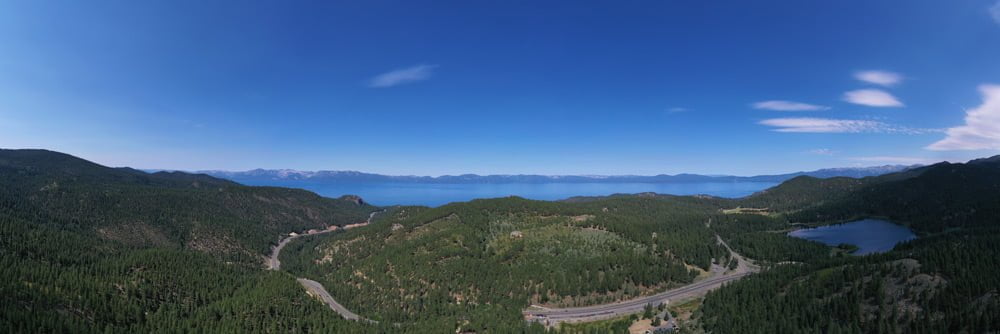
After removing the polarizing filter, you can see the sky has a much more even tonality and without that banding.
Try not to use a polarizing filter when creating an aerial panorama on a clear blue sky day. Remove the filter prior to launching. Deepen the blues of the sky in post-processing if you really need to.

Graduated Neutral Density Filters
A graduated ND filter is kind of a niche filter. If you don’t know what one is, you probably don’t need to read this section.
But if you do use graduated ND filters, make sure you take them off prior to creating an aerial panorama. They create similar problems you’d see with polarizing filters, where different parts of your panorama will be exposed differently.
Vignetting
Adding a “vignette” is a popular post-processing step to slightly darken the edges and corners of a photo. This helps draw the viewer’s attention more towards the center of the photo and keep them there, closer to where your subject likely is.
But vignetting can also occur optically at capture and can create problems during the creation of an aerial panorama.
This is mostly going to be a problem with larger cameras and lenses. Smaller cameras, like what you’d find on the Mavic Mini or Mavic Air, are less prone to this.
But if you have any camera with a variable aperture lens, try to avoid the largest aperture when creating an aerial panorama. Vignetting is more apparent at wide-open apertures. More simply put, if your camera’s smallest f-number is f/2.0, don’t create your panorama at f/2.0. Try to go to at least f/5.6 or f/8.
Lens hoods and cheap filters can also add vignetting – another reason to remove them for a panorama.
Distortion
Those wide-angle lenses we find on most drones also come with the side-effect of some distortion, which is more noticeable if there’s an object really close to your camera or at the corners of the panorama.
You’ll want to make sure that you consider these two things to avoid distortion:
- Don’t fly dangerously close to the closest object
- Avoid easily identifiable straight lines at the corners of the final panorama
Unfortunately, there’s no way I can say something like, “ensure you’re at least 87 feet away from the nearest tree, building, etc…”. It’s all going to depend on the focal length of your lens, the orientation of the objects in your photo, the camera’s vertical & horizontal relationship to those objects, and more. The same goes for the barrel distortion that can distort straight objects at the corners of your panorama.
As a general rule, the further you are from your scene, and the closer your subject is to the center, the less likely you’re going to notice this distortion.
Camera Settings
You’ll also want to make sure that both the exposure and white balance settings are locked during your aerial panorama. If the camera changes any of these settings during the panorama (aperture, shutter speed, ISO, white balance), each photo could have a different brightness and/or color cast from the preceding and following photos.
This is less of an issue in newer drones; in fact, most popular consumer and professional drones today will automatically lock these things when the panorama is started.

But it’s a good idea to know how your drone will behave. If, during the panorama, you see your exposure settings maintaining the same settings, you’re good to go.
If your camera is not locking these settings, or you’re not sure what it’s doing, all you need to do is enable the Auto Exposure Lock feature. And set a manual white balance like “Sunny”, “Cloudy”, etc.

Creating Better Aerial Panoramas
So to sum up, make sure you’re checking these things next time you go out to create an aerial panorama:
- Remove any filters you might have on your lens (especially polarizing or graduated ND filters)
- Don’t use your lens’s widest aperture if your lens has a variable aperture
- Maintain adequate distance from the closest object in your scene and keep your subject towards the center
- Ensure camera settings (exposure & white balance) don’t change throughout the panorama sequence