Disclosure: This post may contain affiliate links. I earn a small commission of product sales to keep this website going.
Are you considering switching to Capture One Pro from Adobe Lightroom? I’m a month into using Capture One Pro 11 after 12 years of Lightroom. I’ll try to provide some insight.
I recently decided to try out Fujifilm mirrorless cameras. Many professional Fuji shooters have mentioned that Lightroom doesn’t do a great job of processing Fuji’s RAW format and that Capture One Pro did so wonderfully. So I thought I’d see what it was all about.
- Update 10/5/2018: Read this post about Capture One’s new Fujifilm-specific processing software.
- Update 11/29/18: Capture One just released Capture One 12, which is even more user-friendly and with increased functionality that former Lightroom users will appreciate.
I was hooked within the first hour.
Disclaimer: The following is from the perspective of someone who doesn’t go to Photoshop much at all. I prefer to do all processing with the RAW files. Color corrections, minimal dodging & burning, contrast, batch conversions, and that’s it. Keeps me off the computer for exorbitant amounts of time & saves storage space.
Capture One Pro vs. Adobe Lightroom: The Big Picture
Pricing & subscriptions
Adobe
As I understand, the current version of Lightroom Classic will be the final stand-alone version of Adobe photography products that you can purchase. Everything is moving to the “Creative Cloud” and requires subscriptions.
Adobe’s Photography Plan includes Lightroom CC (great for mobile editing), Lightroom Classic (for desktop editing), and Photoshop CC. This monthly plan is $9.99 with 20GB of cloud storage or $19.99 with 1TB of cloud storage.
You can pay monthly or annually, but unlike every single other company offering subscription plans, there is no discount for paying for an entire year at once.
Capture One Pro
Phase One offers Capture One Pro as either a standalone purchase or as a subscription plan.
The standalone purchase gives you that specific version of Capture One Pro only. This price is currently $299 for one release.
The subscription plan gives you access to the current and all future versions of Capture One Pro. The subscription price is $180 for an annual plan, or you can pay $20/month ($240 total). They do make significant improvements between releases.
They also have “light” versions of Capture One Pro for both Sony and Fujifilm for a slightly reduced price.
Workspace
This took some getting used to but overall I like the feel of working in Capture One Pro much better. It just feels more contemporary – like a hip new sportscar. Lightroom still feels like something from the old days of Windows – an old bus covered in all sorts of band-aid repairs and piecemeal add-ons that’ll fall apart any day now.
There is, of course, a steep learning curve.
The Capture One Pro workspace
Importing Lightroom catalogs into Capture One Pro
Capture One Pro uses catalogs much like Lightroom and fortunately made Lightroom catalog import very easy.
Aspects retained during catalog import:
- Basic exposure corrections including saturation, contrast, cropping, and white balance
- Metadata including ratings, color labels, keywords, and all other IPTC information
- Collections & catalog folder structure
Things not included during catalog import:
- Dust/spot removal
- Targeted adjustments
- Advanced toning & color corrections
- I noticed some, very few, photos imported with a color temp of 888K. No clue why but C1’s AWB works great.
So you’ll have to almost start over with photos that have been processed with masking or HSL adjustments.
Where Capture One Pro shines in comparison to Adobe Lightroom
Color, color, color. And color. Did I mention color?
I’ll admit it, I’ve always been tormented by color casts. Like if you cranked the saturation all the way up to 100, the overall image would eventually appear bluish, reddish, greenish, etc.
I’d use Lightroom’s color temperature & tint sliders first, then adjust the HSL of different colors and maybe try to adjust curves for RGB channels. These controls are limited and clunky. Nik’s Color Efex Pro “Pro Contrast” tool did a good job of removing casts, but then I’m left with a TIFF file, which kind of defeats my RAW-only mentality.
Capture One Pro has multiple effective tools for dealing with color.
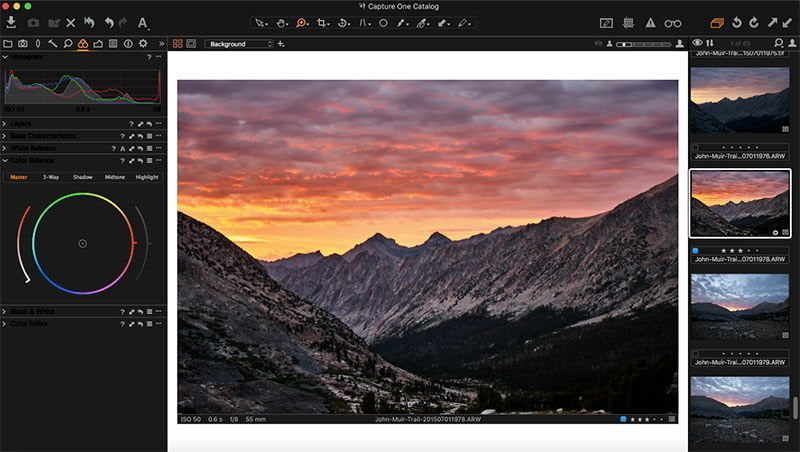
A Color Balance tool with real color wheels will let you adjust the hue and saturation of the highlights, midtones, shadows, and the overall image. Start with large corrections and then make smaller refinements in the right direction. It only takes seconds. (See above photo for a screenshot).
But it doesn’t stop there.
The Color Editor tool, like Lightroom, lets you pick a color range to edit with an eyedropper. But here you have much more exact control of that color range. Drag the wire frame around the color wheel to precisely adjust the range you want to target. Click on the “View selected color range” box and the entire image will turn black-and-white except for the colors that you targeted, giving you an easy visualization of the colors you’re adjusting.
You can also make adjustment masks out of the selected color range.
Or you could just work with skin tones on the Skin Tones tab, removing variances in hues & saturation of what should be uniform skin tones.
I can get more accurate results in Capture One Pro, in a matter of seconds, than I ever could in Lightroom & Nik after a half hour.
If I just had to pick one reason to switch from Lightroom to Capture One Pro, I’d easily do it for the color control.
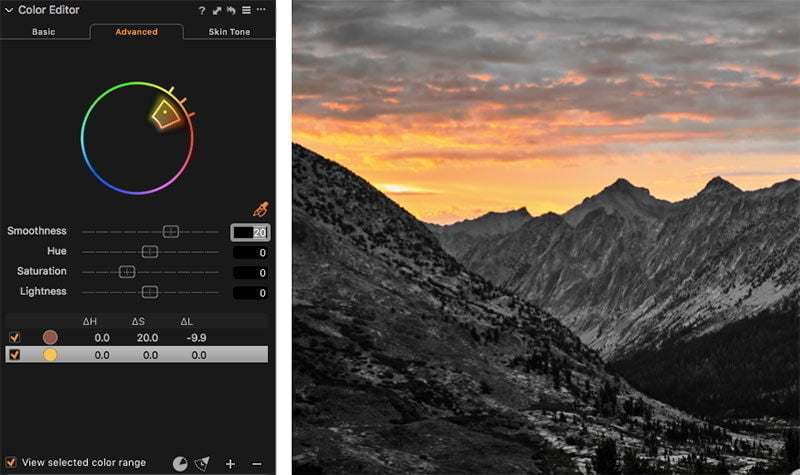
Capture One Pro’s powerful Color Editor tool. Everything except for the fine-tuned color selection is set to grayscale for more precise tuning.
Adjustment Layers
Lightroom has come a long way with their adjustment layers. Lightroom Classic now has auto-masking and masking based on luminance & color values. But one thing that always bothered me was the limitations of adjusting color. You could adjust white balance & hue, but you didn’t have access to the other color controls in the Develop module. I never understood that.
Capture One Pro is much more like Photoshop when it comes to adjustment layers. Make a mask and then you have access to all the tools normally available on the background image. You can create masks out of color & luminance values and adjust the opacity of each layer.
The clone & heal tools are very powerful in Capture One Pro. Its healing source is always waaaay off, but you can easily move the source around and it does a great job of blending it in.
You can name your layers in the Layers tool for easy reference when you need to go back and change one.
Capture One 12 now includes enhanced linear gradients, and radial masking, both of which include luminence masking, much like Lightroom.
Toning
Capture One Pro, probably because it was initially designed for use with $40,000 cameras, deals with shadow & highlight recoveries much better. They retain color and have less of a “muddy” feel.
You can make much more precise curves adjustments in Capture One Pro. You can also adjust just a luminance curve (doesn’t adjust color saturation), the RGB curve (also adjusts saturation), and individual color channel curves.
The basic Contrast & Saturation sliders are easier to use also. They’re both “smart” sliders, much like the Vibrance slider in Lightroom. They’ll adjust the tones & colors that need adjusting, but ease off the ones that are already too high.
Details
Capture One Pro seems to do a better job handling luminance noise. It’s a casual observation, I haven’t done scientific tests with it, but I’m very happy with it.
Capture One’s Clarity slider behaves much more like Nik’s Detail Enhancer than Lightroom’s Clarity slider. It does bring out more details but without the obvious edge halos present in Lightroom. You could always spot Clarity slider use in Lightroom photos.
Performance
Adobe has been consistently touting Lightroom’s improved performance. I didn’t see it. No one else saw it. I couldn’t even remove a few dust spots without my laptop fan sounding like it was going to fly out of the casing. I’d make an adjustment and then wait to see the results.
Capture One Pro, like Lightroom, makes the changes to the preview image instead of the full image for improved performance. But they do a much better job in the execution. I see results almost immediately and my laptop doesn’t sound like it’s going to explode. This is a huge bonus for me when I’m editing off of solar panels or no power sources at all.
Where Adobe Lightroom has the edge on Capture One Pro
Geotagging
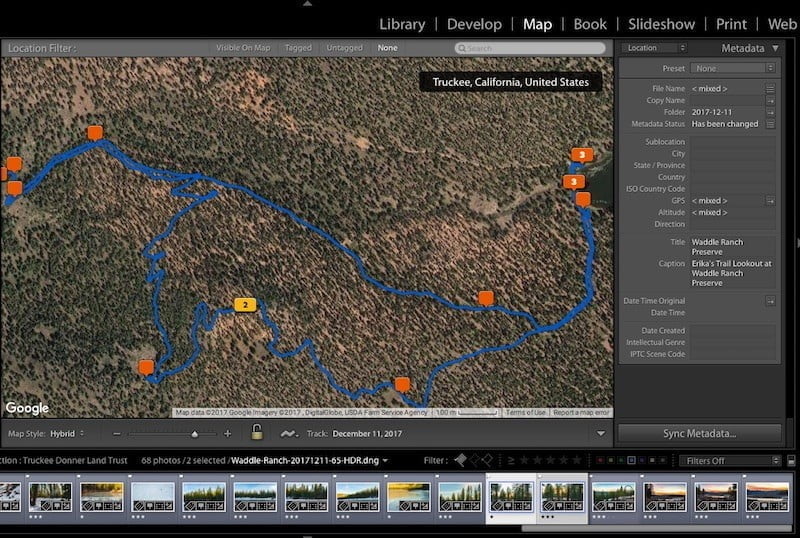
This is a big one for travel photographers who don’t have a GPS-enabled camera. Adobe has a great Map module where you can load a recorded GPS track and then sync all of your photos to that track. Or if you don’t have a track, just drag the photo onto the map to write geolocation data. Right now I’m trying out some third-party programs that will sync GPS tracks to photo EXIF data. I’ll report on that once I find a winner.
Sharpen & dust masking
Lightroom does have some great tools to visualize sharpening and dust removal.
It must all be done manually with Capture One, and this can make it more difficult to visualize overall sharpening effects. It also makes it harder to notice dust spots. I do like how Capture One’s dust removal tool works, but that’s assuming I can find the spots.
Integration with photo hosting services
I’m going to miss this. I host all of my photos on SmugMug, which has a Lightroom plugin. Whenever I make a small adjustment to a photo, Lightroom will mark that photo for synchronization to my SmugMug account. One press of a button and the new images will automatically replace the old.
For now, I’ll have to do all of this manually by replacing each individual photo I update.
Capture One 12 adds functionality for third-party plugins, and hopefully we see one from SmugMug.
Viewing subfolders
I still haven’t figured this one out on Capture One. My folder structure hierarchy, much like many other traveling photographers, goes like this: Location->Year->Date.
In Capture One Pro you can’t view photos in subfolders like you can in Lightroom. You can only view one folder at a time.
Mobile Editing
Lightroom CC does have a great mobile editing app. And the photos sync between your desktop version and your mobile version, so you can edit on your phone at the airport and then pick up when you get back to your computer.
In Conclusion: Will I stick with Capture One Pro or Adobe Lightroom?
They both have advantages and disadvantages. But the advantages of Adobe Lightroom over Capture One Pro are only those of convenience, and I can deal with those. What I can’t deal with are poor performance and limited processing capabilities.
Despite the “inconveniences” that I’ve noted, I’m able to work much faster and create images much closer to my vision in Capture One Pro.
I still have a lot of learning to do, but even at my basic Capture One skill level, I know that this is a much better way to process RAW photos than Adobe Lightroom.
Try the fully-functional 30-day trial – yes, fully-functional for 30 days – free, at phaseone.com/store.
Rob
Sunday 28th of January 2018
Hello John, welcome to the C1-community ! I switched a few years ago from LR to C1 and recognize almost everything you wrote in your article. The learningcurve isn't that difficult, it goes really fast in learning C1. You can get Media Pro SE as your catalog and connect it with C1. Personally I use iMatch for all mu culling, tagging, ... and then use C1 in sessions and to me it works great that way. Enjoy photography and C1.
John Peltier
Sunday 28th of January 2018
Thanks Rob! Yes, I do miss the ability to quickly cull photos - LR was great for that and the task is a lot more tedious in C1. I'll definitely give both of your suggestions a shot as I try to figure it all out. Thanks for the help! Cheers, John
Otis DuPont (Drunkphotography.
Saturday 13th of January 2018
I start in LR with catalogs, do all my tagging, keywording, etc. I'm mostly Cap One nowadays when it comes to the finish though, which I do by Sessions. Easy to port around work and Sync to NAS at that point. Doesn't hurt that Sony gets you that huge discount, then you pay pennies for major upgrades. Been with capone since version 8 but there is no 1 solution for me either. I will be patiently waiting for a solution to go all cap one, if you find it.
Sky Makai
Wednesday 5th of September 2018
I'd love to know more about how this works. How do you make sure Cap1 sees the image metadata from the tagging you do? Then, how do you edit the images in Sessions in Cap1?
John Peltier
Saturday 13th of January 2018
Thanks for the insight! I'm trying to warm up to the idea of sessions after working with one catalog for so long - still trying out some different workflow combinations. My end goal is to get rid of LR completely but I'm not quite ready to do that with the keywording & tagging capability.