Disclosure: This post may contain affiliate links. I earn a small commission of product sales to keep this website going.
Your Fujifilm X-M5 includes a dedicated Vlog Mode that’s surprisingly powerful for creators who want to film themselves – or just want different recording options! Here’s how to use it and what makes it different from regular Movie Mode.
This article is based on a free preview lesson from my Fujifilm X-M5 Tutorial Course (save 20% with BLOG20).

Why Use Vlog Mode on the X-M5?
Vlog Mode gives you a streamlined video setup designed for recording yourself, perfect for travel diaries, talking-head videos, and product reviews. It simplifies exposure, autofocus, and audio options, while adding a few unique tools not available in regular Movie Mode.
Touchscreen Layout & Quick Controls
Here are a few of the touchscreen controls you’ll find on the main Vlog screen:
- Touch Zoom: If using a power zoom (PZ) lens, you’ll see a Zoom option in the upper-left, which opens a touch zoom control.
- Touch Focus: Tap the screen to toggle between touch focus, moving your focus area, or disabling touch controls.
- Play: Tap this to review your videos in a touch playback mode.
- Recording: Tap the red button to start and stop. The screen border turns red while recording.
- Menu: Tap this to go into the additional modes described next.
Vlog Touch Menu
There are several options around the border of the screen after you tap Menu. Here’s the quick rundown from top-left; you can read about some of these features in further detail in following paragraphs.
- Exposure Mode: Tap the letter in the corner to switch between Program, Auto, Shutter Priority, Aperture Priority, or Manual (P, S, A, or M).
- Focus Mode: Choose AF-C for continuous focus, ideal for keeping your eyes sharp as you move. AF-S is disabled if you’re using any of the tracking options.
- Image Stabilization: The X-M5 lacks in-body stabilization, but you can enable Digital IS for smoother handheld footage. It crops slightly into your frame. If you have an OIS lens, the lens IS will be used.
- Face & Eye Detection: Explained in the next paragraph.
- Portrait Enhancer LV: Explained in the next paragraph.
- Background Defocus: Explained in a following paragraph.
- Product Priority: Explained in a following paragraph.
- High-speed Record: You probably won’t be using this much if vlogging, but you can enable or disable the High-speed rec options set in the Movie menu, recording either to the SD card or HDMI.
- Timer: Choose a 3, 5, or 10 second timer. You’ll see the countdown on the screen after tapping Record.
- 9:16 Short Movie Mode: Explained in a following paragraph.
Tapping the microphone with the circles around it in the lower-left corner will also open some audio options, which will be explained soon.
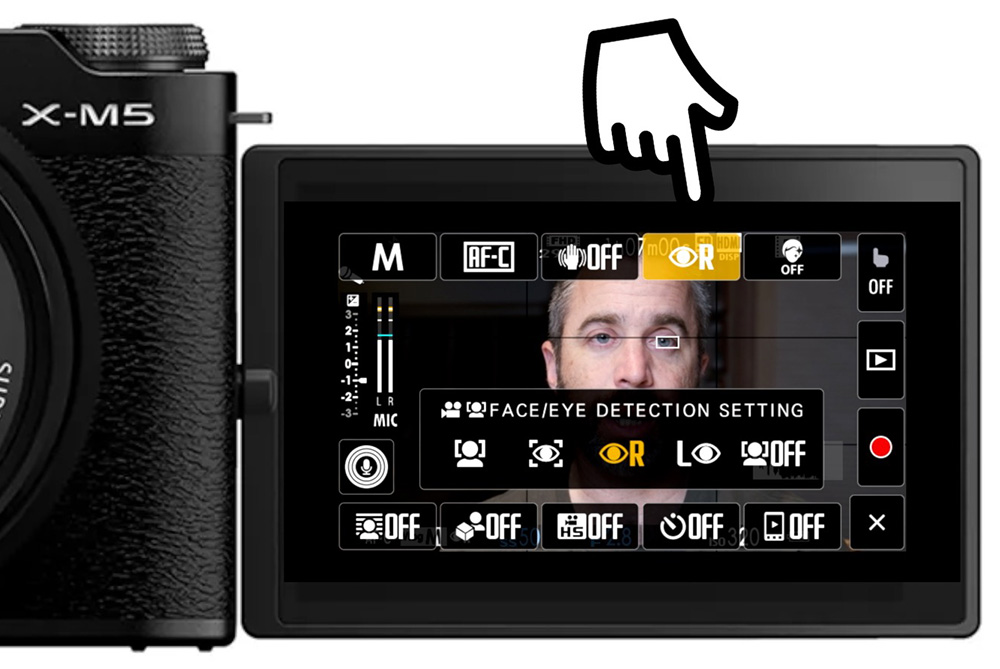
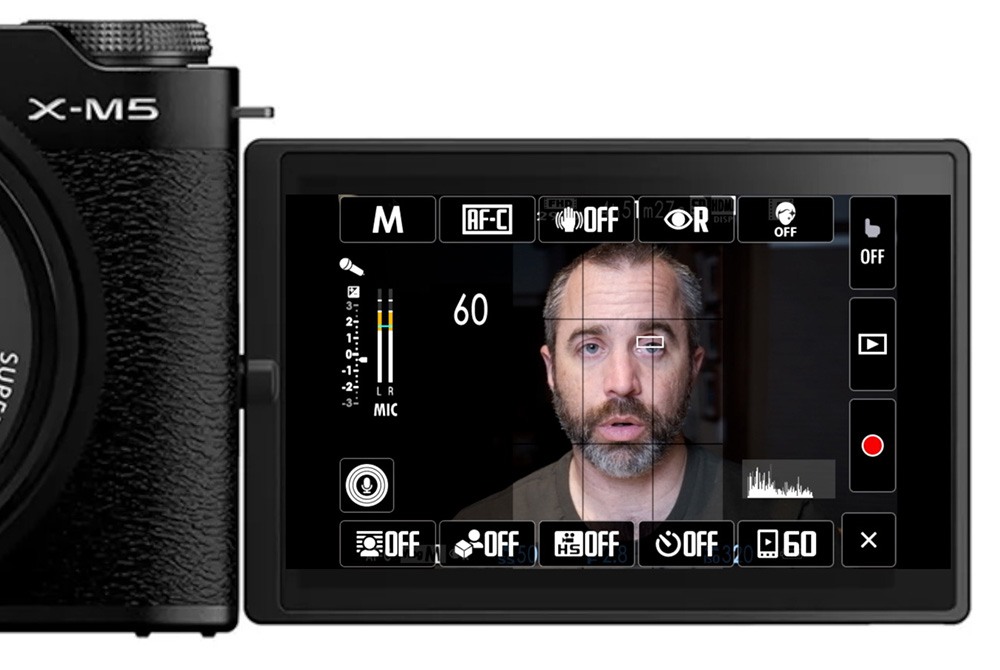
Face, Eye, and Portrait Options
Face and Eye Detection can be set to Face-only, Auto eye, Right, or Left eye tracking.
This feature is unavailable when using Product Priority mode or Manual Focus mode. The Focus Mode will also be set to AF-C when the Face and Eye Detection modes are enabled.
You’ll also find Portrait Enhancer, available in three strengths, for subtle skin smoothing.
All of these modes can help you look your best during Vlogging.
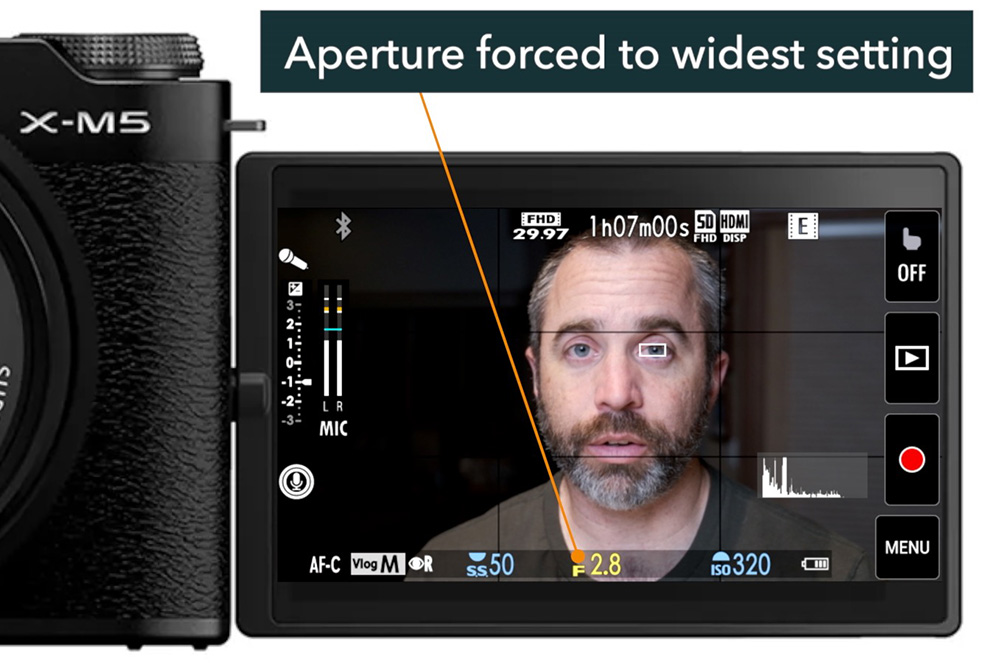
Background Blur & Product Priority Modes
Background Defocus: This forces the widest possible aperture for a natural, optical blur. The amount of blur you’ll get depends on your lens’s widest aperture, the focal length, and your distance from the camera. This does not apply a digital blur – it’s only optical.
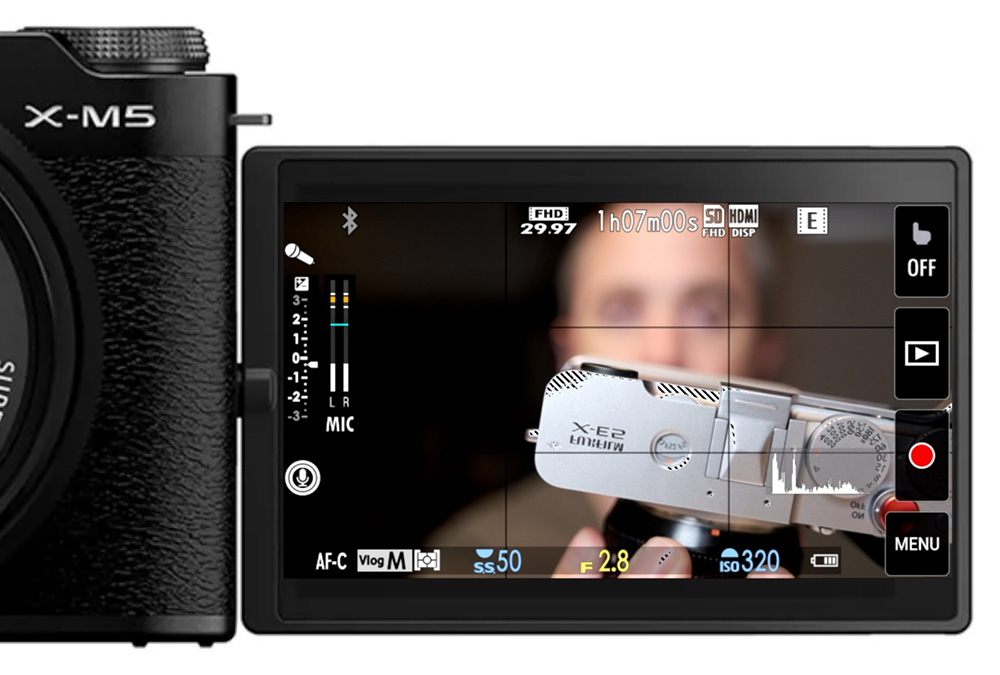
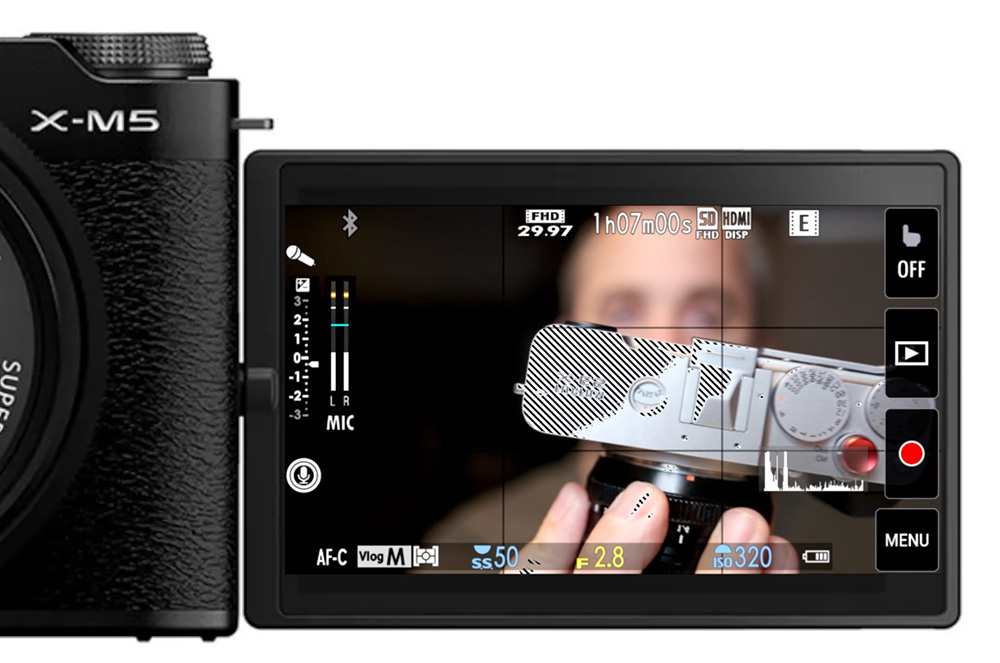
Product Priority: Enabling this option will disable face/eye detection, allowing the camera to focus on objects you hold up to it. Perfect for product demos and reviews.
You can even combine both modes for a blurred background that keeps your product in focus.
Vertical Video Options
Only available in Vlog Mode, the Shorts/Vertical Video option allows you to record 15-, 30-, or 60-second clips in a 9:16 (vertical) aspect ratio for YouTube Shorts or Instagram Reels.
If you need to record longer clips, set your Movie Mode to 9:16 (instead of 16:9) in the MOVIE MODE option (MOVIE SETTING menu).
Audio Controls & Microphone Settings
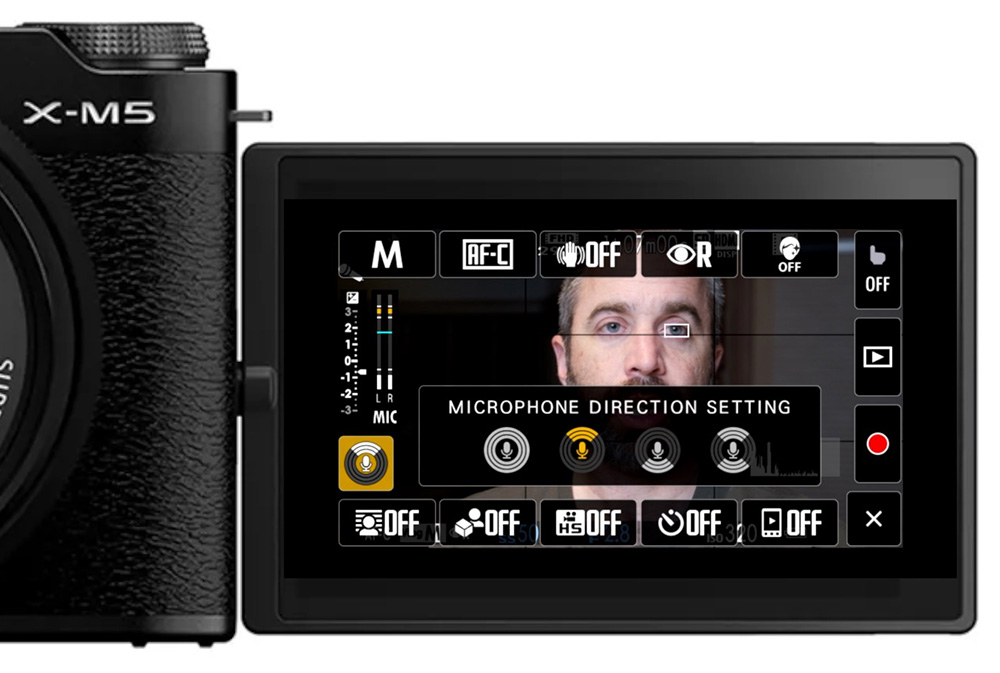
You can choose which of the internal microphones are active by tapping on the microphone icon:
- Surround: Uses all microphones for stereo sound.
- Front Only: Focuses on your voice when speaking to the camera, into the lens.
- Rear Only: Useful if you’re narrating from behind the camera.
For the cleanest sound, monitor your audio levels and avoid red clipping on the meters. The X-M5 also includes wind filtering, steady-state noise reduction, a low-cut filter, and a mic-level limiter for loud environments. You’ll find these in the AUDIO SETTING menu.
Audio Setup Tips for Vlogging
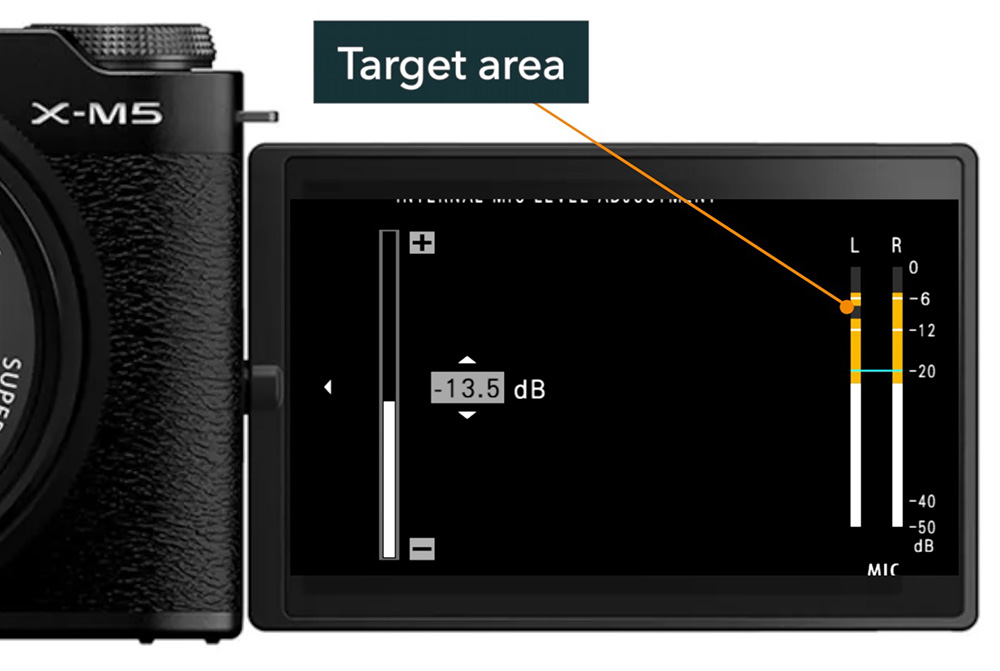
Whether using the built-in mic or an external one, aim for levels between –12 dB and –6 dB. External microphones with built-in amplifiers (like the RODE VideoMic NTG) usually deliver cleaner sound if you set the mic gain higher on the mic and lower in the camera.
To set the microphone gain manually, go to the AUDIO SETTING menu and choose MANUAL for either the INTERNAL or EXTERNAL MIC LEVEL ADJUSTMENT. Speak normally into the microphone at a normal distance and adjust the gain until the levels average between -12 to -6.
Recommended Recording Settings
- Resolution: Full HD or 4K (Full HD is plenty for most vloggers)
- Aspect Ratio: 16:9 for horizontal, 9:16 for vertical
- Frame Rate: 29.97 fps
- File Format: H.264 MP4 or MOV
- Bit Rate: 50–100 Mbps
- Film Simulations: Choose your preferred look. Log profiles (in the F-Log/HLG RECORDING submenu) require more editing, while film sims look great straight out of the camera.
- Zebra Warnings: Overlay stripes show potential overexposure areas. Set to 90% for early alerts. Found in the MOVIE SETTING menu.
Wrapping Up
Fujifilm’s X-M5 Vlog Mode makes it incredibly easy to film yourself. From face tracking to product focus, background blur, and advanced audio control, it’s a great camera to help you focus on your content instead of camera settings. But you don’t even have to film yourself. Use it as an extra movie settings mode.
Want to Learn How to Use Your X-M5?
This article is based on a free preview from my Fujifilm X-M5 Tutorial Course, which walks you through every menu and feature of the camera with clear, bite-sized lessons, setup guides, and quizzes to help you retain what you learn. More free previews are available, and you can use the code BLOG20 to save 20%.