Disclosure: This post may contain affiliate links. I earn a small commission of product sales to keep this website going.
Wondering how to set up your Nikon Z5II, and what the best settings are? This Z5II setup guide will help you make some of those early decisions when you pull the camera out of the box.
A few important notes first:
- These are merely my recommendations. They’re how I have my Z5II set up, and I will provide my reasons why. I am by no means saying, “you must do this.”
- This setup guide won’t cover all settings. We’ll skip most settings where I recommend keeping the defaults. There are some important default settings that I’ll explain why you should keep the defaults.
- Consider these your base settings. Many settings, like the AF-area mode and White balance, are situation-dependent and aren’t covered in the setup. These are largely the “set once and forget it” settings.
- This guide won’t cover video settings. These are only for stills.
You can find everything you need to know about the Z5II in the Nikon Z5II Tutorial course. This course includes videos, text, PDF downloads, and a quiz. Watch the Free Previews, and if you’d like to purchase the full course, use the code “blog20” for 20% off!
Z5II Playback Menu
Playback display options
Choose which information displays you want to be available in Playback mode. These will cycle when you press the DISP button during Playback. Highlight each option and press the multi selector right to check/uncheck it.
- Focus point: View your focus point in playback, indicated by red squares.
- Mark first shot in series: With this selected, the first shot in a burst of photos will have a burst icon and display how many photos were in the burst. This can be useful if you do a lot of burst shooting.
- Exposure info: Displays the image with exposure settings on the bottom.
- Highlights: Shows the image with exposure information and overexposed (clipped) areas will blink.
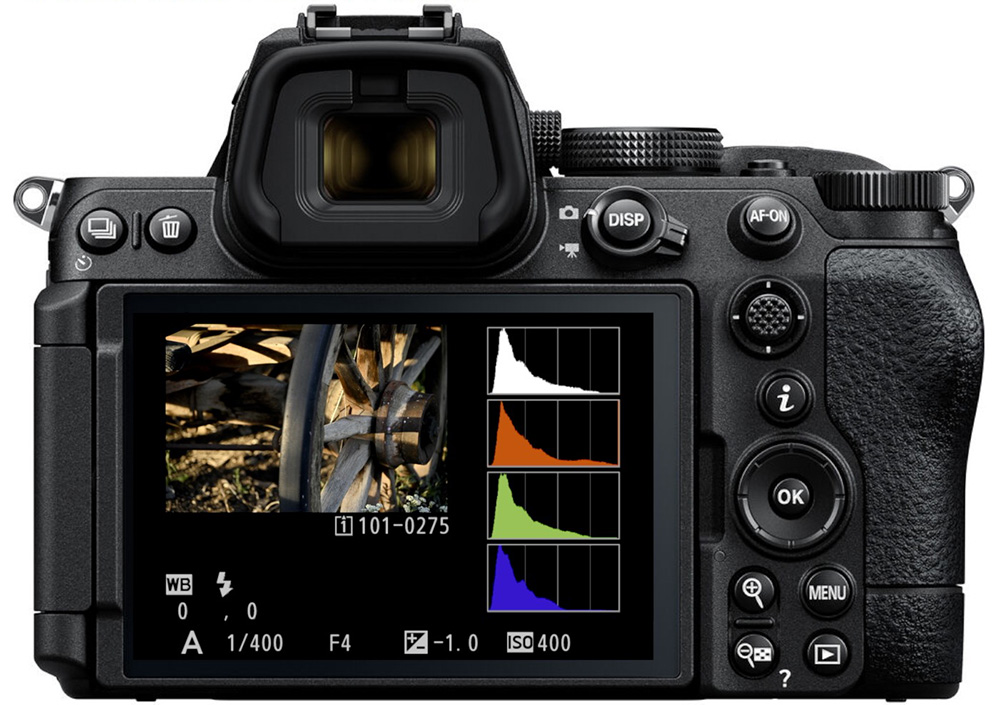
- RGB histogram: Shows a thumbnail with exposure information and RGB histogram.
- Shooting data: Multiple pages (viewed by cycling DISP or up/down arrows) show nearly all settings used when the photo was created – metering, focus modes, lens info, white balance, flash, Picture Control, etc. You can choose which information is displayed here by checking/unchecking the appropriate boxes at the bottom of this page.
- Overview: Show a thumbnail with luma histogram, exposure information, basic shooting settings, and file information.
- None: Shows the full-frame image with no information overlays.
- File info: Like the Exposure display but without the bottom information bar.
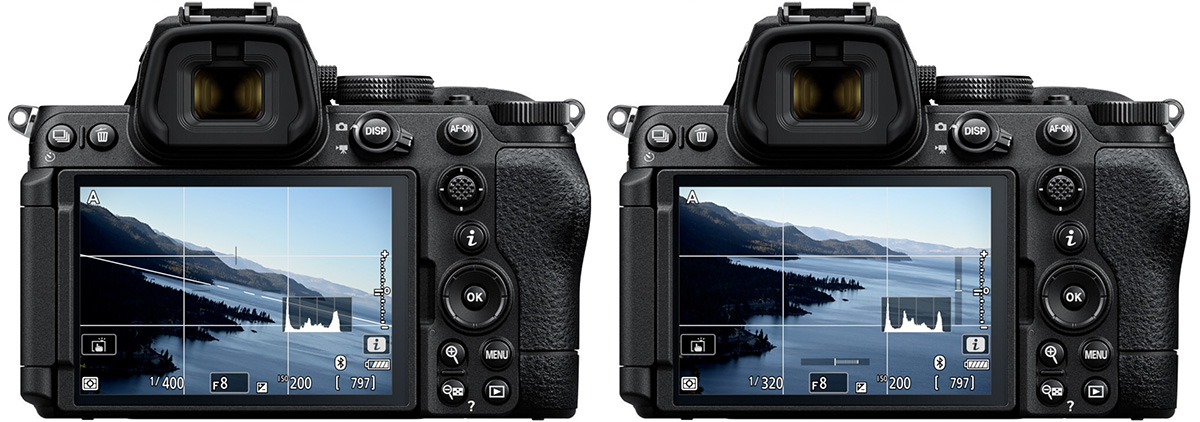
My personal preference is to view the Focus point, RGB histogram, Overview, and None (picture only). You may prefer other displays. Here’s an example of the RGB histogram:
Delete pictures from both slots
If you have any of the Backup or multiple file options set in the Role played by Slot 2 submenu (covered in the next section), enabling this will delete all copies of a deleted photo from all cards.
- Yes (confirmation required): Require confirmation that you do want to delete all copies. Choose which option (current card or both) you want as the default selection.
- Yes: All copies will be deleted.
- No: Only the current file will be deleted.
I’d recommend at least having Yes (confirmation required) set with deleting both copies as the default option. File management can get very confusing if your memory cards do not mirror each other in the photos that are on them.
Series playback
This sets options for viewing photos created in burst mode.
- Sub-selector displays first shot: Enabling this will only show you the first shots in a burst of photos when scrolling through the photos using the sub-selector left/right direction. Any photos not part of a burst will still be shown. Only subsequent burst photos will be hidden. If Off, the sub-selector functions as normal during playback.
- Auto series playback: If On, remaining sequence photos will automatically advance when the first photo of a sequence is viewed for a few seconds. If Off, you will manually advance through each photo.
- Auto series playback options: Here you can set options for how the “Auto series playback” behaves if enabled. Loop will loop the playback, Wait before playback sets a delay for the “slideshow,” Auto series playback speed sets the playback at a manual speed or the speed the burst was created in.
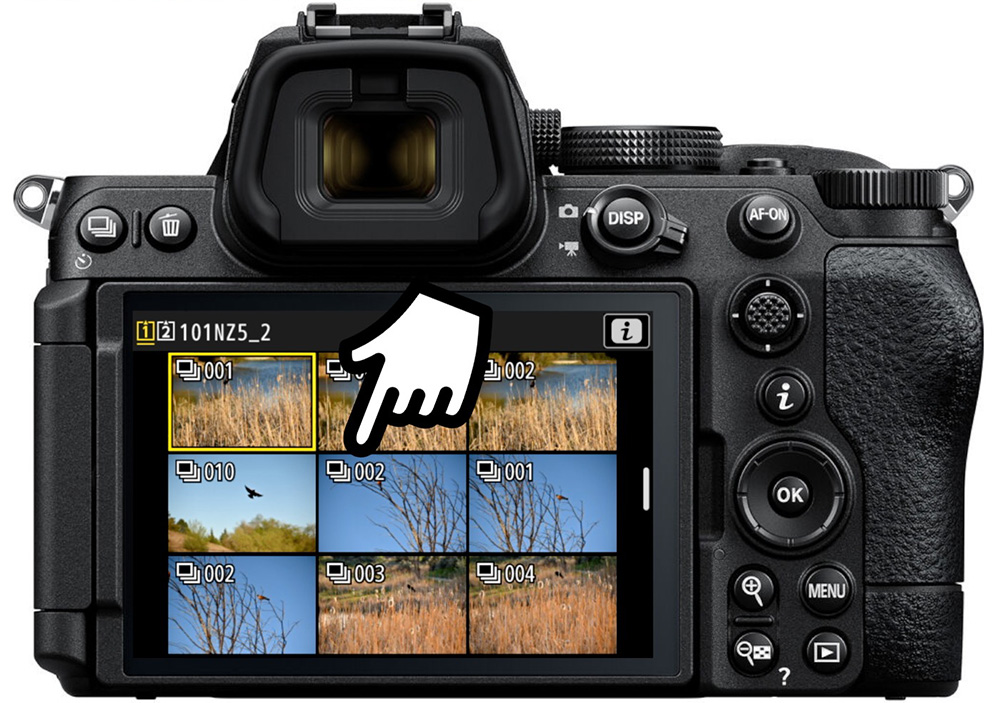
- List series as single thumbnails: Thumbnail views can get overwhelming if you have a lot of burst sequences, or long burst sequences. Turn this On and only the first photo of a sequence will be displayed in the thumbnail views. You’ll see a burst sequence icon and a number indicating how many photos are in the sequence. You will still see all photos in the full-screen views. You need to enable this if you want to have access to the “Manage series” submenu (in the Playback i Menu).
Thumbnails displayed as a series:
Picture review
Set whether or not you want each picture to be displayed immediately after capturing them.
- On: Photos will show on the display currently in use.
- On (monitor only): Photos will show on the Monitor if the Monitor is being used.
- Off: Photos will not show after capture.
I recommend leaving this Off because, honestly, this distracts a lot of photographers and can lead to missed moments. Concentrate on capturing the moments and then review the photos with the Play button when it makes sense to do so.
After delete
This menu sets which photo is displayed after deleting another photo.
- Show next: The next sequential photo is displayed.
- Show previous: The previous photo (before the one deleted) is displayed.
- Continue as before: The next photo displayed will be in the direction you were advancing photos before the deletion. This is my preference to keep things predictable.
Auto-rotate pictures
If you turn this On, portrait-orientation photos will be “right-side up” during Playback, taking up a small portion of the screen in horizontal orientation but full-screen in vertical orientation.
Z5II Photo Shooting Menu
Role played by card in Slot 2
Set which function card slot 2 (the bottom) does. Options you see will depend on the Tone mode you’re in, selected a few items down. You’ll see “JPEG” if the Tone mode is SDR and “HEIF” if the Tone mode is HLG.
- Overflow: All photos are saved to Slot 1. If that fills up, photos will begin being saved to Slot 2 (until that fills).
- Backup: All photos will be will be recorded to both memory cards; they will mirror each other.
- RAW Slot 1…: If recording RAW+JPEG/HEIF, the RAW file will be saved to Slot 1, and the JPEG or HEIF will be saved to Slot 2. If recording just RAW or just JPEG/HEIF, this will function like “Backup” instead.
- JPEG/HEIF Slot 1…: If recording just JPEG or HEIF, the set Image quality setting will be saved to Slot 1. Slot 2 will have a “Basic” quality copy of the same file. Press the multi selector right to choose either Medium or Small for the secondary size. If RAW or RAW+JPEG/HEIF is set for the Image quality, this will function like “Backup” instead.
I recommend “Backup” for important/commissioned shoots.
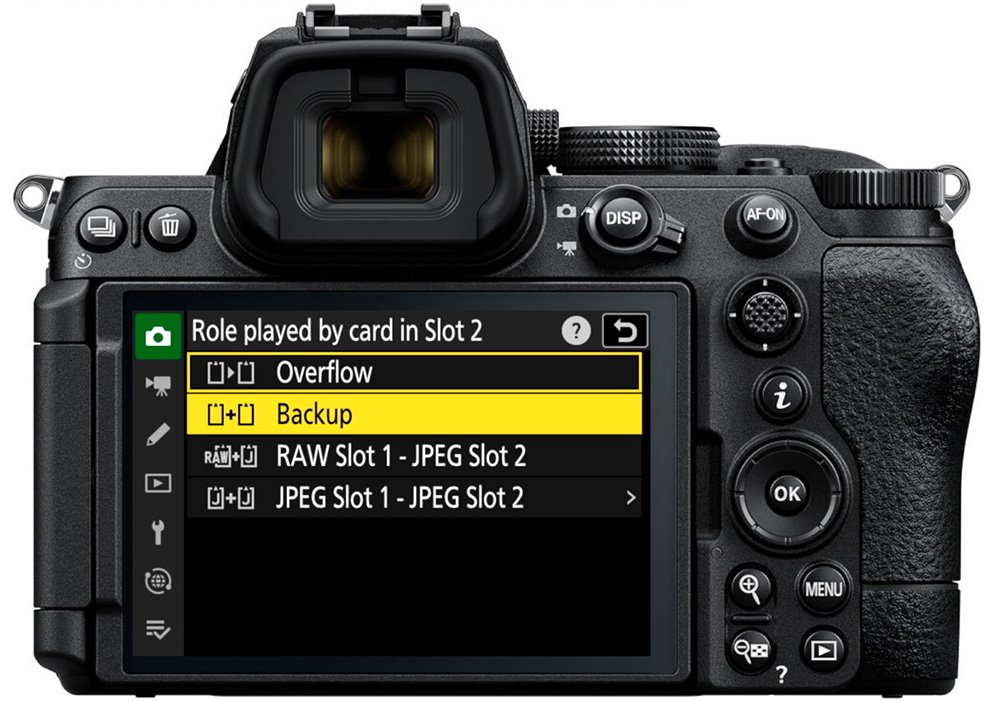
Image area
This lets you choose the ratio of the image saved to your card; which part of the sensor is used. This will affect both the RAW and JPEG files.
- FX: This will record the full sensor size (36mm wide) with a 3:2 image ratio.
- DX: This will crop in to an APS-C size (24mm), with a 3:2 image ratio. The camera will automatically do this if a compatible APS-C (DX) lens is attached. If a basic third-party DX lens is attached, you’ll need to do this manually to avoid serious vignetting for the smaller image area.
- 1:1: A square image; the sides are cropped.
- 16:9: A “letterbox” format image with the top and bottom cropped.
The selected image area will be previewed in the Live View.
Unless you prefer a 1:1 or 16:9 for all of your images, I’d just recommend recording either FX or DX, depending on your lens type, and then cropping later.
If DX crop alert is On (as it is by default), the “DX” image area icon will flash in your screen to let you know your image area is cropped.
Here’s an example of vignetting you might see if using a manual third-party APS-C lens on your Z5II without setting the DX image area:
Tone mode
Set whether your in-camera processed photos are saved as JPEGs (SDR) or HEIF (HLG).
HLG will result in photos with a wider range of tones. However, being a newer way of processing a photo, not all monitors/devices are capable of displaying a HEIF file. Only choose HLG if you know that the destination display devices are capable of HEIF.
Otherwise, select JPEG to ensure universal compatibility.
Image quality
Choose the file format for recorded photographs.
If you want to record a JPEG or HEIF, you can choose from three different “qualities.” Fine will have the highest quality but be the largest file size, while Basic will have the lowest quality and smallest file size.
If you only want to record the RAW (.NEF) file format, choose RAW.
You can also record both RAW and a JPEG or HEIF file by selecting RAW plus the desired JPEG quality.
The options with a ★ next to them will have an even higher quality than the option without the ★. Without the ★, all photos will be compressed so they have relatively similar file sizes. If they have a ★, they will be compressed with the set quality, but there will be no limits on file size.
I prefer RAW + JPEG fine★ so that I can have the original “RAW” negative plus a processed JPEG file that is hopefully up to my standards.
Image size settings
Choose a size for JPEG/HEIF files. This option is unavailable if only recording the RAW file format.
For the FX Image area:
- L: 6048×4032 (24.4MP), 13″ x 20″ at 300dpi
- M: 4528×3024 (13.7MP), 10″ x 15″ at 300dpi
- S: 3024×2016 (5.2MP), 7″ x 10″ at 300dpi

You can also enable separate sizes if you’re recording the DX Image area:
- L: 3984×2656 (10.6MP), 9″ x 13″ at 300dpi
- M: 2976×1992 (5.9MP), 7″x10″ at 300dpi
- S: 1984×1328 (2.6MP), 4″x6″ at 300dpi
Unless you’re directly printing your JPEGs or want some good cropping ability, FX Medium works just fine for posting to websites, social media, and otherwise sharing while maintaining a smaller file size.
Images with a crop (1:1 or 16:9) will have smaller dimensions.
RAW recording
Choose the compression type for RAW files saved to your Z5II. All RAW files are compressed to give smaller files, but with different types of compression.
- Lossless compression compresses the RAW file without any data loss. This is the highest quality, largest file size, and my recommendation if you want to get the most out of your RAW files. They are approximately 30MB.
- High efficiency★ will give you a smaller file size, but this is “lossy” – some RAW data is discarded during compression. You won’t see a difference in Lossless or this when casually viewing your photos. They are approximately 18MB.
- High efficiency is also lossy and will compress the file even further for smaller file sizes and lower quality. They are approximately 12MB.
If you’re recording, RAW you probably want to stick with Lossless or High efficiency★.
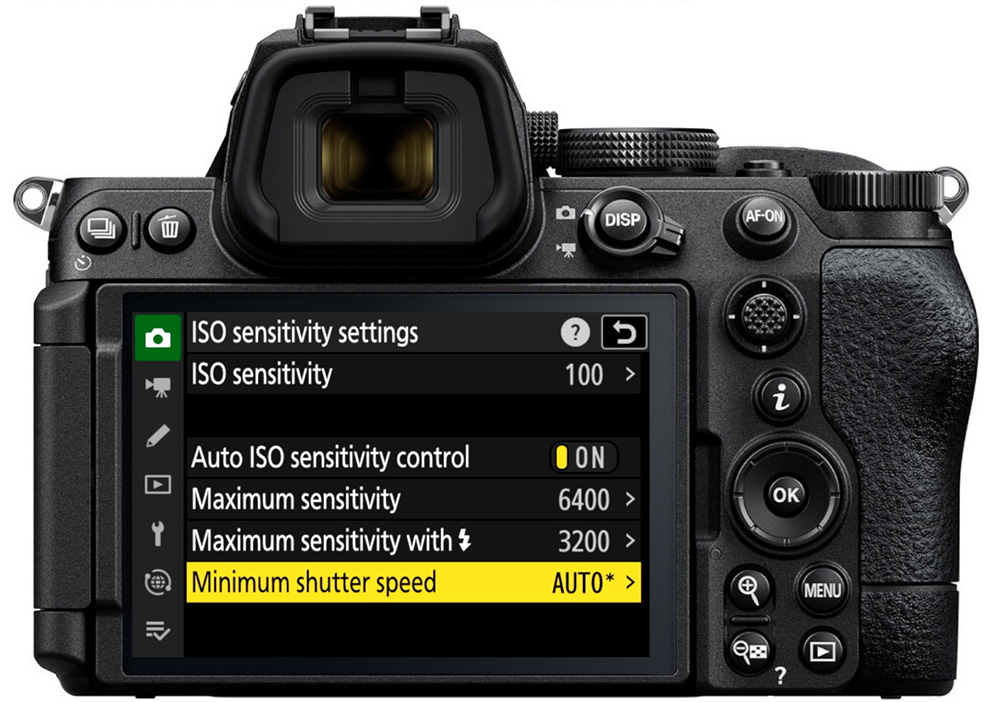
ISO sensitivity settings
Set up your Auto ISO programming and manual ISO.
- ISO sensitivity: This sets two things: your manual ISO (Auto ISO OFF), and the minimum ISO when Auto ISO is ON.
- Auto ISO sensitivity control: Set this ON if you prefer to use Auto ISO, where the camera will automatically raise the ISO to get a proper exposure with the given aperture/shutter speed combo.
- Maximum sensitivity: Choose the highest ISO you give the camera permission to go to if it needs to raise the ISO in Auto.
- Maximum sensitivity with flash: Same as above, but this is for when using flash.
- Minimum shutter speed: Set the slowest shutter speed you want the camera to use when Auto ISO is ON and when in P or A exposure modes. Set from 30 seconds to 1/8000 seconds.
An Auto shutter speed is calculated using the lens focal length (faster shutter speeds for longer focal lengths). Highlighting Auto and pressing OK allows you to fine-tune the Auto shutter speed, setting faster speeds if things are moving in front of the camera, or slower speeds for still life and when the camera is stable. Each tick mark from center represents approximately one stop of exposure.
I love using Auto ISO for documentary photography. The camera can handle higher ISO fairly well, and I see no reason to not give the camera control of this. It’s one less thing to worry about. I set a maximum sensitivity of 6400 with a minimum shutter speed of Auto + 1.
Color space
Select between Adobe RGB and sRGB.
- While Adobe RGB is technically “larger” than sRGB, it should only be used by professional printers.
- sRGB is the color space that all digital displays use – phones, computers, tablets, TVs. If you want an accurate representation of your colors on any digital device, and even if you send it to a print lab, select sRGB.
This is only applicable to JPEG files. HEIF files will use the BT.2100 color space. RAW files do not have a color space; you’ll select a color space for outputting images in your RAW converter.
Vibration reduction
This enables vibration reduction and sets the mode.
- Normal: Vibration reduction functions in the standard mode in an attempt to reduce camera shake.
- Sport: The camera won’t correct in the direction of panning if it detects panning. It will correct in the other directions. Use this if panning.
- Off: Vibration reduction is off.
If you’re using an F-mount lens with an adapter on your Z5II, the vibration reduction setting will follow the switch position on the lens if it has a switch position.
Z5II Custom Settings Menu
a5 Store points by orientation
This allows you to save different focus areas & positions for both horizontal and vertical orientations. This can be useful if you want a Single-point AF-area in the lower third for landscape orientation and an AF-Wide (S) area in the upper third for portrait orientation. Different focus points can be saved for both clockwise and counterclockwise vertical rotations, giving you up to three different options.
- Focus point saves just the position of the horizontal & two vertical positions; the AF-area mode will stay the same regardless of orientation.
- Focus point and AF-area mode saves both the position and the AF-area mode of each horizontal and two vertical orientations.
- Off will disable this feature, so the focus area position will remain in the same absolute position on the screen regardless of orientation.
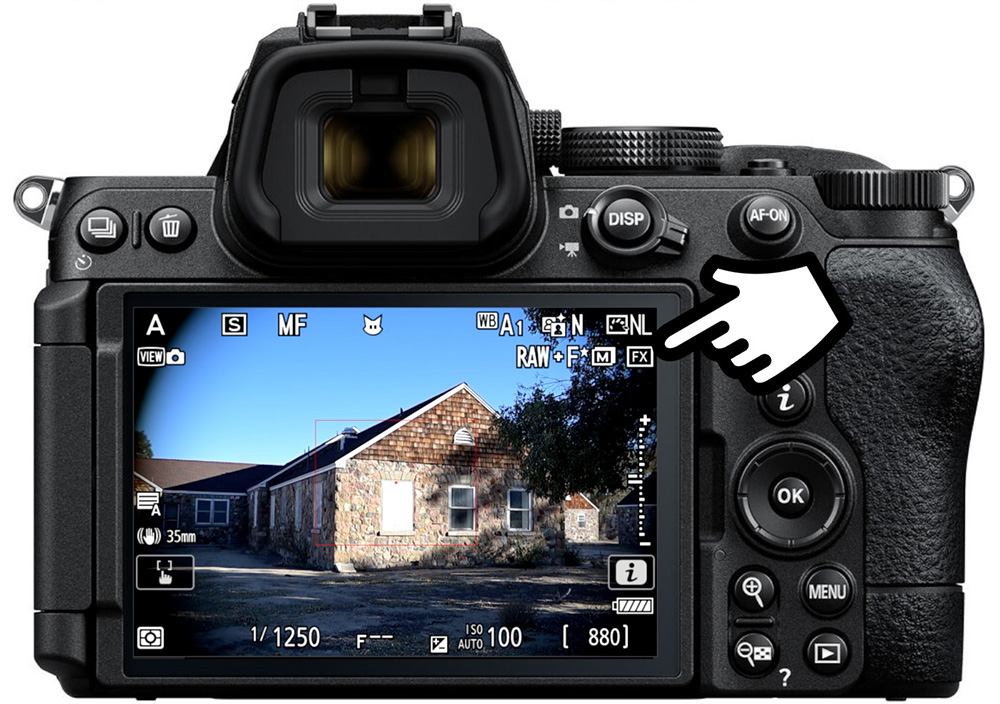
a6 AF activation
Choose whether or not the shutter button is used to activate autofocus.
For those who prefer the “back-button focus” setup, you’ll want to set this to AF-ON only. This means that only the button assigned to the function “AF-ON” can be used to command autofocus. You’ll need to program that in the f2 Custom controls menu (AF ON to “AF ON”). Read this article for more on back-button focus.
The standard setup – the default for nearly every camera that most people are used to – is Shutter/AF-ON. This means that both the shutter half-press and the AF-ON-assigned button can be used to command autofocus.
a8 Limit AF-area mode selection
Don’t have any need to ever use the Pinpoint or Dynamic-area AF modes? Don’t care to use the custom size Wide area modes? You can “hide” AF-area modes you don’t want to use by removing the checkmark. Highlight the mode you don’t want to use and press the multi selector right to remove the checkmark.
The hidden options will be removed from the list when using the Command dial to change AF-area modes, allowing for faster selection. They’ll still be available in the i Menu grid and main menus under AF-area mode.
a10 Focus point display
Set how your focus points are displayed.
- Manual focus mode: If Off, the focus box will only be displayed when moving it. It will then disappear. If On, it will always show (my preference as an additional indicator).
- Dynamic-area AF assist: If Off, only the center focus box will show when using Dynamic-area AF. If On, you will see both the center box and the dots surrounding it (my preference).
- AF-C in-focus display: If On, the focus point will turn green when the camera thinks the subject is in focus in AF-C focus mode. If Off, the focus point will stay red or yellow (depending on the AF-area mode). On can give you a better idea if the subject is in focus, but it is not guaranteed with fast-moving subjects.
- 3D-tracking focus point color: Set the color of the 3D-tracking box. It’s white by default, but you can set it to red.
- Focus point border width: Set different widths for the focus box; the smaller widths can be difficult to see.
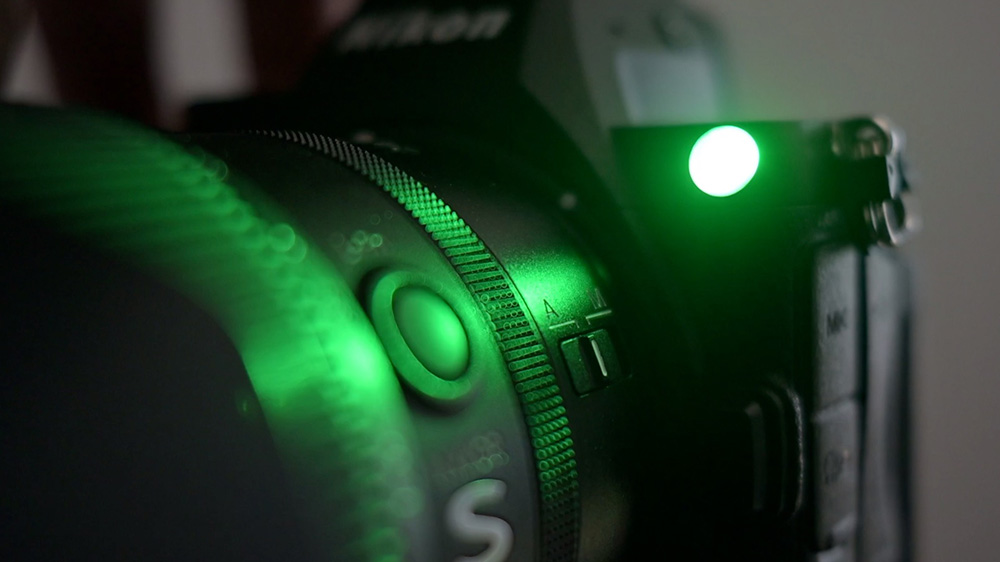
a11 Built-in AF-assist illuminator
This controls the lamp on the front of the camera that comes on in the dark to help your autofocus system. While this sounds like a cool feature, I really think it’s only useful for close-up still life. It has a limited useful range and can surprise/blind people in front of your camera. I prefer to keep this Off.
b1 ISO sensitivity step value
Choose whether ISO is adjusted in third stops or whole stops when changing the ISO. Set third stops for more precision; set whole stops for quicker selection.
Whole stops may be easier here; you can always really refine your exposure using shutter speed and/or aperture.
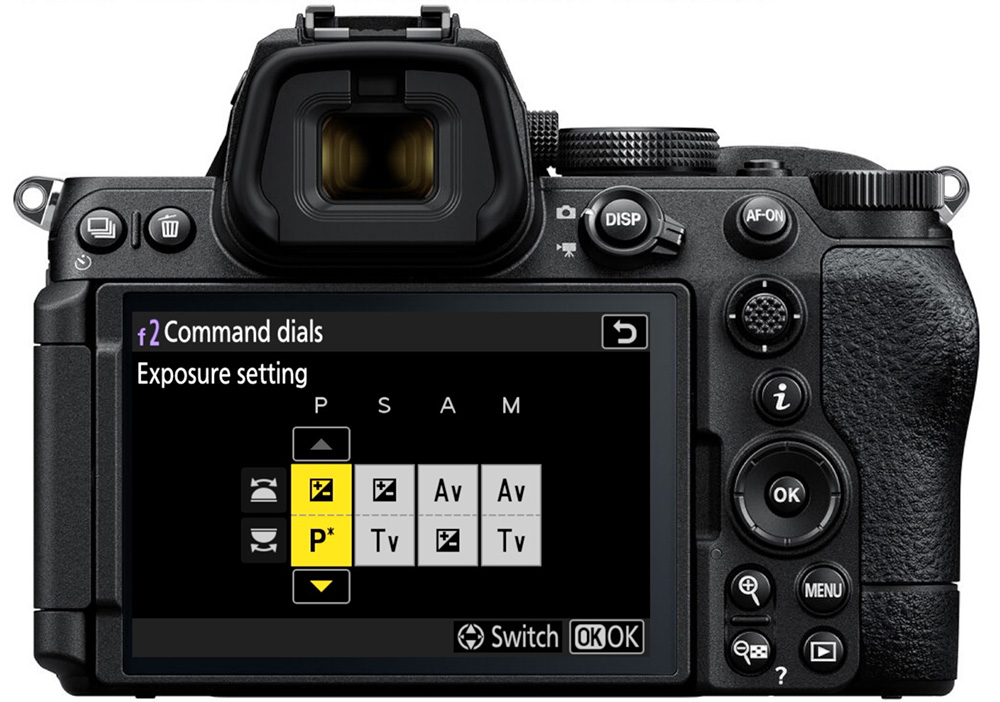
b3 Easy exposure compensation
This setting allows you to rotate the command dials to adjust exposure compensation without holding the button. This is only available in P, S, A, and AUTO exposure modes. It is not available in M.
The command dial you use will be the one not used in your current exposure mode (use the sub-command dial in P, S, and AUTO modes, and the main command dial in A mode).
- On (Auto reset): Use the command dial to change the exposure compensation; it will be reset to 0 when the camera power is cycled.
- On: Use the appropriate command dial to change exposure compensation. It will stay at the last setting when the camera power is cycled.
- Off: The Exposure Compensation button must be held while rotating the main command dial to change exposure compensation.
The Custom Settings f2 submenu will remind you which command dials are used for exposure compensation (+/-) in each exposure mode.
c1 Shutter release button AE-L
Set whether or not the exposure is locked with the shutter button (Auto Exposure Lock mentioned in the last lesson). The default value is Off, which is different from how nearly all other cameras are set up.
- On (half press): The exposure values lock when the shutter is pressed halfway.
- On (burst mode): The exposure values don’t lock when the shutter is pressed halfway; they do when pressed all the way when capturing a burst of photos.
- Off: The shutter button does not lock the exposure. You’ll need to use another button to lock the exposure.
My preference is On (half press) so my exposure doesn’t change as I recompose my photo, but you may not have this need. You always have the back AF-ON button to lock the exposure calculation.
d7 Extended shutter speeds
You’ll want to enable this to select slower exposure times in Manual exposure mode, between 30 seconds and 15 minutes. There’s no reason to not enable this (turn it on). You’re limited to 30-second exposures otherwise.
d17 Virtual horizon type
Like Grid type, choose the type of Virtual horizon if enabled for your displays. Type A will show the “levels” in the center of the screen while Type B moves them off to the side and bottom.
Type A (left) and Type B (right):
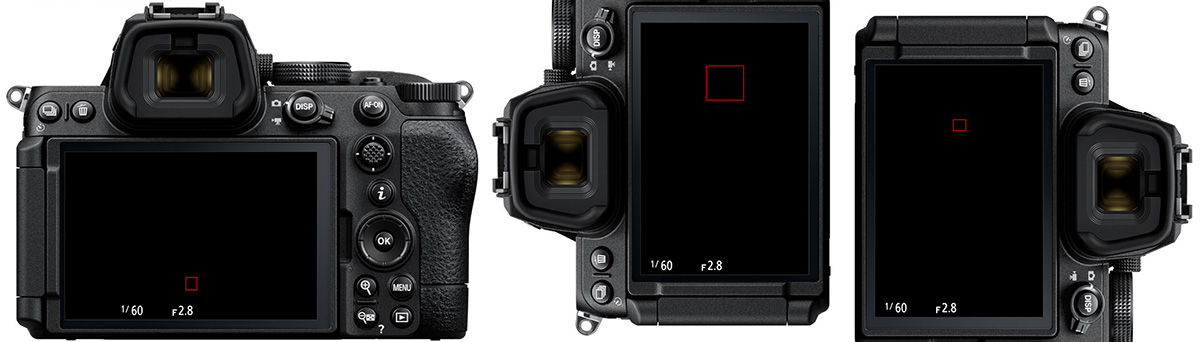
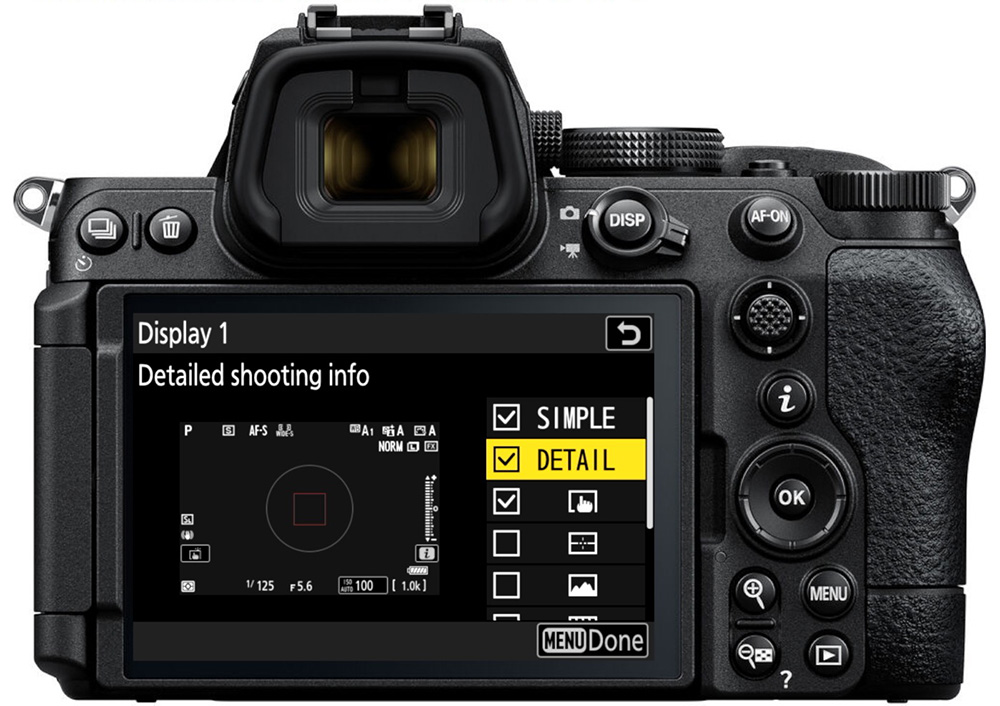
d19/d20 Custom shooting display
You can press the DISP button when either looking at the Monitor or through the Viewfinder to cycle through different overlays in your Z5II. Here you can choose how many overlay options you want, and what those overlays show. You can have up to 5 different overlays for the Monitor and 4 for the Viewfinder.
Disable display options you don’t want by highlighting them and pressing OK. Customize the displays you do want by highlighting them and pressing the multi selector right. You’ll see a preview of what that display will look like as you check/uncheck options.
- Simple shows your shooting mode, exposure information, battery, and shots remaining.
- Detail shows additional information like focus, shooting, and image settings.
- Touch controls displays the touchscreen options available to you while shooting.
- Virtual horizon will display the virtual horizon type selected in d16.
- Histogram shows a small histogram in the lower-right. This is called Brightness information in the Video custom settings.
- Framing grid enables the grid overlay set in d15.
- Center indicator displays crosshairs in the center of the screen.
- Center-weighted area shows the size of the center-weighted metering area set in b4. This isn’t available for video.
f1 Customize i Menu
I’d really recommend customizing your i Menu so that you can more quickly change your important settings. You can read how to do that in this article.
f2 Custom controls (shooting)
You can also customize your Z5II controls, changing what the buttons and dials do. Spend some time with your Z5II to figure out how you want to customize this. You can also come in here to see how your Z5II controls are configured.
f4 Touch Fn
This allows you to use the Monitor touchscreen as an additional control when looking through the Viewfinder. Turn it On here if you wish to use it and set what it does.
- Assign touch Fn: Choose what the touchscreen will do when looking through the Viewfinder. I like to set it to Move focus point but there are several options here.
- Touch Fn area sets where the Monitor is active for touch in both horizontal and vertical orientations. If you accidentally hit certain spots you can disable them.
f7 Release button to use dial
As you’ll see in the Z5II tutorial course, some of the custom controls require you to hold them down while rotating a command dial to adjust that setting. If you find this a difficult maneuver to pull off, you can set On here so that you don’t need to hold that button down while making the adjustment. You will release that button, use the command dial, and then push the button again to leave the adjustment. You can also press the shutter halfway to leave it.
Z5II Setup Menu
Format
You’ll need to format your memory card before first use with a camera and periodically after that.
This is where you do that. Select the card you want to format, highlight “Yes”, and press OK – after you have backed up all images on that card, if any.
Save user settings
You can set up your own custom camera settings for different scenarios. Read about customizing Nikon User Settings here.
Time zone and date
Set your time zone, date & time, and date format.
- Daylight savings time: Do this first. Set “ON” if you’re currently observing Daylight savings time (summer in the U.S.).
- Time zone: Set your home time zone with the up/down pad. Note that the UTC number won’t match if you’re currently in Daylight savings time.
- Date and time: Set the current date and time. Hours are in the 24-hour format.
- Date format: Choose the format you’d like the Year/Month/Day displayed.
Note that all of this can be synced automatically from the SnapBridge app, if you’re using it.
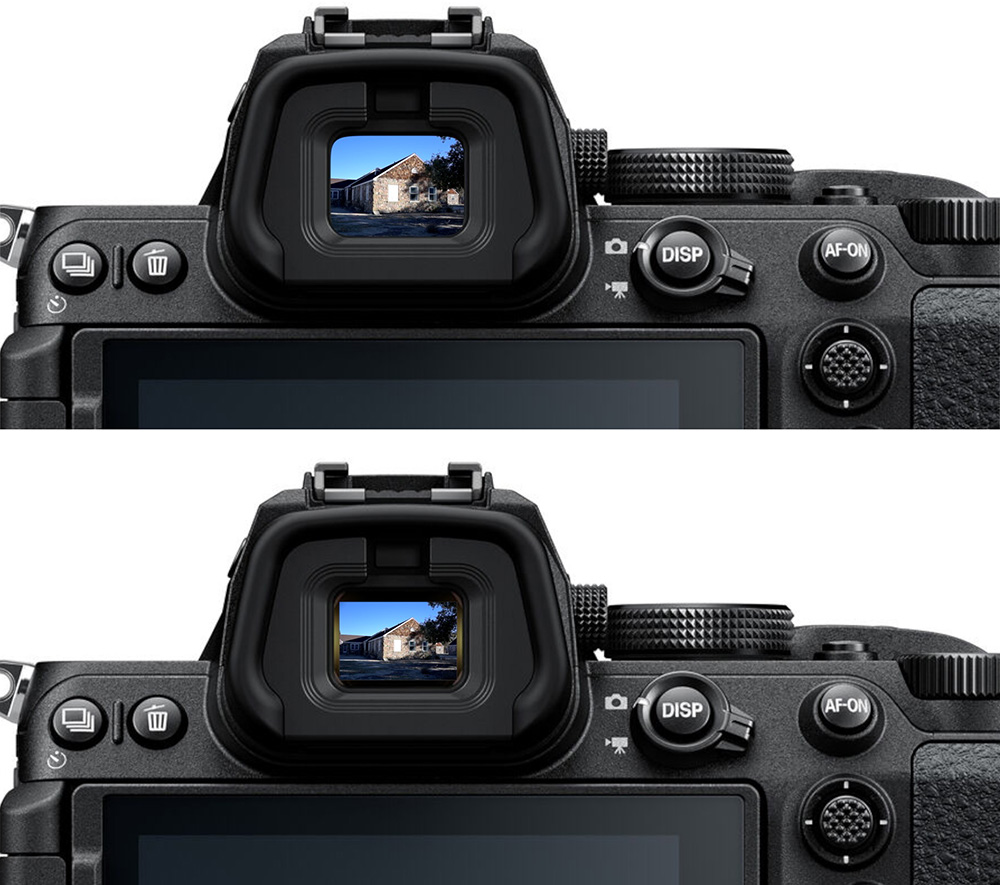
Finder display size
If you find it difficult to view your entire composition at once in the Viewfinder (Standard), you can set this to Small to shrink the Viewfinder image. Below you’ll see a simulation of Standard on the top and Small on the bottom:
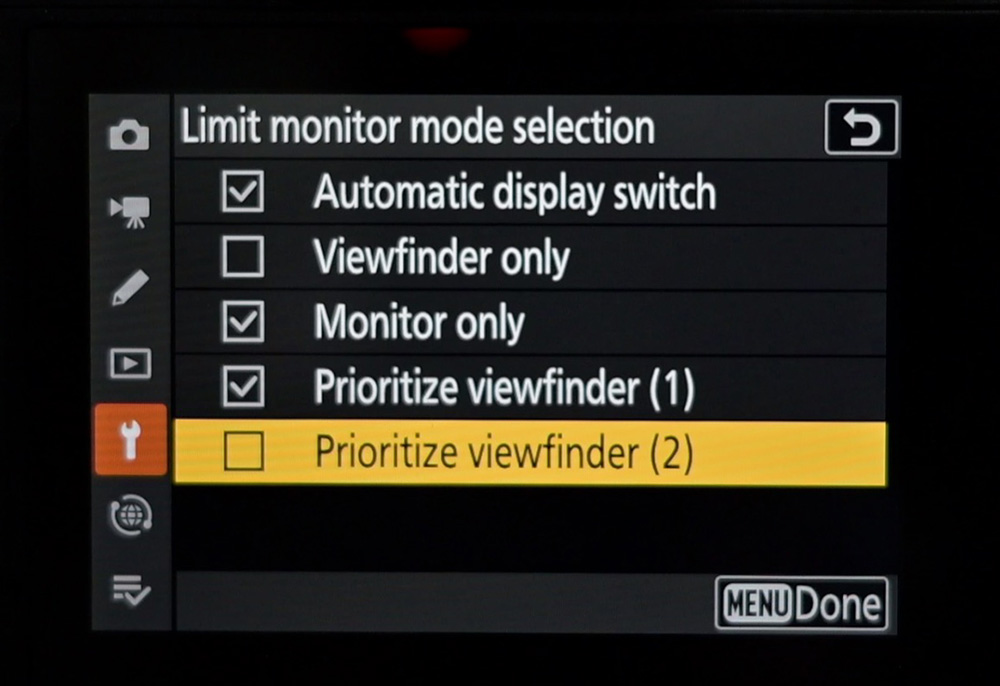
Limit monitor mode selection
Set which choices you want available when you press the monitor mode button. These are the different modes available:
- Automatic display switch: Shooting, playback, and menus are in the Viewfinder when the eye sensor detects an object, otherwise those are all on the Monitor.
- Viewfinder only: The Monitor will never come on. You will use the Viewfinder for shooting, playback, and menus. The Viewfinder will only come on when activated by the eye sensor.
- Monitor only: The Viewfinder will never come on. Shooting, playback, and menus will all be on the Monitor, which will always be on when the camera is on.
- Prioritize viewfinder (1): In Shooting mode, the Monitor will remain off and the Viewfinder will come on when activated by the eye sensor. Playback, Menus, and Video modes will either be in the Monitor or the Viewfinder, depending on the state of the eye sensor. This is my favorite.
- Prioritize viewfinder (2): In Shooting mode, the Monitor will remain off and the Viewfinder will come on when activated by the eye sensor. It will also come on for a few seconds when the camera is turned on, or when the shutter button is pressed halfway. Playback, Menus, and Video modes will either be in the Monitor or the Viewfinder, depending on the state of the eye sensor.
For example, I like using the Viewfinder for photography but prefer the Monitor for playback and going through the menus. This means I would never use Viewfinder only, and I don’t care for Prioritize viewfinder (2). I have those de-selected as options when toggling monitor modes.
Save focus position
When this is set to On – and you’re using a compatible Nikon Z lens – your focus distance will be saved when you cycle camera power.
I recommend keeping this On so it’s not reset to infinity every time you cycle power.
Copyright info
It’s always a good idea to attach your name as the creator of the photos.
- Highlight “Attach copyright information” and press the right selector to check the box.
- Artist: Enter your name on the keypad.
- Copyright: Enter your name or how you wish the copyright to appear.
With “Attach…” checked off, whatever is in the Artist and Copyright fields will be attached to metadata in all future photos.
Camera sounds
Set the artificial sounds your camera makes, useful for feedback.
There are a few options for Beep on/off:
- On turns on the beeps for touch controls, autofocus lock, self-timers, and interval modes.
- Off (touch controls only) will keep the beeps on for everything except touch controls.
- Off turns off all beep sounds.
If set to anything but Off, you’ll also want to set
- Volume: Set a volume for the sounds from 1 to 3.
- Pitch: Set if you want a high-pitched or low-pitched beep.
I like to be a little more discreet so I just keep everything off.
Self-portrait mode
When the Monitor is flipped into the “Self Portrait” position, this mode will activate the Monitor no matter which view mode you’re in. It will also disable all buttons except the shutter button so you don’t accidentally hit something while holding the camera in an awkward self-portrait manner.
There’s no harm in keeping this Enabled, even if you don’t do self-portraits.
Z5II Network Menu
Connect to smart device
This is where you can connect to and set the options for smartphone and tablet connections.
Follow the on-screen instructions for pairing your camera to your smartphone’s SnapBridge app. Other settings you’ll see:
- Wi-Fi connection (AP mode) is used to start a Wi-Fi network that you can connect other devices to with the provided SSID and Password. You can change those in Wi-Fi connection settings. Close the connection when not in use.
- Wi-Fi connection (STA mode) is what you’ll use to connect the camera to an existing Wi-Fi network. You can create various profiles for different locations.
- Upload while off, when turned On, will continue the image transfer when the camera is turned off until all images in the queue have been transferred, then the camera will turn off.
- Location data (smart device) shows you the location, altitude, and time data transferred from a connected tablet or smartphone.
Getting started with your Z5II
I hope this setup guide will get you started with your Nikon Z5II!
There’s so much more to learn about using this camera.
I’d encourage you to check out the Free Previews for the Nikon Z5II Tutorial course, and if you’d like to continue in the full course, get 20% off with the coupon “blog20”. It’s more than just a collection of videos – there’s comprehensive text & figures, downloadable PDFs, and a comprehension quiz, all to help your understanding!
Questions or comments? Please let me know!
Santiago Rasse
Thursday 12th of March 2026
Good morning, Sir. What is the value for Nikon Z5II's tutorial?
What's 'Blog20' coupon? How may I get it?
Thanks a lot. Have a nice day.
John Peltier
Thursday 12th of March 2026
It depends on your local currency. You can follow this link, click on "Enroll Now", and you should see the discounted price on the screen.