Disclosure: This post may contain affiliate links. I earn a small commission of product sales to keep this website going.
The Right Way to Not Photograph Meteor Showers
My first attempt at photographing objects in the night sky was in 1997, when I photographed Comet Hale-Bopp from my driveway. I was using an old Pentax 35mm film camera and had no idea what I was doing with exposure settings, so I just clicked away and ended up with a few keepers. Even a blind squirrel sometimes finds a nut!
Almost 20 years went by before I made another serious attempt at it – other than maybe photographing the moon as part of a landscape, but that doesn’t count. Technology had come a long way in those years! I had never tried photographing meteor showers before.
I have now, as of this writing, switched to Sony mirrorless cameras due to their capabilities compared to my old Canon DSLR. I was very happy with the images I made during the daytime, and was very interested to see how it’d perform at night. The Perseid meteor shower of August 11-14, 2015 seemed like a prime opportunity.

Just a weird picture. Pointing straight up to avoid light pollution left me with a smaller piece of the sky and some distracting foreground elements. 28mm, ISO 1600, f/2.8, 15 seconds.
Taking Pictures of Meteor Showers and the Night Sky
“Preflight” Your Camera
You’ll want to do a few things before it gets dark. Other than making sure the batteries are charged and the memory card is in, you’ll need to focus your lens.
Focusing at night can be a royal pain. It’s almost impossible unless you have a bright man-made point of light on the horizon.
Install the lens you’ll be using and set the fastest aperture on the lens (smallest f-number) – this is generally the aperture you want to use when photographing the night sky. Point the camera at an object out in infinity and focus on that (still in the daytime). Then get a piece of tape, like gaffer’s tape or medical tape, and tape across the focus ring and the lens barrel to hold the focus ring in place.
Clean the lens real good with something like Zeiss Lens Wipes, put the cap on, and wait for nightfall!
Avoiding Star Trails and the 500 Rule
You know star trails – very long exposures of the night sky show the path of the stars traced through the frame. It’s more pronounced towards the horizon and less towards the north star.
Star trails have their time and place, and they can work during meteor showers, but I was more interested in showing what the sky looks like to the eye, in a moment of time.
After some searching the internet (believe everything you read on the internet!) I learned about the “500 Rule”. This is a general rule to use to avoid star trails. The rule states:
Divide 500 by your lens focal length in millimeters to get your exposure time
So, for example, if you’re using a 20mm lens, your maximum exposure time would be 25 seconds. 500/20 = 25. Anything longer than this and you’ll notice the stars appear to be “oblong”.
Caveats to this. The literal rule only applies to full-frame cameras. If you’re using an APS-C or “crop sensor”, you’ll need to use your equivalent focal length because these sensors appear to magnify the scene. Nikon & Sony have a 1.5x factor and Canon has a 1.6x factor. You’re generally safe using a 1.5x factor for the 500 Rule.
APS-C Example: Using a 20mm lens yields a 30mm equivalent focal length. 500/30 = 16.6 seconds, round down to 15 seconds.
This is why full-frame cameras are preferred. You get a wider view of the sky for a given lens and can have a longer exposure time.
You’ll still see small “trails” when you zoom in on your image, but unless you’re going to be making billboard-sized prints, these won’t be noticeable to the viewer.
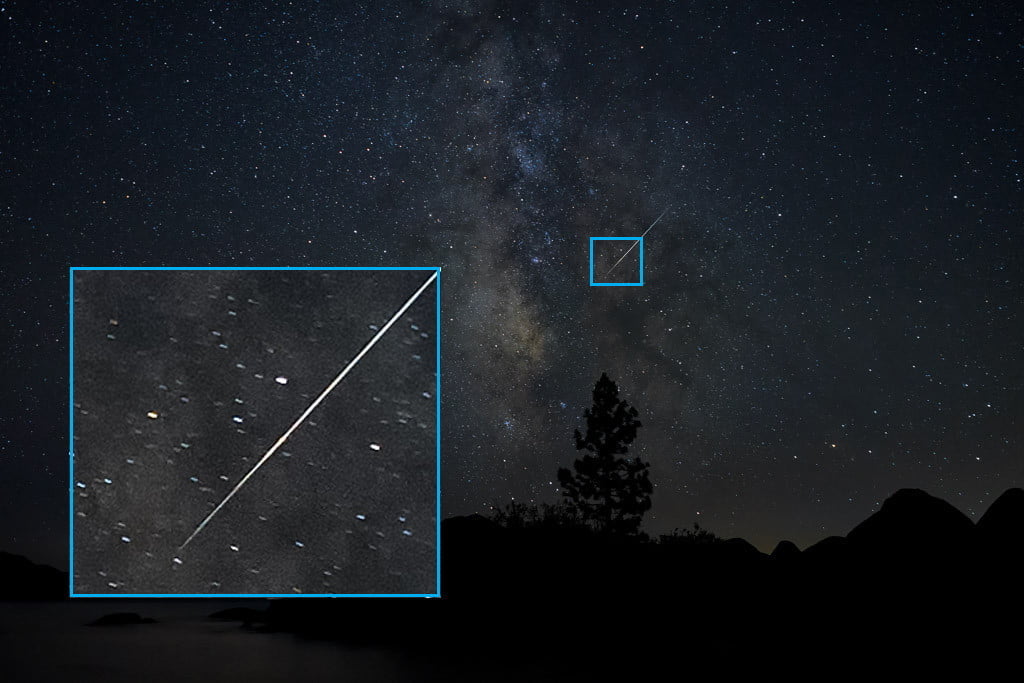
15-second exposure at 28mm. Stars are slightly oblong when zoomed in at 100%, but appear sharp at a normal screen resolution.
Wider Lenses or Faster Lenses?
Lenses are always a compromise. It all depends on what is available for your camera and the quality of the lens.
Very wide lenses, like 15-20mm, are great for photographing the night sky because it conveys the sense of awe and grandeur one usually gets when looking up at the heavens. A narrower lens, like 50mm, will only capture a relatively small area of the night sky.
And for photographing meteors that can show up anywhere, you want to capture as much sky as possible.
But a wide lens won’t necessarily be faster. That is to say, the biggest aperture available may not let in enough light.
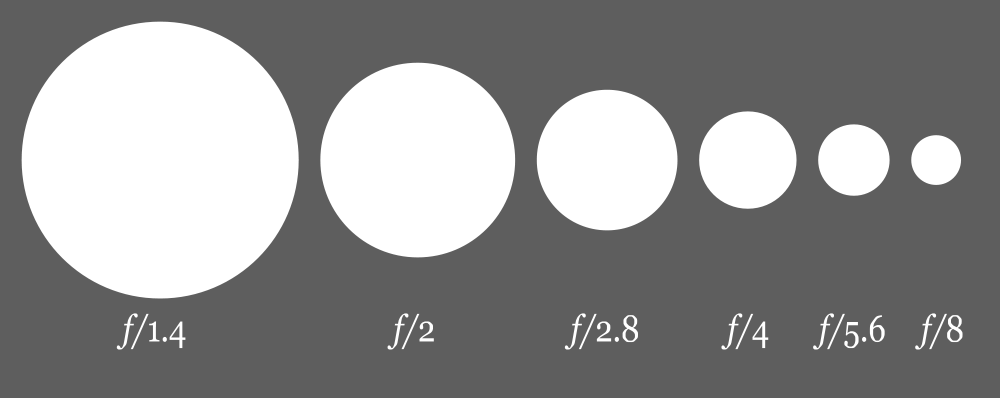
Aperture diagram showing how much light will be let in for a given f-number. Photo from Cbuckley at the English language Wikipedia.
A lens with an f-number of 1.4 is ideal; 2.8 will do. A lens with a maximum aperture of f/1.4 will let in eight times more light than a typical f/5.6 camera lens! And you can stop this down to f/2 for slightly better sharpness without sacrificing much in the way of light sensitivity. The smaller the f-number, the more meteors you’ll capture – even the faint ones.
If the only wide lens you can find has a maximum aperture of f/4, you’ll need to bump up the ISO to somewhere around 6400-8000 and this will introduce a lot of noise and make your image grainy – you don’t want this.
My compromise for speed and field of view for my Sony a7 was their new 28mm f/2. Wide enough to capture a decent portion of the sky and fast enough to use a lower ISO for a sharper image.
And don’t forget, if your camera has a crop sensor, you’ll need to take in to account the equivalent focal length as described in the previous section – so way wider is way better in that situation.
Be Patient
 You don’t know where they’ll fall or when. Get a blanket, a chair, some hot chocolate, and make yourself comfortable.
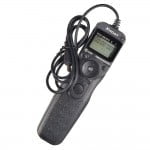
Your camera needs to be on a sturdy tripod and you’ll want to invest in an intervalometer.
Intervalometers are like fancy camera cable releases. You can set them to expose a picture for a set amount of time, set the interval between shots, set multiple shots, and so on.
If you’re taking 15-second exposures and your camera needs 17 seconds to process the image before taking the next shot, you can set all of this on the intervalometer for hands-free recording all night.
The Landscape To Your Advantage (and Disadvantage)
You’ll first need to go where it’s dark to capture as much natural light from the sky as possible. Get away from cities and don’t point the camera towards cities. Light from large cities can glow in the distance for hundreds of miles.
Light from the sun can also linger in the atmosphere for a couple hours after sunset, so it’s best to go out at least 2-3 hours after sunset.
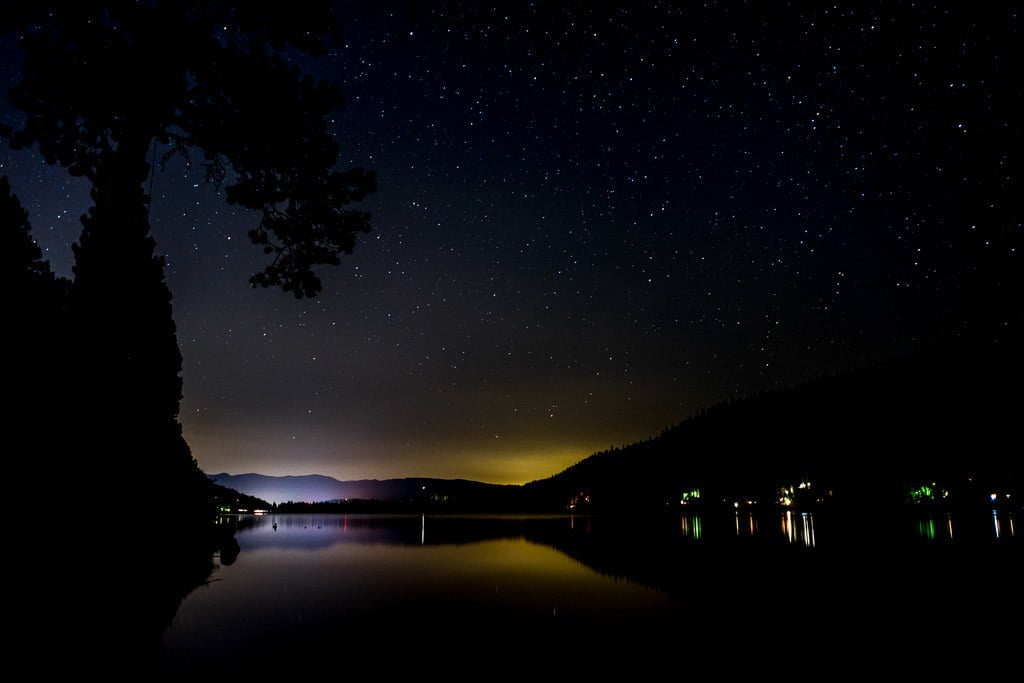
Lakes and silhouettes usually make great foreground subjects, if it weren’t for the light pollution from Truckee and Reno in this scene.
Because of my poor planning the first night, I almost had to point the camera straight up. How much of the sky do you see when you look straight up versus looking at the horizon? You only see a small piece of the sky when you’re looking perpendicular to the Earth’s surface. You see a lot more of it when looking towards the horizon – more real estate for meteors to fly through.
I was left with distracting half-silhouettes of distorted trees and a smaller piece of the sky to catch meteors.

Pointing the camera straight up to avoid light pollution doesn’t work too well. 28mm, ISO 1600, f/2, 15 seconds.
For my second night out photographing the Perseid meteor shower, I went to a secluded beach on an uninhabited portion of Lake Tahoe. I pointed the camera to the southwest, getting the Milky Way in the frame, the water, silhouettes of trees and rocks, and avoided most light from South Lake Tahoe. Because I was looking at the horizon, I could catch more sky for meteors to fall through. Even though the meteors radiate from the northeast, they streak across all of the sky.

The Milky Way and Perseid meteor shower from Hidden Beach, Nevada. 28mm, ISO 2000, f/2.2, 15 seconds.
I’ll definitely have to go camping out at some remote lake for next year’s shower and be a little more prepared.
Questions, comments, suggestions? Please leave a comment below!
[/et_pb_text]
[/et_pb_column]
[/et_pb_row]
[/et_pb_section]
Max Karren, Back o' Beyond
Monday 28th of August 2017
Great read! I didn't know about the "500 Rule." I'm definitely going to implement that. What wide-angle lenses do you recommend for a Sony A7?
John Peltier
Tuesday 29th of August 2017
The 500 Rule has come in very handy for me! I thought I had to drop a lot of money on a really fast wide angle lens. But you know what? For the Perseids this year I used the Sony E 10-18mm f/4 and actually liked that better than the 28mm f/2. I'll be updating this post soon. Thanks!